sewing

Kitty Cave

Another post that’s been sitting in the drafts folder, this time due to the SD card reader slot on my laptop being an arse. However, after much fiddling, I was able to get the photos off it and now we’re in business!

Luke and I are currently fostering three 17 week old kittens and their mother, and they are quite shy, having been born in the wild. They are getting more used to us with time, but they still like to spend time in “safe” spots, and I had this idea that a cat cave would be a perfect idea. Somewhere cosy and enclosed, but where they can still see us and we can see them.

Originally, I was just planning on starting with a circle or oval shape and sewing darts into it to make it curve up, more like a basket shape. But then one night when I couldn’t sleep, I had this idea to do something more geometric. Why? I have no idea. But that’s what I decided to do. With Luke’s help (in the absence of a protractor or a set square or other helpful tools) I drew a pentagon with 5 centimetre sides on some card and then cut out 11 of them and taped them together into a prototype model cave, just to see if it would work.

It did! Excuse my cracked window sills, our house is ancient. Next, I tried a 10 centimetre pentagon, but it still seemed a wee bit too small, so I settled on 12 centimetres (it scales up quite quickly). I found thick felt (3mm) in Eurokangas, my local fabric chain store, for €8,95 a metre. I bought a whole metre, which was way too much but I wanted to have more in case of mistakes. I decided to hand sew the pentagons together, because I wanted them to sit nicely together and I thought a whip stitch would accomplish that. It took three nights of TV watching to sew them all together.

Tada! I’m really happy with how it turned out. It’s sturdy and cute, and pretty much exactly how I imagined it would be. But I know what you’re thinking – did the kittens use it? I had my doubts, because cats are well-known for ignoring anything purchased or made for them in favour of, say, boxes. Please note, the photos below were taken after a few days of use, because the kittens primarily come out at night time and the lighting is awful then. But then we had a sunny day and the warmth lured them out into the open!

But it quickly became apparent that the kitties hadn’t been taught to share…

The cave is now a battleground most nights, with one kitty triumphantly claiming it before the others descend and try to assert their dominance. The cave is very lightweight, so it’s amusing to watch them roll it around the room as they play, and often by the end of it, it’s squashed flat! It’s very easy to pop it open again though and so far, it’s retaining its shape fairly well. Sometimes in the morning we find a kitten sleeping on the squashed cave, so it doubles as a bed too I guess!

I think this is one of my most satisfying makes this year, and certainly the most used. I was planning on making more, but this little family will be moving on from us in November so I think they can just share this one until then.

Standard
sewing, Uncategorized

Woodland Chic Hide Away

Moi, kaikille (Hi, everyone). It’s been a while, hey? Sometimes life gets in the way. Earlier this year, my mum passed away suddenly back home in Australia and we spent a stressful, heartbreaking three weeks there dealing with the aftermath of that. I miss her every day, and some days are easier to deal with than others.

I’ve actually had this post sitting in my drafts for a little while, waiting on photos. When Luke took the photos, I was feeling good – I felt like I looked good, it was the first time it had been cold enough to wear this dress and I was comfy and cosy. I wore it on a trip to Pori and Rauma with my dad and his wife on their recent visit to Turku, and Dad complimented it. I wore it to work after they left, and one of my friends asked where I bought it, and said it looked like something you could buy in a shop. I know some people think that’s not the greatest compliment, but I like it as it means it doesn’t look “home-made”. So, I was feeling pretty good about this make. That was, until I sat down to look at the photos. Instead of looking cute and stylish, I just look chubby. I’ve put on some weight this past year due to a medication and not being as careful with my diet, and it’s bothering me. But let’s step away from the pity party and talk about the details, because photos aside, I love this dress!

This was my first time sewing with an Ottobre pattern, and I was inspired by Katharina’s version. She was kind enough to buy me my own copy of the Ottobre issue (2/2017) containing the pattern, and mail it to me in Finland! Aren’t sewing friends lovely? ❤ For those that aren’t familiar, Ottobre is a Finnish pattern magazine released four times a year, usually two kids and two women (however they recently did a family version with some men’s patterns!) It’s the usual European deal – horrendous tracing and adding seam allowances, but the patterns are quite cool in my opinion and worth the effort. I already knew what fabric I would use – I’d been hoarding this sweatshirt knit from Spotlight in my stash for a couple of years, waiting for the perfect pattern, and this was it. I decided to add contrast red rib knit hem and cuffs, and line the hood in a red jersey, both bought locally from Kangaskapina.

I made size 44, with a small 4 cm full bicep adjustment using my preferred method that I always use now from Professor Pincushion.. I can see here that I should have done a swayback adjustment, though (and pressed the bottom hem better, eep). I left the length as it was – I think it’s supposed to be a tunic, but I’m just wearing it with tights in these photos. I plan to wear it with fleece leggings as the weather gets colder.

I had a little bit of trouble with the construction of the pockets – my version of the pattern was in German, and although I speak a little German and Google Translate generally does an okay job of German to English, I couldn’t get my head around how they went together. I emailed Katharina in the end, and she explained it to me beautifully and I was able to get them right first try. The pattern doesn’t have the hood lined, but I just used the same pattern piece as the lining and added extra seam allowance to allow for sewing them outer and the lining together. I sewed the whole thing on my overlocker, except the pockets as I thought that would be courting disaster.

I’ve worn it about five times in the last two weeks, and it’s so comfortable. The pockets are big enough for my wallet and phone, and the hood is nice and roomy. The fabric feels like nice quality – it’s quite thick and is soft and fluffy on the wrong side. However, I noticed it’s pilling a little on one hip from when I wore my leather satchel with it, so that’s a bummer.

Here’s my dad and I outside one of the colourful old wooden buildings of Rauma. I’ve already bought more fabric to make two more of these dresses, as I think they’re going to be an autumn/early winter staple for me!

Standard
knitting, sewing, yarn

Cosy Feet (the less exciting sequel to Happy Feet)

Before Christmas, I stumbled across Tilly & The Buttons’ free snuggly slipper boots pattern, and thought they would make a great Christmas present for Luke. He’d been wanting slippers for some time, but a) he’s quite picky about what he wants in a slipper and b) he has large feet, so he had’t had much luck finding any. So while he was at work, I scurried off to the library and printed the pattern out, then went to Eurokangas and rummaged in their remnants bins for the right fabric. I bought some soft fleece, and then I found some leather with a thick fleece lining that I thought would be perfect for the soles. And then, I pondered how exactly to make them. Tilly’s pattern has a lining, but I dismissed that straight away because I figured it would come out every time you took your foot out of the slipper, and who wants that? I wanted to find a way to have them still look nice when cuffed, and be sturdy enough to hold their shape, AND have the fleece of the leather against the foot. I thought about interfacing the fleece, but decided on just doing a double layer of it, and basting them together to use as one piece. I cut separate pieces for the cuff, so the seams would be encased inside and not on display when cuffed, but then I didn’t use them at all because the boots were tall enough without the cuff (and I knew Luke would never bother cuffing them anyway, honestly).

I had to enlarge the pattern first – as I said, Luke has big feet and he wears a size 45 or 46 in European shoe sizing. So I got his gumboots and traced around those, and then enlarged the length of the sole piece by 4 cm (and then all the corresponding pieces that join to the sole!)

For the sole, I just cut one piece of the leather/fur fabric, and then I “shaved” the seam allowances to make it easier to sew. There was fur everywhere! It looked like I’d murdered a teddy bear. I assembled the boot as per Tilly’s instructions, minus the lining. I was worried my machine wouldn’t like sewing the leather/fur, but actually it went quite smoothly. Then I just folded the fabric twice on the top of the boot and topstitched it down. Bam, done!

In continuing the theme of keeping Luke’s feet warm, I decided to knit him a pair of socks. Handknitted woollen socks are a Big. Deal. here in Finland. Everyone has them, knitted for them by mothers, grandmothers, friends (or themselves) and they swear by them in winter to keep their feet warm inside their boots. I bought a knitting magazine from Novita, one of the bigger yarn/pattern retailers here, because they had a “my first sock” section, complete with diagrams and a link to a video. I wanted to use a Finnish pattern – I don’t know why, my life would have been much easier if I’d chosen an English pattern, especially since I’d never knitted a sock before, or used DPNs. Nevertheless, I painstakingly translated the pattern as best I could, and got to work.

The yarn came from Finnish sheep – I went to a sheep event with Luke’s supervisor and bought two skeins of yarn from one of the vendors there. It’s a wool/nylon blend designed for socks. It was a little greasy and smelled strongly of sheep, so they are very rustic socks!

They are not perfect – I’m sure any knitter would notice that the toe decreases are in the wrong spot on one sock. I got confused about which needle was which somehow, I don’t really know how. I also changed colours a row late on one of them, because I wasn’t paying attention. Still, Luke likes them, and he says they’re cosy! I already had to reinforce the toes though, because Luke feels like socks aren’t on his feet properly until he’s practically jabbing his toenails out of the ends. His store-bought socks always get holes in the toes very quickly!

I made my own “sock display” things out of a spare foam exercise mat that Luke had already cut up to reinforce his backpack (hence the little bit of blue you can see poking out of one sock), because I don’t want to pay 20 euro for a pair of sock-shaped pieces of plastic.

Any tips for sock knitting? I’ve heard about so many things, like toe-up, afterthought heels, and of the course the debate over magic loop versus DPNs. I’m slowly working on a pair of Kalajoki socks for myself, but I’d love to hear your favourite patterns as I want to increase my sock stash, stat. And I’m a bit shit at using it, but I’m whimsicalkitty over on Raverly if you want to add me there 🙂


Standard
life lately, sewing

Return

Well, hello! Apparently I haven’t written a blog post since April 2017 – whaaat?! Not sure how that happened. Well, maybe I have some idea – not long after that, Luke and I packed up our lives in Auckland, New Zealand and made the move to Turku, Finland, via Australia to spend some time with loved ones. Even though this is my third overseas move, I still underestimate how long it takes to get your life back in order afterwards. I actually bought a sewing machine (secondhand) within a week of arriving in Turku, even though I’d sent my beloved Pfaff via sea mail, because I needed to do some pattern testing! But after that was done, I didn’t touch the machine for some time. We were busy doing all the official stuff one needs to do to become a proper resident of Finland, finding a place to live more permanently than the student housing sub-let we got for the summer, and exploring our new home.

We eventually found a gorgeous apartment in an old puutalo (wooden house) built in the late 1800s. I have a sewing nook on the top floor, in the same room as our bedroom. It’s less space than I had in Auckland, but I’m making it work. Besides, it’s so cute!

After three looong months, my Pfaff (and most of my fabric stash) arrived in Finland! The bad news was, one of the few plastic parts on the machine, the hand wheel, broke during transit. I tried gluing it back together (successfully!) but then discovered the plastic screw that holds the wheel in place had broken, leaving the threaded part inside the machine. In my search to find a new screw, I found a seller on eBay in Germany selling some parts in a bundle, including a new hand wheel! So I bought those, and also a new metal screw to replace the plastic one. The new wheel arrived, I went to put it on…and the belt around the wheel snapped. So. Much. Rage. So again, German eBay sellers were my friend, and I purchased a new belt. Finally, finally, I got it all put together and secured with a shiny new screw, and it works like a dream. So now I have two vintage machines, and for the first time, no modern one.

During surgery…

Good as new!

The agent who handled the rental of our apartment loves sewing too, and she has lent me an overlocker for the duration of my stay – such a lovely woman! Apparently it belongs to her daughter, who hasn’t used it in years. So I’m basically all set up now, and ready to roll. It’s not like I haven’t sewn anything in the past six months, though – I made a pair of curtains, hemmed another pair from IKEA, made a shirt for Luke and the piece de resistance – a pair of slippers for him for Christmas! I’ll do a separate blog post on those, because I’m kind of proud of them 😀 I also did a spot of embroidery, and I’ve been really digging knitting lately.

Curtains…

Shirt for Luke – Simplicity 1544 again

Slippers!

Mushroom embroidery

First knitted sock! The other is still on the needles…

I’d really like to blog more this year – I use instagram a lot (I’m kirstyteacat there if you want to follow me) but the chronology of the timelines is all kinds of fucked up nowadays, and besides, I like reading blogs, and hopefully some of you like reading mine.

I will leave you with some snapshots of my last 6 months, because I also enjoy seeing peeks of peoples’ lives outside of sewing, so maybe you will enjoy it too!

My first bike!

First Juhannus (Midsummer) bonfire

Housewarming party in our new flat, complete with pavlova!

Lots of berries!

Watching the squirrels outside my lounge room window.

SNOW!!

Someone else’s magnificent snowman.

Standard
sewing

Wanted

My other recent successful make has been the Wanted tee by French pattern designer Vanessa Pouzet. I bought a pattern from her ages ago which I’ve never used (La Petite Robe, which I now see has an English version!), but in doing so I subscribed to her mailing list and when this slipped into my inbox, I was sold, even though it’s currently only in French. I love the square neckline! I have to say I think it looks better in person than it does in these photos, though.

I made it from a deliciously soft viscose knit remnant I got from Centrepoint Fabrics. It pressed really well, which was nice when doing all those sharp corners. I was a bit terrified of making this pattern, I must admit – my French is basically restricted to greetings and terms for baked goods, due to choosing Chinese over French when I entered high school. However, Google Translate does a very good job of translating it without many mistakes, and the diagrams that come with the pattern are very clear and easy to follow. The neckline is actually very easy to sew, to my surprise. I made a practice one in a fugly knit remnant I got from an op shop, and then felt confident enough to cut into the good stuff.

I made it in a size 46, and after measuring the sleeves against the Papercut Ensis tee, decided to do a little 2cm full bicept adjustment for a wee bit more ease in the arms. This knit is nice and stretchy, so that adjustment may not have been strictly necessary as it turns out. I chose the “retro” sleeve length, as the 3/4 length sleeve was nearly full length on me! It’s more modest than I was expecting, too – I was worried there might be more cleavage than I bargained for, but it’s just right in my opinion.

I think this will be a good staple pattern for me – I already bought some charcoal grey silk/merino knit to make another more sedate version to wear tucked into my skirts and with jeans as a basic layering piece, and a black and white Breton stripe to wear underneath a black jumpsuit I bought recently.

Standard
sewing, Uncategorized

Chardon & Flamingoes

This outfit is one I whipped up in my week off work – I’m working towards something of a capsule wardrobe, which seems to be the hot thing of the minute! I really just want my wardrobe to be full of clothes I love where everything can work with everything else. I’ve owned a copy of the Deer & Doe Chardon skirt for a long time, and I finally got around to making it up. This was designed to be a wearable test version, but I actually really like it. It’s a designer cotton I got at Fabric-a-brac for a steal, and it’s a tiny plaid. I made version A of the skirt, without the belt loops.

This photo is from the previous failed photo shoot and I had to heighten the contrast but it shows off the pattern of the fabric quite well. It has a little coral/pink line running through the plaid which I quite like. It frays like a bitch though, so all the seams inside are serged, and the waist facings are turned under and handstitched into place. Instead of the recommended bias hem finish, I just turned it under twice and stitched it and it worked fine. I made a size 46, which is the largest size the pattern goes up to and the size I usually make for Deer & Doe patterns. It could stand to be a tiny bit snugger in the waist but I’m happy with it, I’d prefer this than it digging into me whenever I sit down. I used the length of the shortest size though, which is fairly standard for me.

Such an awkward photo, god. What am I even doing with that hand?! I used leftover pocketing from Luke’s jeans for the pockets. I love things with pockets.

I used a pink zip from my stash because it was the only zip that was the right length, and I liked the little peep of pink that matches the pink stripe running through the plaid. It was very easy to make this skirt, and I made it in a day. I already have fabric lined up for two more, including one that’s going to be repurposed from an old kimono! I’m excited.

The blouse is a pattern I’ve used before, from Bootstrap Patterns – I thought I had blogged about it, but apparently I only posted it to Instagram. Oops! It’s called Tunic with Long Back, and it’s become my go-to blouse pattern. Here is my previous version, in a $3 buy from Fabric-a-brac:

I wear it quite a bit with jeans, but I wanted something a bit flowy for my next one, and also without the hi-lo hem. I bought a gorgeous flamingo-print rayon voile from Hart’s Fabric earlier this year, and decided it was the perfect candidate for the next blouse. Sadly, it seems they’ve sold out – the fabric felt so soft and drapy, it’s honestly the nicest fabric I’ve ever touched! I need more rayon voile in my life. I don’t usually wear the blouse with the checked skirt as above, I have a navy blue midi skirt with pleats I bought from Uniqlo in Japan that suits it perfectly. Or, I wear it with jeans as pictured below:

I made bias binding from the same flamingo fabric to hem it, since it has quite a curve on the sides and it made it much easier to deal with. Making the binding was a bit time-consuming though as it was too floaty to put through my Clover bias binding maker and kept slipping everywhere, so I had to do it the old-fashioned way – pressing it in half and then pressing each half towards the middle. Worth it though! The blouse has facings, which tend to flip out in thi fabric, so I tacked them to the shoulder seams and catch-stitched them in a few strategic places. Any tips on how to secure them further would be great though!

Of course, I had to add one of my labels to this blouse, since I love it so much! I’ve worn it to an indie gig, to lunch with friends and out to dinner with the family – and I’ve got more planned too, in a kitty plaid and another rayon fabric I’ve had stashed!

Standard
sewing

Puttin’ a bird on it

A while back, I bought a bird-print scuba fabric from Backstreet Bargains, with the vague intention of making the Deer & Doe Arum dress. Then I didn’t touch it for ages because in my mind it was a Good Fabric and we all know what happens with Good Fabrics – they sit in the stash because we’re too afraid we might ruin them! Luckily for me, I’m moving to Finland at the end of May and thus am facing the prospect of using it or losing it, as I can’t take all my fabric with me! This has spurred me into action, and am now digging gaily through my plastic tubs and making all the things.

However, this is not the Arum dress. I was worried that the style of sleeves of the Arum wouldn’t suit the scuba fabric, so I decided to pick a different pattern. Unable to decide, I asked my sewing peeps on Instagram to help me choose between a faux two-piece dress or a more simple knit dress, both from Bootstrap Patterns. The simpler dress won out, just barely. In all honesty I preferred the two-piece dress, but as someone wisely pointed out, I would get more wear from the simpler one. I’ve used Bootstrap Patterns before, and I’m a fan of being able to put my measurements in and get a good-fitting pattern, no muss, no fuss. Except, well, that’s not quite what happened this time.

Nothing about the line drawing of this pattern or the sample photo on the model indicated that this would be a tight, short dress – but that’s what I got. I feel like these photos do not adequately convey how short this dress is. Maybe I’m becoming a prude in my old age, but I don’t want to be pulling my dress down every few minutes or worrying about whether my undies are on display. No thanks! Luke tried to insist that it wasn’t that short – until I bent down to pat the neighbour’s cat and he said “Oh…I can see a good two thirds of your knickers.” Fantastic.

Too short!! As you can see from the above photo. By the way, that’s Zambesi, the neighbour’s very vocal cat that likes to poo in my vegetable garden -_-

So unfortunately, this dress will be stuffed in the op shop bag. Not everything can be a winner. It’s a shame, because it’s cute and fun and I love the print, but I’m not sacrificing comfort and practicality. Have you made anything disappointing lately? Commiserate with me!

PS: I have some definite winners to share with you in the coming week that I’m very happy with – my sewjo is at an all time high!

Standard
sewing

And now for something a bit different

I recently took a week off work and had a gloriously productive sewing week, making a skirt, a top and a dress – none of which I can show you today, because when Luke took my blog photos, neither of us noticed the camera wasn’t on the right setting and all of them were horrendously over-exposed. And with daylight savings having ended and a deluge of rain predicted for the North Island this week, I’m not sure when I’ll be able to take them again just yet!

So instead, I’m going to show you a project my stepsister commissioned me to make last year.

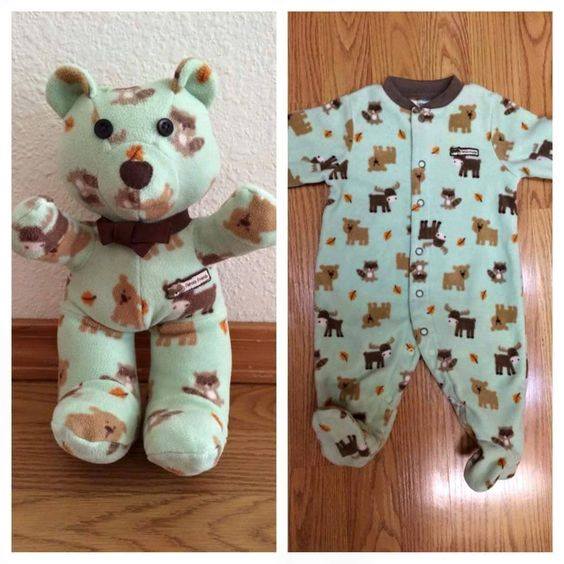
So yes, about a year ago (!) my stepsister sent me the following photo and asked if I would be able to make 4 of them, one each for her 4 children.

I hadn’t actually seen anything like this before, but after some Googling it became apparent they are called memory bears, and that they are plush bears made from the onesies your child is brought home from the hospital in/wore when they are small. I also discovered pretty quickly that these are one of those infuriating “Pinterest Projects” that are all over Pinterest, but with very little solid information on how they’re made or a pattern to use due to the rampant re-pinning of pictures from sources other than the original one.

So my stepsister provided 4 chosen onesies, and also a couple to practice with, which turned out to be invaluable. There are lots and lots of teddy bear patterns out there, but few are designed to fit onto something as small as a child’s onesie as it happens. So there was quite a bit of trial and error while I experimented with a few different patterns and shrinking/enlarging them until they fit onto my provided onesies. I’m very bad at visualising how to piece things together to make a 3D object, so a pattern was essential for me. This was my first attempt:

I use a very simple, free pattern for that one and I didn’t like the way the bear ended up looking at all. It went into the bin straight after this photo (well, after I took the stuffing back out. Waste not, want not!)

Finally, after hours down the Pinterest rabbit hole, I found a promising pattern by Kim Macfarlane at cuddlybuddly.com. I unfortunately can’t remember how much I enlarged it by now, but after a few false starts, I got it to just the right size for my onesies! Note that there are no instructions for the pattern, but it’s fairly obvious how it all fits together.

And sewn up:

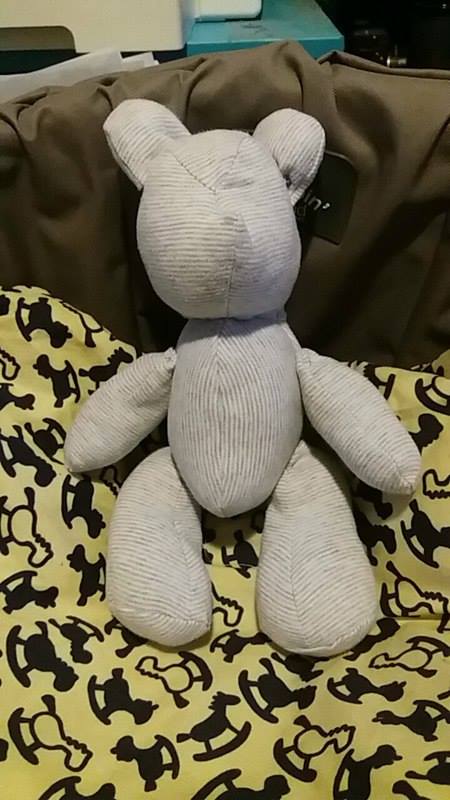
This was a rough practice one that was pinned together for this photo. I sent it to my stepsister and she was happy with it, so I started work on the final 4. It was really nerve-wracking, because I felt like there was no room for mistakes – after all, you can’t replace precious onesies your children wore! I worked slowly and carefully, first tracing onto each onesie to make sure they fit before cutting them out. Even though they were all the same size, there was some variation in how much fabric was available due to the slightly different styles. Thankfully, they all fit. Once they were all cut out, I sewed them up in batches – all the legs, then all the arms, the bodies and so on. Then I stuffed all the pieces and hand-sewed up the stuffing holes using a ladder stitch.

I had originally bought some black embroidery thread for eyes, noses etc, but I didn’t like the way it looked, so I ended up using some brightly coloured wooden buttons from my stash, a different colour for each bear. The ears weren’t stuffed, and were folded in a fortune cookie style before being stitched on with ladder stitch also.

Finally, I sewed each bear together one by one using some upholstery thread for extra durability. The legs and arms are sewed so they are movable, so the bears can be seated or standing.

This was the first one I fully completed. This onesie fabric stretched the most, so he’s a bit bigger than his counterparts. I didn’t think of it until it was too late, but interfacing thinner, stretchier onesies might help to eliminate size disparities – just a tip if anyone’s thinking of making some! I quite like that they’re all unique, though.

This was the second bear to be completed. The onesie had contrasting pink feet, which I used for the ears. I like this one the most, I think he looks slightly quizzical!

The third bear! This was a Winnie The Pooh themed onesie with a couple of appliques, which I used for the feet. The fabric was thicker and had less stretch, so this bear is smaller than the previous two. It was nice fabric to sew with though, my hand stitches just sank into it and were completely invisible!

The fourth and final bear was this one – another fuzzy onesie with colourful sheep on it. Maybe the best looking one of the lot – I was really getting into the swing of it by this stage.

So there you have it – 4 memory bears, soon to be carefully escorted to Adelaide when I visit this weekend and delivered to their excited recipient!


Standard
sewing

Indigo Gingers

One item of clothing I’ve been wanting to make myself for ages is a pair of jeans. I love pretty dresses and skirts, but a lot of the time when I’m getting dressed, it’s jeans I reach for. When I’m not in pajamas or leggings, of course. I’m in something of a comfort rut at the moment.

I bought Ginger jeans pattern from Closet Case Patterns quite some time ago. So long ago that before I got around to making them, Heather made changes to and re-released the pattern and I lost the download link I originally got and had to get her to resend it. Oops. I probably would have procrastinated for a while longer on the jeans front, but two things forced my hand:

  1. My previous pair of jeans from Jeans West wore through at the inner thighs, and
  2. We had a trip to Japan coming up in winter and I knew I would be needing jeans

After buying myself a pair of extremely cheap jeans from Target (sorry, fast fashion, I know) and discovering they had no front pockets, just the appearance of pockets, I got annoyed enough to begin.

First off, let me say, these jeans are well worn. I wore them for 3 weeks in Japan with very few washes, and have worn them quite a bit since then! I chose view B, with the high waist and skinny legs and cut out a size 14, which was pretty much bang on my measurements. The only adjustment I made off the bat was to shorten the crotch length by 1/4″, because I am short and after measuring the crotch of my terrible Target jeans, I figured that was going to be necessary. I would have done more, but Heather recommends doing 1/4″ at a time as a small adjustment can make a big difference.

Even though I hate faffing around with things like muslins and drafts, I followed Heather’s advice and baste-fitted the jeans first. Thanks to that, I discovered the waistband was gaping terribly at the back. Not a surprise, I have a sway back and this is a common problem for me in jeans/pants and skirts. I took out 1″ in four 1/4″ sections in the waistband pattern piece to make it much more curved, and then recut it. Unfortunately I did not have quite enough of my denim to cut two pieces, so I had to pinch a bit of non-stretch denim I bought for jeans for Luke for the facing.

I had to take these jeans up a huge amount. At least 14cm, and I think then I took off some more after that. However, I am absolutely stoked with the length – I think I got it spot on!

Ah, close-up crotch photos. I think my coin pocket is on the wrong side, but I never use that pocket so I’m not bothered. My fabric was a Japanese indigo stretch denim bought from Drapers Fabric in Newmarket. I also got black at the same time for a second future pair. It’s good fabric, but it does not take kindly to having stitches removed. With the Ginger jeans fly instructions, Heather has you baste the fly closed and then remove the basting at the end. You can see along the folded edge of my fly that the removal of the basting stitches has left little marks, which is unfortunate, but not as unfortunate as what happened on the back when I basted the pockets on!

Oh god, this is such a terrible photo of my backside. Anyhow, you can see near the left pocket, there is a small repair. After I basted the pockets to try and check where they should be placed, they did NOT want to be repositioned. Pulling on the stitches at all made marks on the denim, and after a few tries, one area formed a small hole, which I had to stitch up and interface on the inside to prevent further fraying. And now I can see that the stupid pockets aren’t even level with each either (either that or I have a wonky bum). Argh. The pockets were my absolute least favourite part of the whole thing. I hated basting them and trying to check how they looked by getting Luke to take photos of my bum (we have an unfortunately mirror situation in our house and none of them are useful for checking out one’s posterior), I hated removing them and trying to reposition them, and I hated how much time I spent trying to surreptitiously check out the bums of strangers on the street to see how good pocket positioning looked.

Clearly, in the end I did not nail it. I think they’re too far apart? Possibly I even got them around the wrong way, I lost track of which side was more curved and was supposed to be facing the side seams.

While we’re on the back view, I have to say that I find the yoke of the Ginger jeans very wide. It is much wider than any other pair of jeans I’ve owned, and ones I’ve observed in the wild. I notice Heather has now released a mid-rise version that has a shorter yoke, and I’m a little tempted, but also slightly put off by the fact that it’s a whole new pattern and not an add-on. I don’t really fancy sticking all those PDF pieces together again for a new pattern, so I’ll probably just fiddle with the yoke height myself and sort it out.

Another issue I had (and it doesn’t seem apparent in the photos) is that the left inner leg seam twists towards the front from the knee down. I cut all my pieces out on a single layer of fabric and was very careful with the grain, so I don’t think that’s the issue. The lovely Amanda of Bimble and Pimble also had the same twisting issue and got lots of useful comments on her post about it, and I’m thinking I might need a knock-knee adjustment. I am a bit pigeon-toed, always have been, and I never thought about how this might affect the fit of my pants! I wonder why just the one leg, though? Bodies are weird.

There are some wrinkles with these jeans, particularly behind my knees and under my butt. I know some wrinkling under the butt is normal and needed to actually sit down in close-fitting jeans, but how much wrinkle is too much?

Jean guts. I made the pocket/tummy stays from a Japanese cotton I got from Spotlight with corn on it, in the clearance rack. I’m in love with the corn fabric, and I kept it around just for this purpose. Whimsical corn ftw. I bound the waistband with my self-made bias tape that I made two years ago now. It’s the bias tape that keeps on giving, I still have loads of it left. You can see the interfacing on my back pocket repair, and if you’re wondering what that square of fabric is on the jeans button, well. Let’s just say my first attempt at putting a jean button in these jeans was less than successful. It went on crooked, and I could not get the bloody thing off, and in the process of trying to remove it, the hole for the button got so big it slipped through and I couldn’t insert another one. So I added an interface, fray-checked patch on the inside of the waistband to give it more stability, and attempted a fresh insert with a new button, and thank God it worked. Unfortunately, that corner of the waistband got stretched a little when I topstitched it, and pokes up a bit and is a bit visible under closer-fitting tops. You win some, you lose some.

All in all, I am satisfied with these jeans. I wear them a lot, and I find it easy to forget about the slightly wonky pockets and under-bum wrinkles when I’m wearing them because they’re comfy and I think they don’t look too bad. And I know what to change for next time when I make my black pair! Do you have any jeans-fitting or making tips that you’d like to share with me?

Standard
sewing

Sewing for the husband: Colette Negroni Mk II

img_6385

This is the second time I’ve made the Colette Negroni for Luke – the first being nearly 3 years ago. This time around I made the short sleeve version for summer. I didn’t change anything else except instead of using the XL length, I went with L (and in my opinion it’s still quite a long shirt, but Luke’s happy with it). Oh, and 1 pocket instead of 2. When Luke requested summer shirts, I suggested the Negroni because I think the camp collar style fits a casual summer short sleeved shirt well. He agreed, but later, after I’d cut the fabric out, said he didn’t like the large facings. Unfortunately, with everything already cut out, I couldn’t do much about it, so the facings are unchanged. But he’s right, they are huge – and I can’t really see why they need to be. I’m not sure if I’ll make it again – I could convert the facings to a button band, but why bother when I already have at least 2 other shirt patterns I could use?

img_6387

As you can see, it’s quite roomy – Luke’s lost about 10kg since I last made him a Negroni, but he insists he’s still happy with the fit of his original one, so who am I to argue?

img_6389

The fabric is this amaaaazing lightweight cotton I bought at least a year ago from Stitch 56 – my brother bought me a birthday gift from there and they sent him a discount voucher, which he promptly passed on to me and I promptly used! Stitch 56 says it’s part of the Rajasthan Express collection, Miss Maude (who lovely Wellington sewing blogger Emma reminded me sells this fabric closer to home) says Little India collection. Let’s just agree that it’s hand block printed in India and we’ll call it good. It’s made by Merchant & Mills, and it is the best. It’s so light and breezy, it’s absolutely perfect for a summer shirt. It was great to work with – pressed beautifully, and sewed up like a dream (once I stopped fighting with my shitty modern sewing machine and employed my vintage Pfaff, anyway). Stitch 56 have increased their shipping prices to NZ substantially since I bought this fabric, so I’ll definitely be checking out Miss Maude for some more instead! I didn’t have quite enough for the stupidly huge facings, so I supplemented it with some Japanese cotton lawn from Spotlight in a dark blue that was *almost* the same weight – I used this for the inner yoke as well as the bottom 3/4 of the facings (but not the top, because I didn’t want it to be visible).

img_6390

We found the perfect buttons in Spotlight – my beloved Masco Wools where I used to buy all my buttons at amazing prices disappeared when they decided to renovate the Britomart shopping centre 😦

img_6401

Last year I bought some personalised labels from the Dutch Label Shop with my Christmas money, and they were waiting for me when I got back from Japan. I love them! If you’re wondering why “yes mice” – well…short story, it’s something Luke and I say to each other when one of us comes up with a particularly excellent suggestion. E.g.

Me: Shall we get some cheesecake for dessert tonight?

Luke: Oh, yes mice!

Longer story – this came about because when I visited the UK in 2004, I bought a small Bagpuss plush toy that, when you pressed his stomach, said, “Oh yes mice, I love you all!” I was not familiar with Bagpuss, but I was taken in by his scruffy charm and his odd catchphrase, so he came home with me. After Luke and I had been dating for a while, he too got introduced to Bagpuss, and was equally delighted by him. Bagpuss lives in my Dad’s shed with a lot of my belongings now (such is the nomadic postdoc life), but he’s with us in spirit 🙂

Standard