Uncategorized

French Blueberries

When I first saw Deer&Doe‘s gorgeous patterns, I swooned. I loved all of them! And I’ll admit, I even thought about ordering the patterns in French, I was that impatient to get my hands on them. Except, well, I never learned French in school, and I was a little hesitant to leave the fate of my future beautiful dress in the hands of Google Translate. So I patiently waited until they were translated to English, and then pounced. I was restrained, though – I bought just one to start, the Robe Bleuet – which Google tells me means Blueberry dress, which I felt was rather fitting.

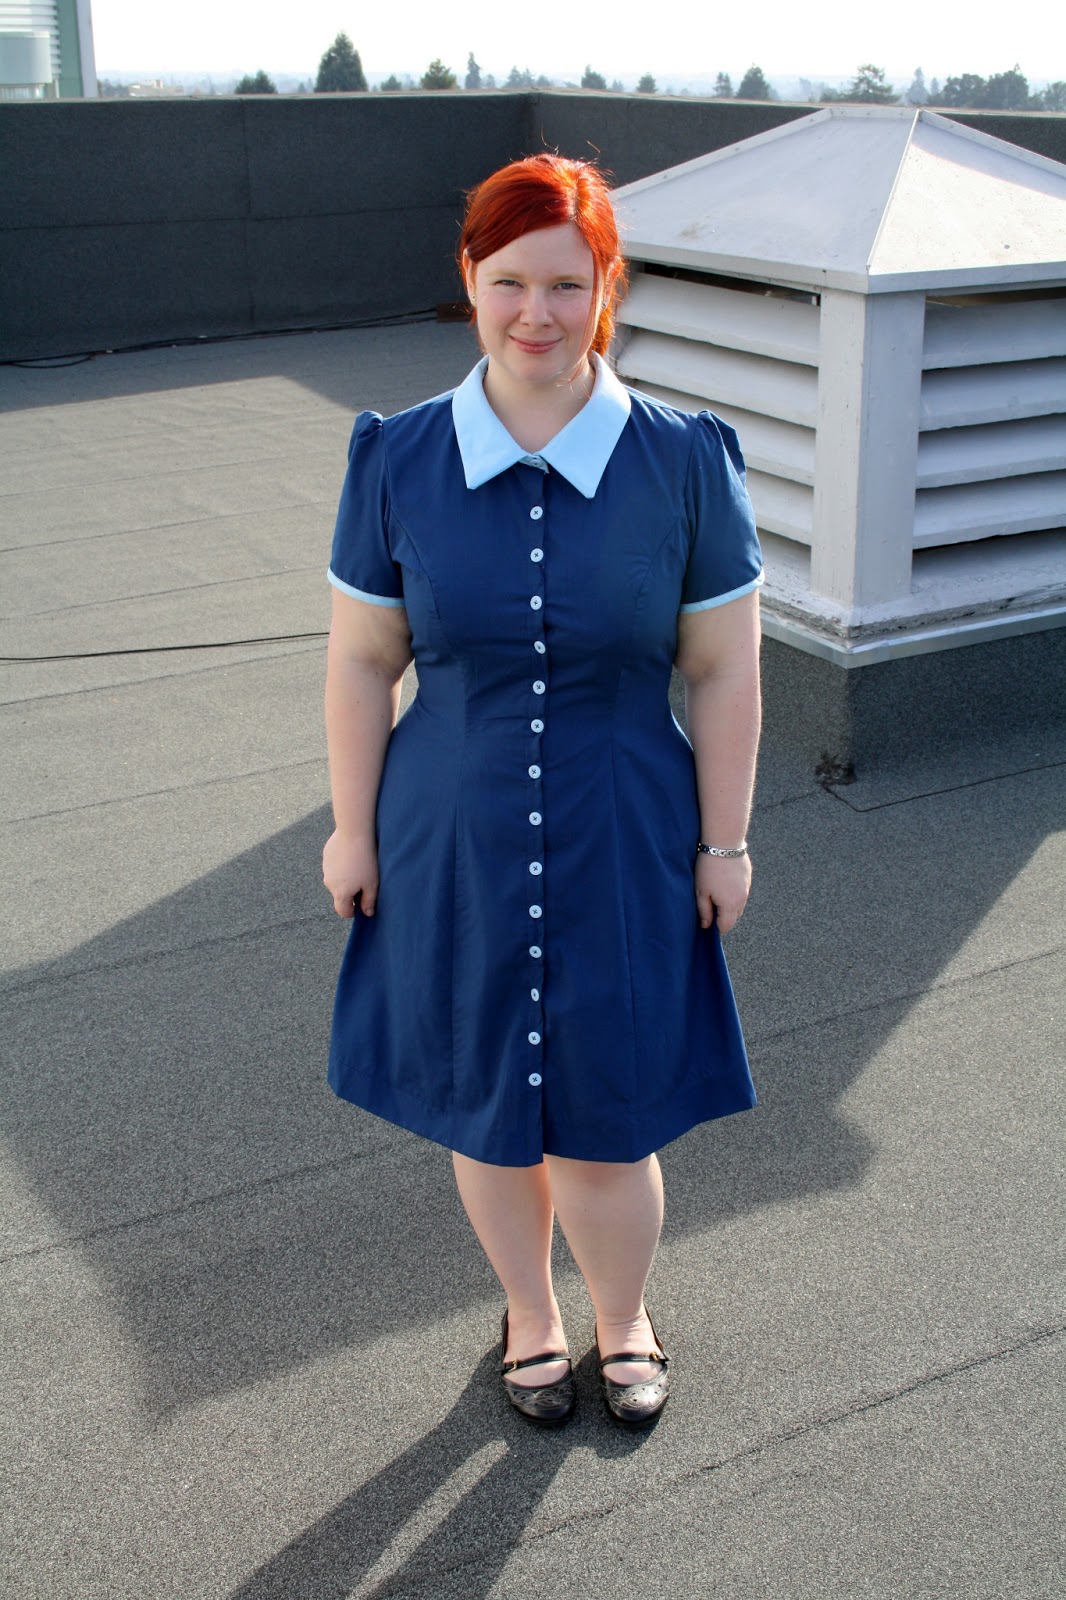
This dress. Oh my. I love it, but I’m not going to sugar-coat it – this was not an easy pattern to work with. A good chunk of this was my fault – I may have overestimated my sewing abilities a tad. The dress pattern is marked as advanced, and I feel now that is an adequate assessment of the difficulty. This dress marked my first collar, and my first real set of buttonholes. Yikes.

The pattern booklet is very sparse on pictures, so if you have trouble visualising how things go together, like me, it certainly presents a challenge. I ended up having to scour the internet for a collar tutorial I could understand, but I got there in the end. I also sewed the princess seams together the wrong way (how embarrassing) because I had a brain fart and suddenly became unable to match curves. I don’t even know.
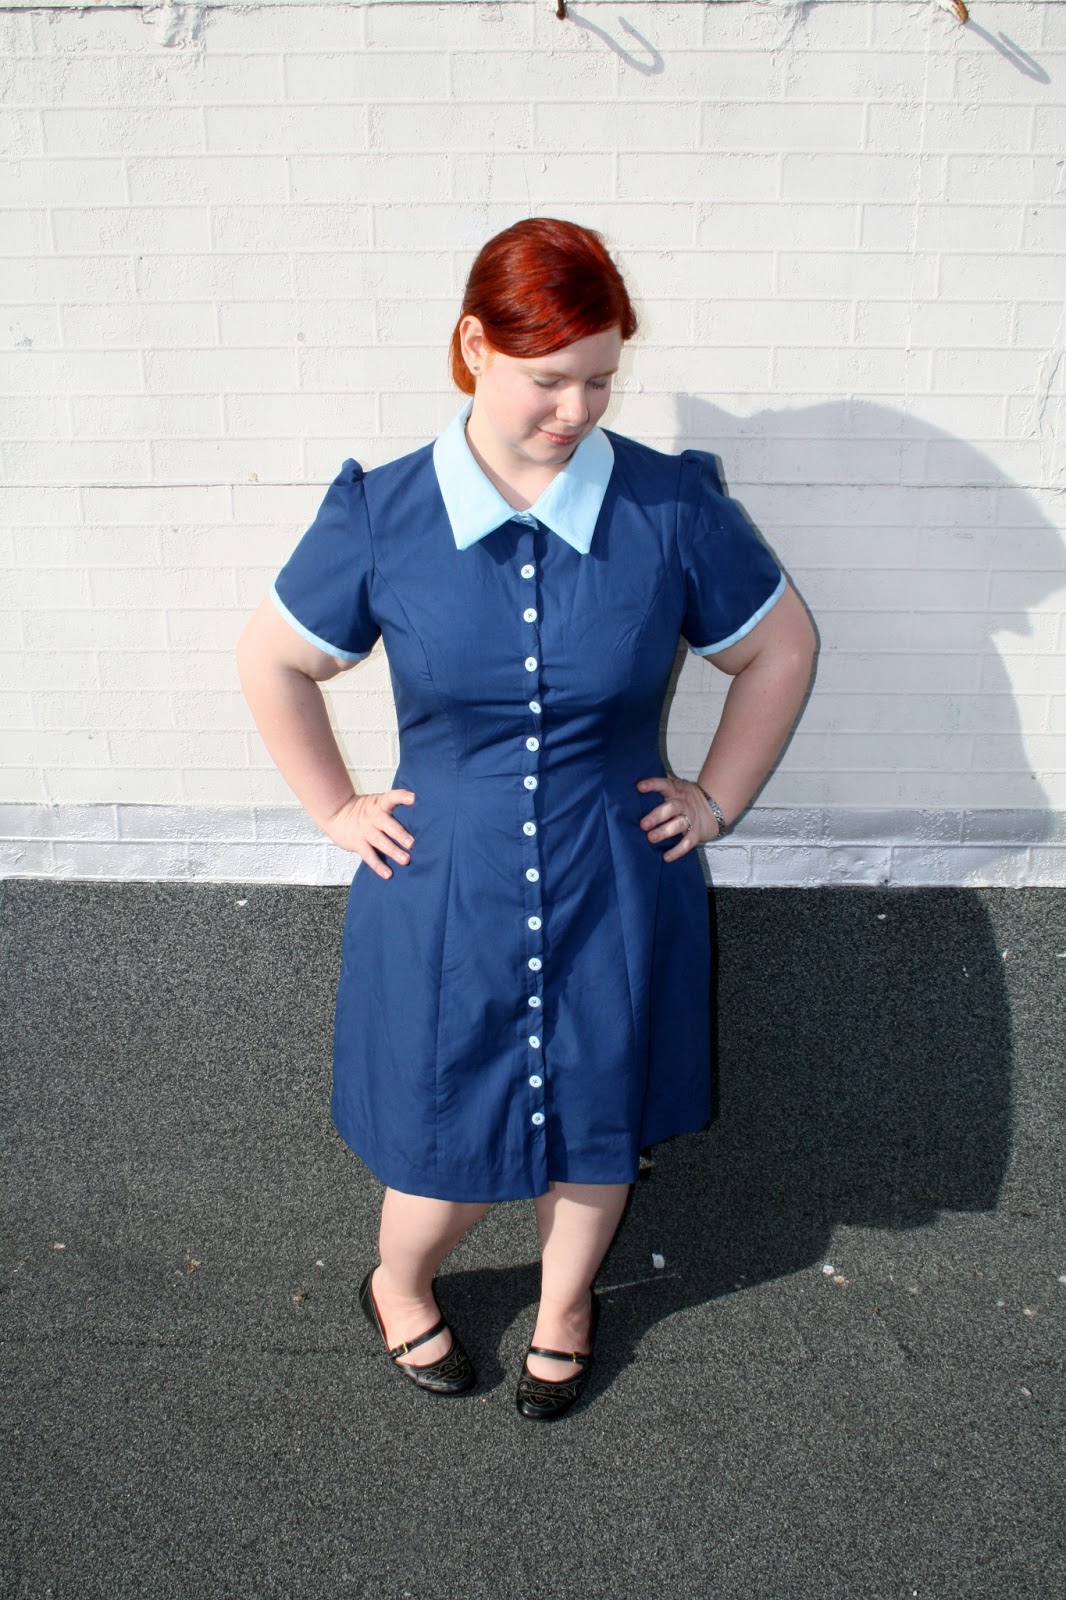
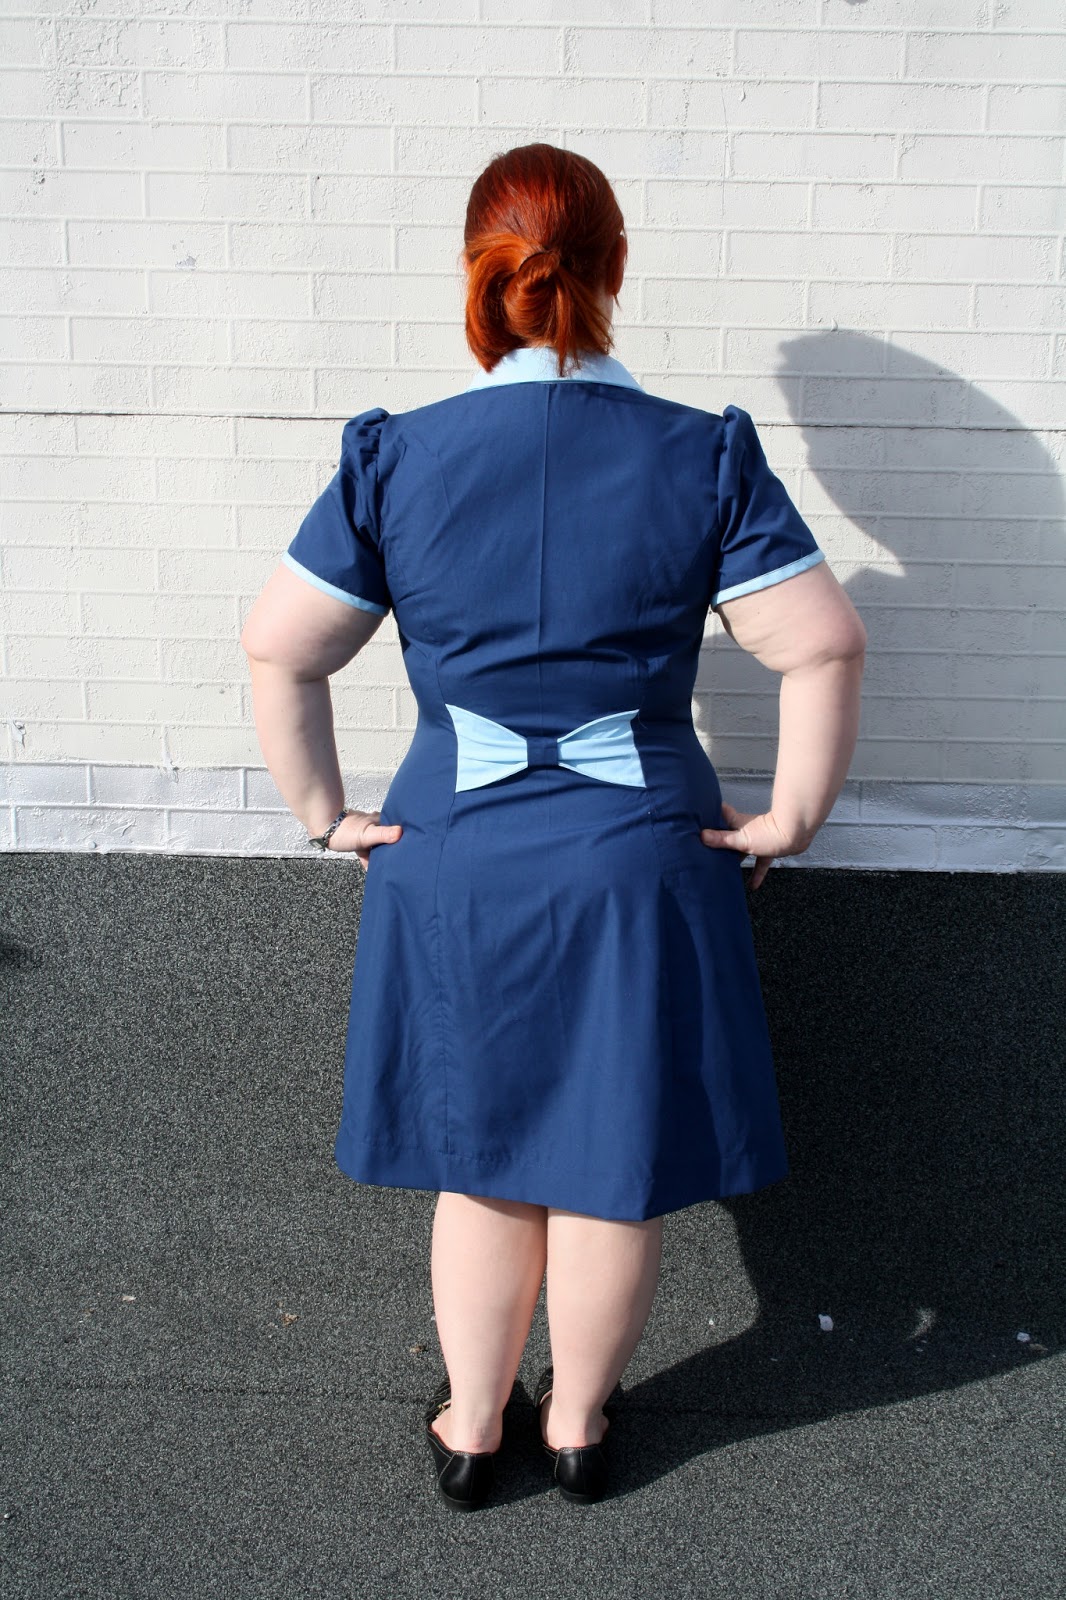
 I promise, the bow isn’t crooked! I just don’t know how to pose for photos. And although the dress looks a bit snug here, I’m actually super duper pleased with the fit. I made the largest size, and I’m glad I did. I didn’t make any changes at all to the way it fits – no adding or subtracting length or width anywhere. So lucky, that never happens! 
I did make some changes, however. You may notice that my sleeves aren’t gathered at the cuff, and that my cuff isn’t as wide as it should be. This is because I was blessed *cough* with bountifully plump upper arms, and the original cuff would have squeezed my arms like poorly made sausages. Ugh. Unfortunately, I didn’t have any more of my sheet left to cut new, larger cuffs, so I resorted to double-fold wide bias tape which I managed to find in a similar colour. I like the way they turned out – it might be the first sleeved dress I own that doesn’t pinch my bingo wings!
I added an extra button to the base of the collar – maybe it was my newbish collar-making skills, but I didn’t like the way it sat without it, it looked all wonky and flappy. I also think, next time (for there will be a next time), I will add less interfacing to the collar, as I felt it was a bit stiff with interfacing on every piece. 
Now, confession time: This dress actually has a serious flaw. Several of them, in fact. You know how I said it was my first attempt at doing multiple buttonholes? Yeah, that didn’t turn out so well for me. I managed to rip not 1, not 2, but 3 of the damn things by the time I was through. I was horrified. I didn’t know whether to cry or scream. Instead I did neither, took a deep breath, set my sewing machine to a dense zig zag, and sewed over the rips. To my surprise, it’s virtually unnoticeable in photos, and even in person you really have to be looking for it to see the mending. But I know it’s there, and it’s the one thing that saddens me about this otherwise amazing dress.
Pattern: Robe Bleuet
Fabric: Navy cotton broadcloth, bought from Discount Fabrics, and an old blue bedsheet from Goodwill.
Notions: 15 pale blue chalk buttons from Etsy, lightweight fusible interfacing.
Cost: All up, probably $50. The exchange rate between the Euro and USD isn’t great, and accounted for over half the cost, with shipping. Fabric was around $16 all up.
And the most important, pressing question – would I make it again?
HELLS. YEAH. 

Standard
Uncategorized

New Beginnings

One of my New Year’s resolutions was to start a sewing blog. I may be almost two months too late, but here I am nonetheless. It’s not my first foray into the world of blogging – I’ve had a Livejournal for the past 13 years (yes, people still use Livejournal), and I used to have a crocheting/other crafts blog too, until I took it down out of embarrassment. I know everyone has to start somewhere, but I don’t need the evidence of my frankly crappy beginnings out there for all to see 😛

I’ve been sewing for three or so years now. I started off by borrowing my MIL’s sewing machine and making what were quite possibly the worst Christmas presents for my family (kudos to them for gracefully accepting them). After that, I bought my own cheap machine and my first Big 4 sewing pattern, and promptly made a skirt that was at least two sizes too small. That was the day I discovered that clothing sizes count for nothing in the sewing world, and measurements are where it’s at.

A string of ever-so-slightly-less-terrible garments, an international move, a new sewing machine and a growing fabric and pattern stash later, here I am. I was hesitant to make this blog, because there are so many amazingly talented seamstresses out there, showing off their incredible creations and being all witty and charming, that I felt like there was no space for me. But, there’s no harm in trying. And though he tries, my husband can only hear me talk about princess seams and darts and collars so much before he starts to look for an escape. I want to share my sewing successes (and my failures, because we all need a good laugh) with like-minded people.

So, here I am. Cheers!

PS: I’m terribly sorry for the craptastic webpage experiencing I’m giving you at the moment. I’m new to Blogger, and if I waited until it was perfect, I’d never get around to posting anything. It will get better, I promise!

Standard
change, goodbye for now

A change is as good as a holiday…

Those of you who still read this blog (am I deluding myself in thinking that anyone does?) would have noticed the distinct lack of updates these days. I’m really sorry about that. It’s not that I haven’t thought about updating it – I have. And it’s not that I haven’t produced any new crafted items to show off – I have. The main problem is, and I’ll be honest here, is that I don’t really like this blog any more. It started as a purely crochet blog, but as I’ve moved onto other crafts (still crocheting, mind you) it’s started to be a bit all-over-the-place, and I don’t like that. It’s not just that, though. I need a change. A change of name (I already have a new one in mind, but it’s a secret for now), a change of domain, maybe even a change of blogging platform. And definitely a change of banner. It’s something I’ve been thinking about for a while, but ultimately I’ve decided to wait until I get to the USA to implement my changes. I want to put a lot of time and effort into my new blog, and that’s something I wouldn’t be able to do now.

I want to learn some web design skills, so I’m not at the mercy of a blogging theme I don’t understand and can’t change, and I also want to improve my photography skills. What’s the point of making pretty things and taking bad photographs of them?

So please, watch this space: Once I get to the USA and get settled, I’ll redirect this blog to my brand-spanking new one! Until then, keep calm and craft on.

PS: For anyone who is concerned, I will be moving my patterns to my new blog and they will still be available there, just in a better, easier-to-find format.

Standard
crochet, sewing, wip

Current Projects

What I’m currently working on:

  • Midsummer Night’s Shawl, in Jaggerspun Zephyr Wool/Silk blend, Admiral colour. Coming along nicely, but slowly.
  • Waikiki Scarf, in Debbie Stoller Stitch Nation Bamboo Ewe, Mermaid colour. Not too sure about this one, though, it might get frogged in the near future.

What I’m hoping to start on soon:

  • Jeans-to-skirt refashion. They’re black jeans, and I’m thinking tulle, velvet and lace ruffles, somehow.
  • Men’s shirt-to-fitted women’s shirt refashion. Picked up a great blue and black checked shirt at Goodwill for $6.50!
  • Shirred dress-to-shirred waist skirt refashion. Bought a dress in Japan, but it’s a bit tent-like. It will look much better as a skirt!
  • American McGee Alice cosplay! Very excited about this, was hoping to start cutting dress pattern pieces today, but stupid me bought the wrong size, so it will have to wait for a little bit.
  • Portal Companion Cube crochet for my brother’s birthday. Just need the yarn.
  • Luke’s super secret birthday present! Need materials.

I have all the time in the world at the moment to work on these, but sadly, not the cash. You know you’re poor when you can’t even make your own clothes, haha!

Standard
fabric, lucky lantern, sewing

Lucky Lantern

I almost can’t believe it, but I won a competition! A competition run by an Australian fabric store, no less!

Although Facebook ads creep me out a lot, I still click on some of them, when they’re relevant to my interests. That’s how I found Lucky Lantern. I had a browse through their fabrics, and noticed they were doing a giveaway, if you filled out a survey. So I did, and promptly forgot about it – until the lovely Michelle contacted me and said I’d won! I got to pick out 4 different fabrics for her to send me, and I had no trouble doing that, there are so many gorgeous prints! They just arrived in the mail the other day, and I got half a metre of each fabric. I can’t wait to start crafting with them, I already have my eye on the Mini Tote pattern over at Shiny Happy World!

Standard
accessories, crochet, Hats and other stuff

I’m back, bitches!

For a short while, anyway. Japan was absolutely amazing, I loved every minute of it and can’t wait to go there again some day. And yes, I did buy a little bit of craft stuff…but I was a good girl, so I didn’t buy too much. To be honest, I had a little bit of trouble finding these magical craft stores of many levels everyone talks about online…the only native Japanese speaker I know isn’t really into crafting, so she couldn’t help much, and it’s so hard to find stuff on the internet, because, well, it’s all in Japanese 😛 But I did find a Yuzawaya, which is a chain craft store, and I got some *very* pretty fabric, and a needle-felting kit to make kitty cell phone straps. I was also kind of limited by luggage space and budgetary concerns, but not to worry – not getting much this time gives me a reason to return (like I needed another reason!)

I’ve been easing myself back into crafting – it took a little while to get back into the swing of things, but I’m not working now until we go to the USA, so I have plenty of time on my hands! I chose a small crochet project that I knew I could finish, and that I would use, to start me off – I chose one I’d been eyeing off for a while on Ravelry, the Divine Hat. I did the body in Sean Sheep Rockbank, a wool/soy mix, in hibiscus colour. It’s a self-striping yarn, very cheap (it comes from Big W!), and I liked working with it. Others have complained that it’s splitty and the dye rubs off on your hands, but I didn’t experience either of these. I did the band in a random purple yarn I bought off Ebay – supposedly it’s hand-dyed and spun, but it came from China, so who knows! All I know is that it was cheap, it’s a beautiful purple colour, and feels really good to work with. The end result? A hat that looks cute on me, and hardly took any time to finish. Yay!

Standard
sewing, Tips and Tricks, tutorial, Tutorials

Jean Hemming Tutorial!

Now that I’ve taken up and hemmed at least 4 pairs of jeans, I feel confident enough to post a tutorial to help other people out with it! It’s really easy once you know what you’re doing, and there’s no way you’ll pay anyone to do it for you again! You will need the following items:

  • Jeans, trousers, or whatever else you want to take up/hem
  • Scissors
  • Thread
  • A measuring tape
  • Hemming tape (optional)
  • Pins
  • A sewing machine (or needle if you prefer to hand sew
  • An iron

So! Without further ado, let’s get on with the tutorial.

First of all, grab your jeans, and put them on. I highly, highly recommend washing them first, to see how much they shrink. Once you’ve put them on, you’ll need to fold up the hem and pin it so your jeans are at your desired length. It’s really helpful to get someone to do this for you – I use my husband. Standing on a chair is good, too, so they can have better access to the bottom of your jeans. It’s also a good idea to wear the shoes you’ll probably wear most with your jeans. I’m not wearing any shoes here because I’m lazy 😛

Now, take off your jeans, and measure the length of the upturned hem. Mine was 7.5 inches. Yes, I’m very short. Now, I like to leave 1.5 inches for making the new hem of the jeans, so I would cut 5.5 inches off the bottom of the jeans. You can have a smaller or larger hem, it’s up to you, just remember to allow that extra fabric to make your hem when you cut your jeans. I usually mark my cutting line in tailor’s chalk, because I’m terrible at cutting in a straight line.

Now, cut your jeans! Remember the old saying, measure twice, cut once. Trust me on this. You really want to make sure you’re only cutting off what you measured, or else you’re going to have very cold ankles!

Now, fold up the new bottom of your jeans about an inch, and press. If you choose to use hemming tape, this will make the process slightly easier. Make sure it’s even all the way around. Then, fold up another inch and press again. At this point, I like to try the jeans on again just to triple check they’re the right length. If you press the hem enough, you should be able to try them on without it falling down.

Now, take to the sewing machine! I use thread to match the jeans, but if you’re certain of your ability to sew in a straight line, you could use contrasting thread for a different look. Sew at the top of the hem, not the bottom, to make it neater and more secure. Sew all the way around, backstitching at the start and finish.

Voila! You should now have a pair of nicely-hemmed, perfect length jeans! I hope this tutorial was easy enough to understand, and that some of you found it useful 🙂


Standard
Sunday Spotlight

Sunday Spotlight

This is my second-to-last Sunday Spotlight before my husband I travel to Japan! Yes, we’re still going. Since most of my internet browsing this week has been concentrated on keeping an eye on things in Japan, I haven’t been looking at crafty things as much as usual. Still, a few little things have caught my eye, so I’ll share them with you now 🙂


These cute little Totoros are made out of socks! Genius! If I had spare socks, I would totally be making these right now.

Genuine Mudpie is a blogger I follow, and I love her tiny crocheted creations! Her latest brainchild is crocheted tater tots, and they’re super cute! The pattern is free, so go and make yourselves an army of them, you know you want to!

Standard
Sunday Spotlight

Sunday Spotlight

First of all,  I want to express my sadness and horror at what has happened in Japan over the last 48 hours. My thoughts are with everyone affected by the earthquake and subsequent tsunami, and I hope everyone is as safe as they can be. I donated some money through the Red Cross and encourage anyone who has a bit of spare money to do the same.

Now, onto the inspiration crafts/tutorials I’ve seen this week!

How adorable is this little fox ring for sale on Etsy? Definitely on my to-buy list.

I absolutely love this plush baby sloth, made out of an old towel, of all things! He even has velcro on his hands so he can hang from things…genius!

Finally, a shirring tutorial that came in very handy for me this week, when I made my very first item of clothing – a dress! But more on that later…


Standard
Sunday Spotlight

Sunday Spotlight

I know, I know, I’ve slacked off a bit with the Sunday Spotlight. Shameful, I know. Maybe I’m just not cut out for regular posting. Still, I’ll perservere – I do want this blog to be a success, and I do want to share with you all the wonderful crafts I come across every week!

Will you just look at this adorable Ganesh plushie, made by SpookyPooky on Craftser?! How adorable is he? It’s not the first time I’ve admired some of Pooky’s work – check out more of her amazing creations here.

I came across this brilliant little deal from Sock Dreams the other day – bundles of odd socks you can buy for crafting purposes! Sock Dreams do amazing socks, and I bet you’d be able to make some pretty cool things from their odd and deformed socks. I want to buy a bundle so badly, but I don’t know if I’ll have the time to use them before I leave for the USA 😦

So sorry there are only two links today, I’ve been a bit busy this week and haven’t had as much time to browse crafty things only as I usually do. I’m currently in the middle of a mad crafting session for my Alice in Craftsterland swap partner on Craftster – trying my hand at a new craft, among other things – so fingers crossed I finish in time! I hope you all had a good and productive week 🙂

Standard