
Please note: I have just switched my blog over from Blogger to WordPress, so if things look a little clunky, bear with me while I sort out all the teething problems!
As predicted, not long after I made Luke his Negroni, the weather got warmer and he started getting excited for the shorts I promised him. I initially bought something labelled as cotton drill from Trademe to make them with, but when it turned up and I prewashed it, it wasn’t suitable. It wrinkled hopelessly in the wash, and even a hot, steamy iron couldn’t get the deeper ones out. On top of that, one side of it was slightly brushed, and picked up any small piece of lint or cat hair lying about. Not practical. After a bit of a rummage in the stash, I found what I think is a cotton/linen blend that Luke approved of, and I got to work.
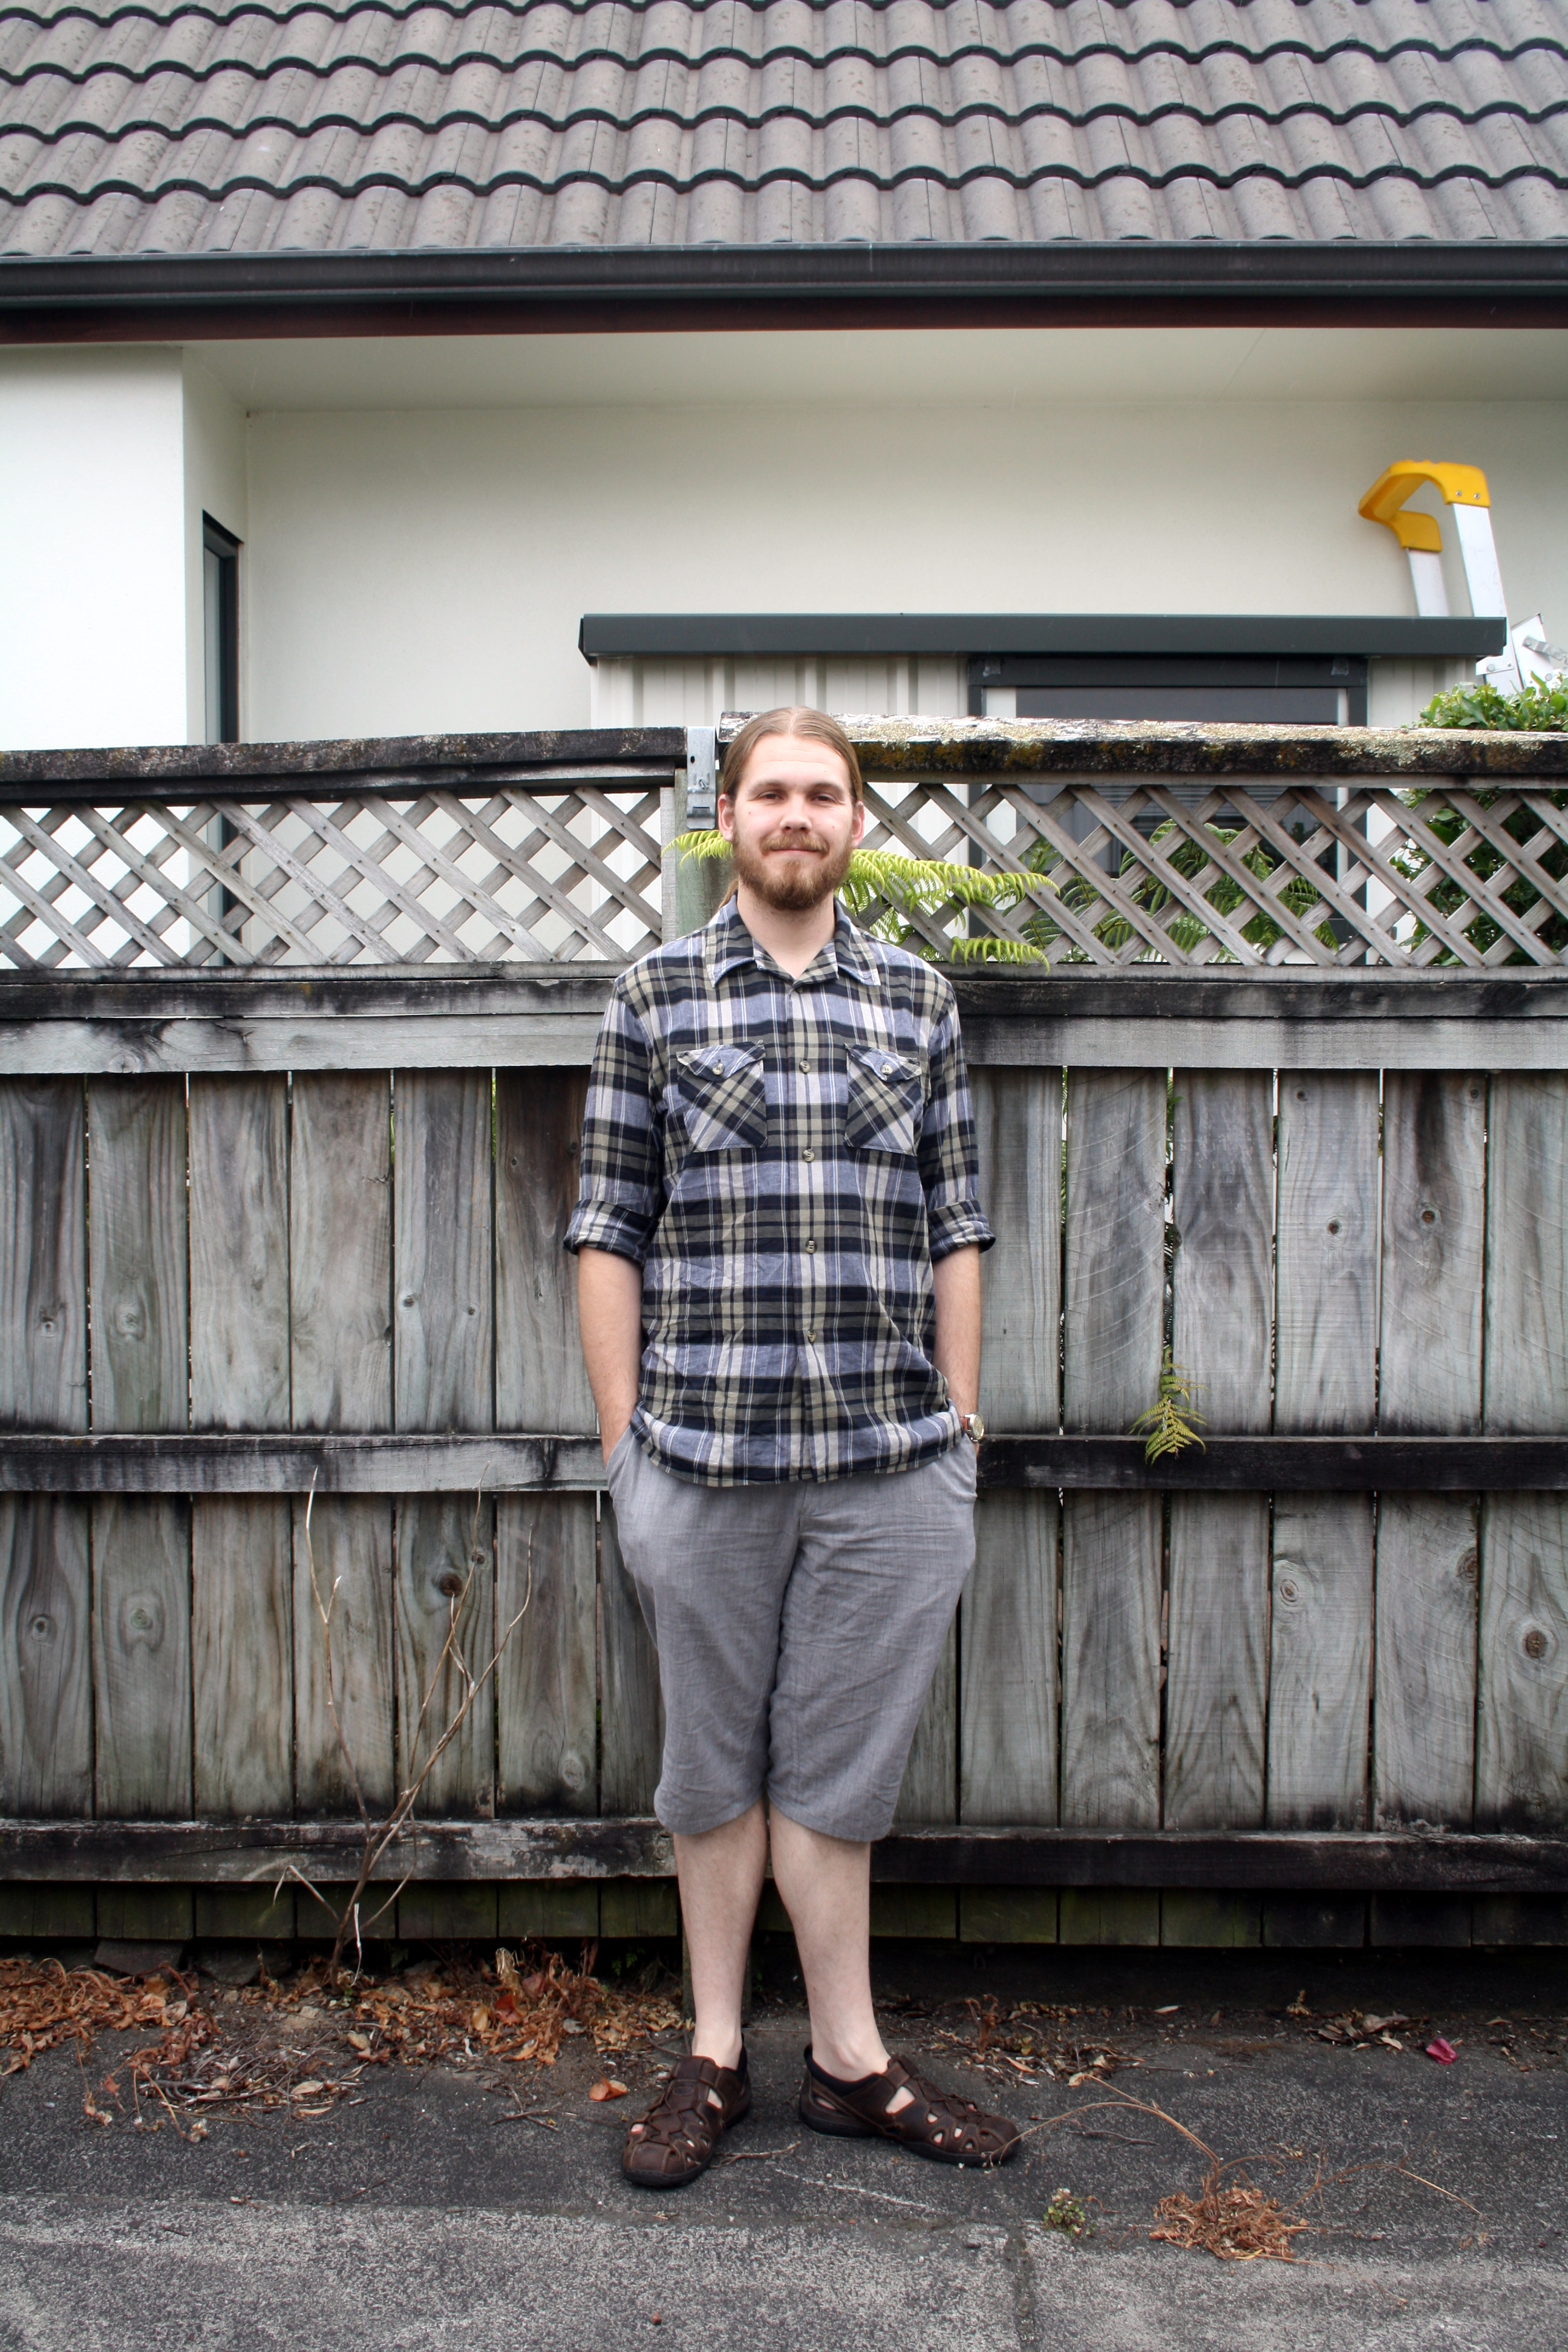
The pattern I used was the Jedediah shorts pattern from Thread Theory. It was my first time using one of their patterns, although I’ve been following their releases since they started. I cut out a size 38, as it matched Luke’s measurements, and they’re supposed to be closer-fitting than other patterns. I think the photos speak for themselves, but let me just say, these are really way too big. I’m honestly not sure what happened – I measured the waistband against a pair of his favourite jeans, and all seemed well. Then when I got him to try them on sans waistband to check the fit, they were huge. I couldn’t really take them in at the sides by that point, as they had been bar tacked and topstitched, so I took them in another 3 inches at the back, and they were still too big, although wearable with a belt. I’m thinking perhaps I stretched them out a little during the sewing process, although I’ve never had anything stretch that badly before, and the fabric is not stretchy and is quite firm.

I’m kind of mortified by how big they are, but Luke loves them. He’s on his third day of wearing them in these photos, and he says they’re lovely and cool in the warm weather, and that he feels trendy when he’s wearing them. He has said he would like them a tiny bit shorter when I make him another pair, and I’m happy to oblige – Luke is tall, so I thought simply hemming them by 1.5″ would be fine, but they sit just below the knee instead of just above.
Unfortunately, I kind of hated making these. I went into it not expecting many problems – I’ve inserted a front facing fly twice now, on my muslined-but-yet-to-be-completed Jamie Jeans, and on my Moss skirt, and both times it’s gone pretty smoothly. I resorted to using the sewalong posted by Morgan of Thread Theory pretty early on, because I found the PDF instructions to be a little sparse. I’m a visual learner when it comes to stuff like sewing, and I have a lot of trouble envisaging how things go together, although I’m getting better at it all the time, so diagrams and clear pictures are important to me. Unfortunately, I didn’t really find the sewalong very helpful, and at times, I found it very frustrating. It seemed like everything was too zoomed in or too zoomed out, and I couldn’t get a clear idea of what I was supposed to be doing, especially with the fly instructions, as they differed from those I’ve used before.
By the time it occurred to me I should just do it the way I know how, I was too far into the construction to back out and change without a LOT of unpicking, so I forged on. Luke loves practical, durable clothing, and I was disappointed in the lack of a flat-felled seam on the crotch and seat seam, as I feel that’s one of the areas you really want one. I found binding the seat seam to be very difficult, with the sharp curves of the fly front, and this is something Morgan glosses over in her video. Actually, I was a bit baffled by the sheer amount of bound seams in this pattern – I like a good bound seam, it’s a perfectly good seam finish, but I do find it to be a bit bulky, and even using a lightweight fabric for the shorts I found it created bulky seams where I didn’t want them. In the end, I only bound the seat seam (and wished I hadn’t), and the zipper shield, and I did it the more time-consuming way – sewing one side first, then folding it over and sewing the other side. Early on in my sewing adventures, I tried sewing binding the way Morgan does in her video and I find there’s a lot more room for error – not catching the seam in the binding being the major one. I overlocked the outer side seams – my first time actually using my new-to-me overlock! By the time we got to the waistband and I saw there was yet more binding and oddly turned under partway, I admit I closed the sewalong and just did it my own way – turning and pressing the seam allowance under on the inside and stitching in the ditch.
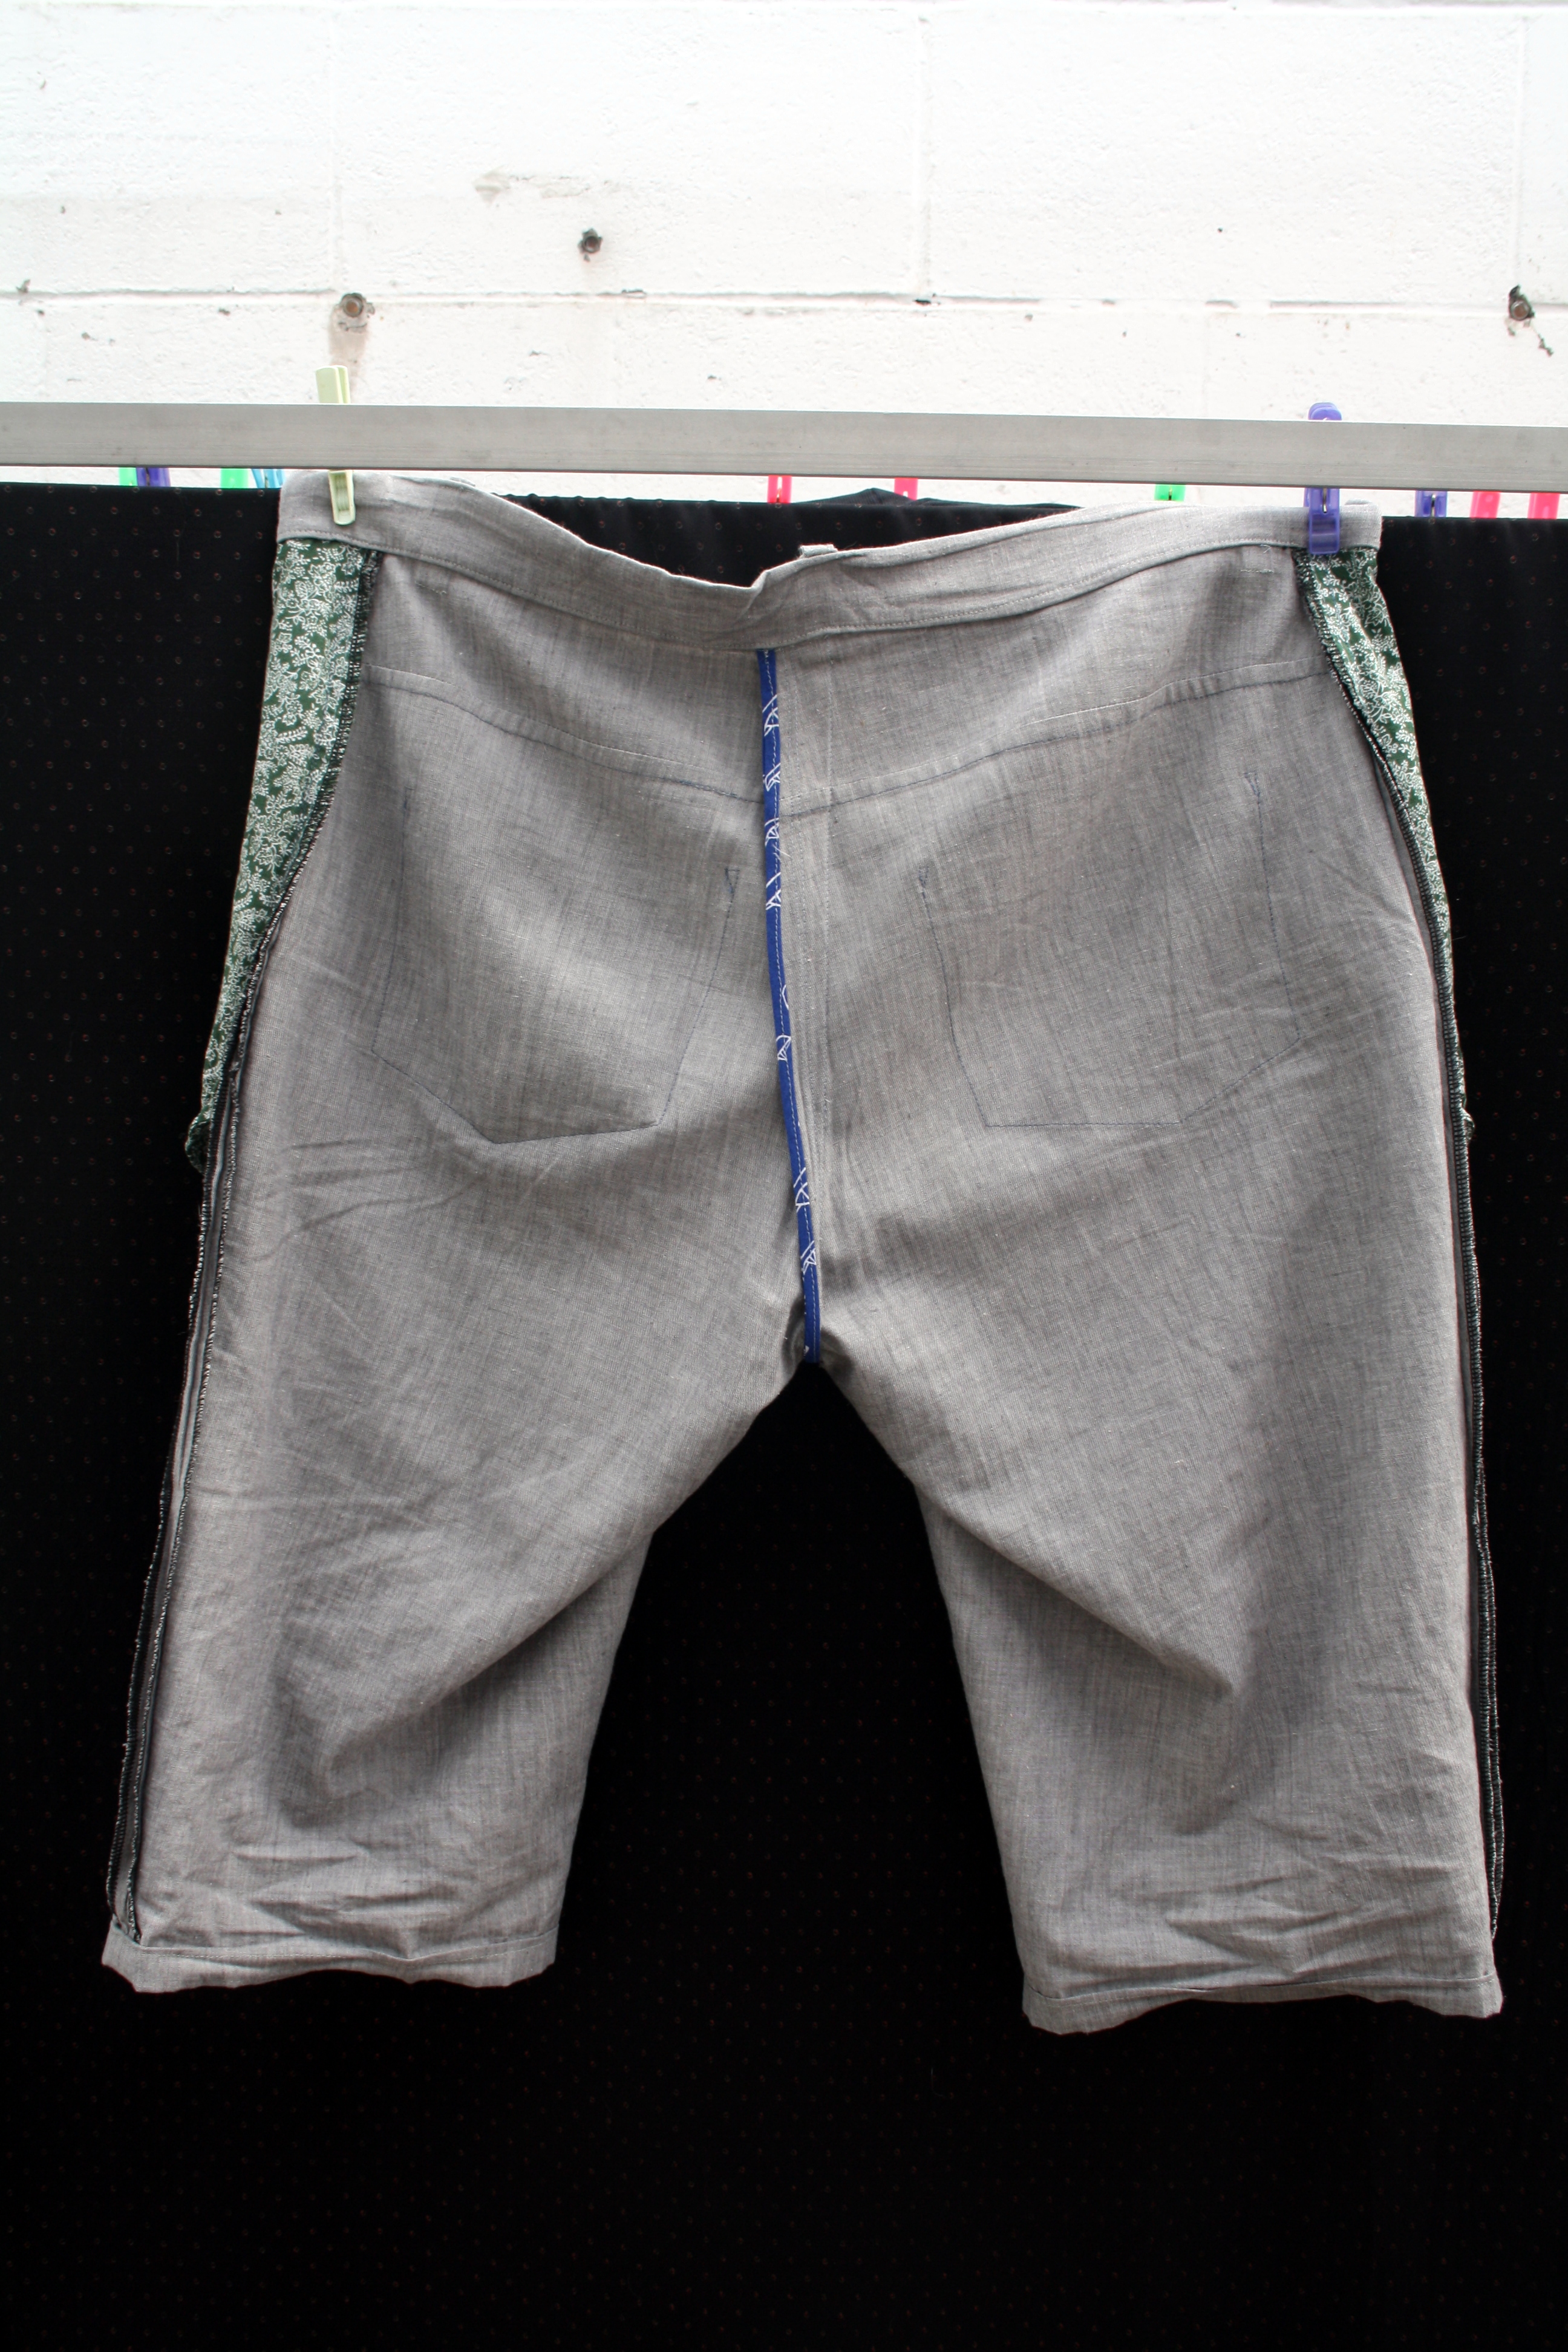
I used some leftover self-made bias binding from my nautical Reglisse for the seat seam. You can see where I took it in at the back 3″ – I didn’t trim the seam allowance as I’d already bound and finished it. Luke picked some green and white cotton from my stash for the pockets. Apologies for the wrinkles in this photo, I had to ask him to take them off so I could finally get some photos of the insides!
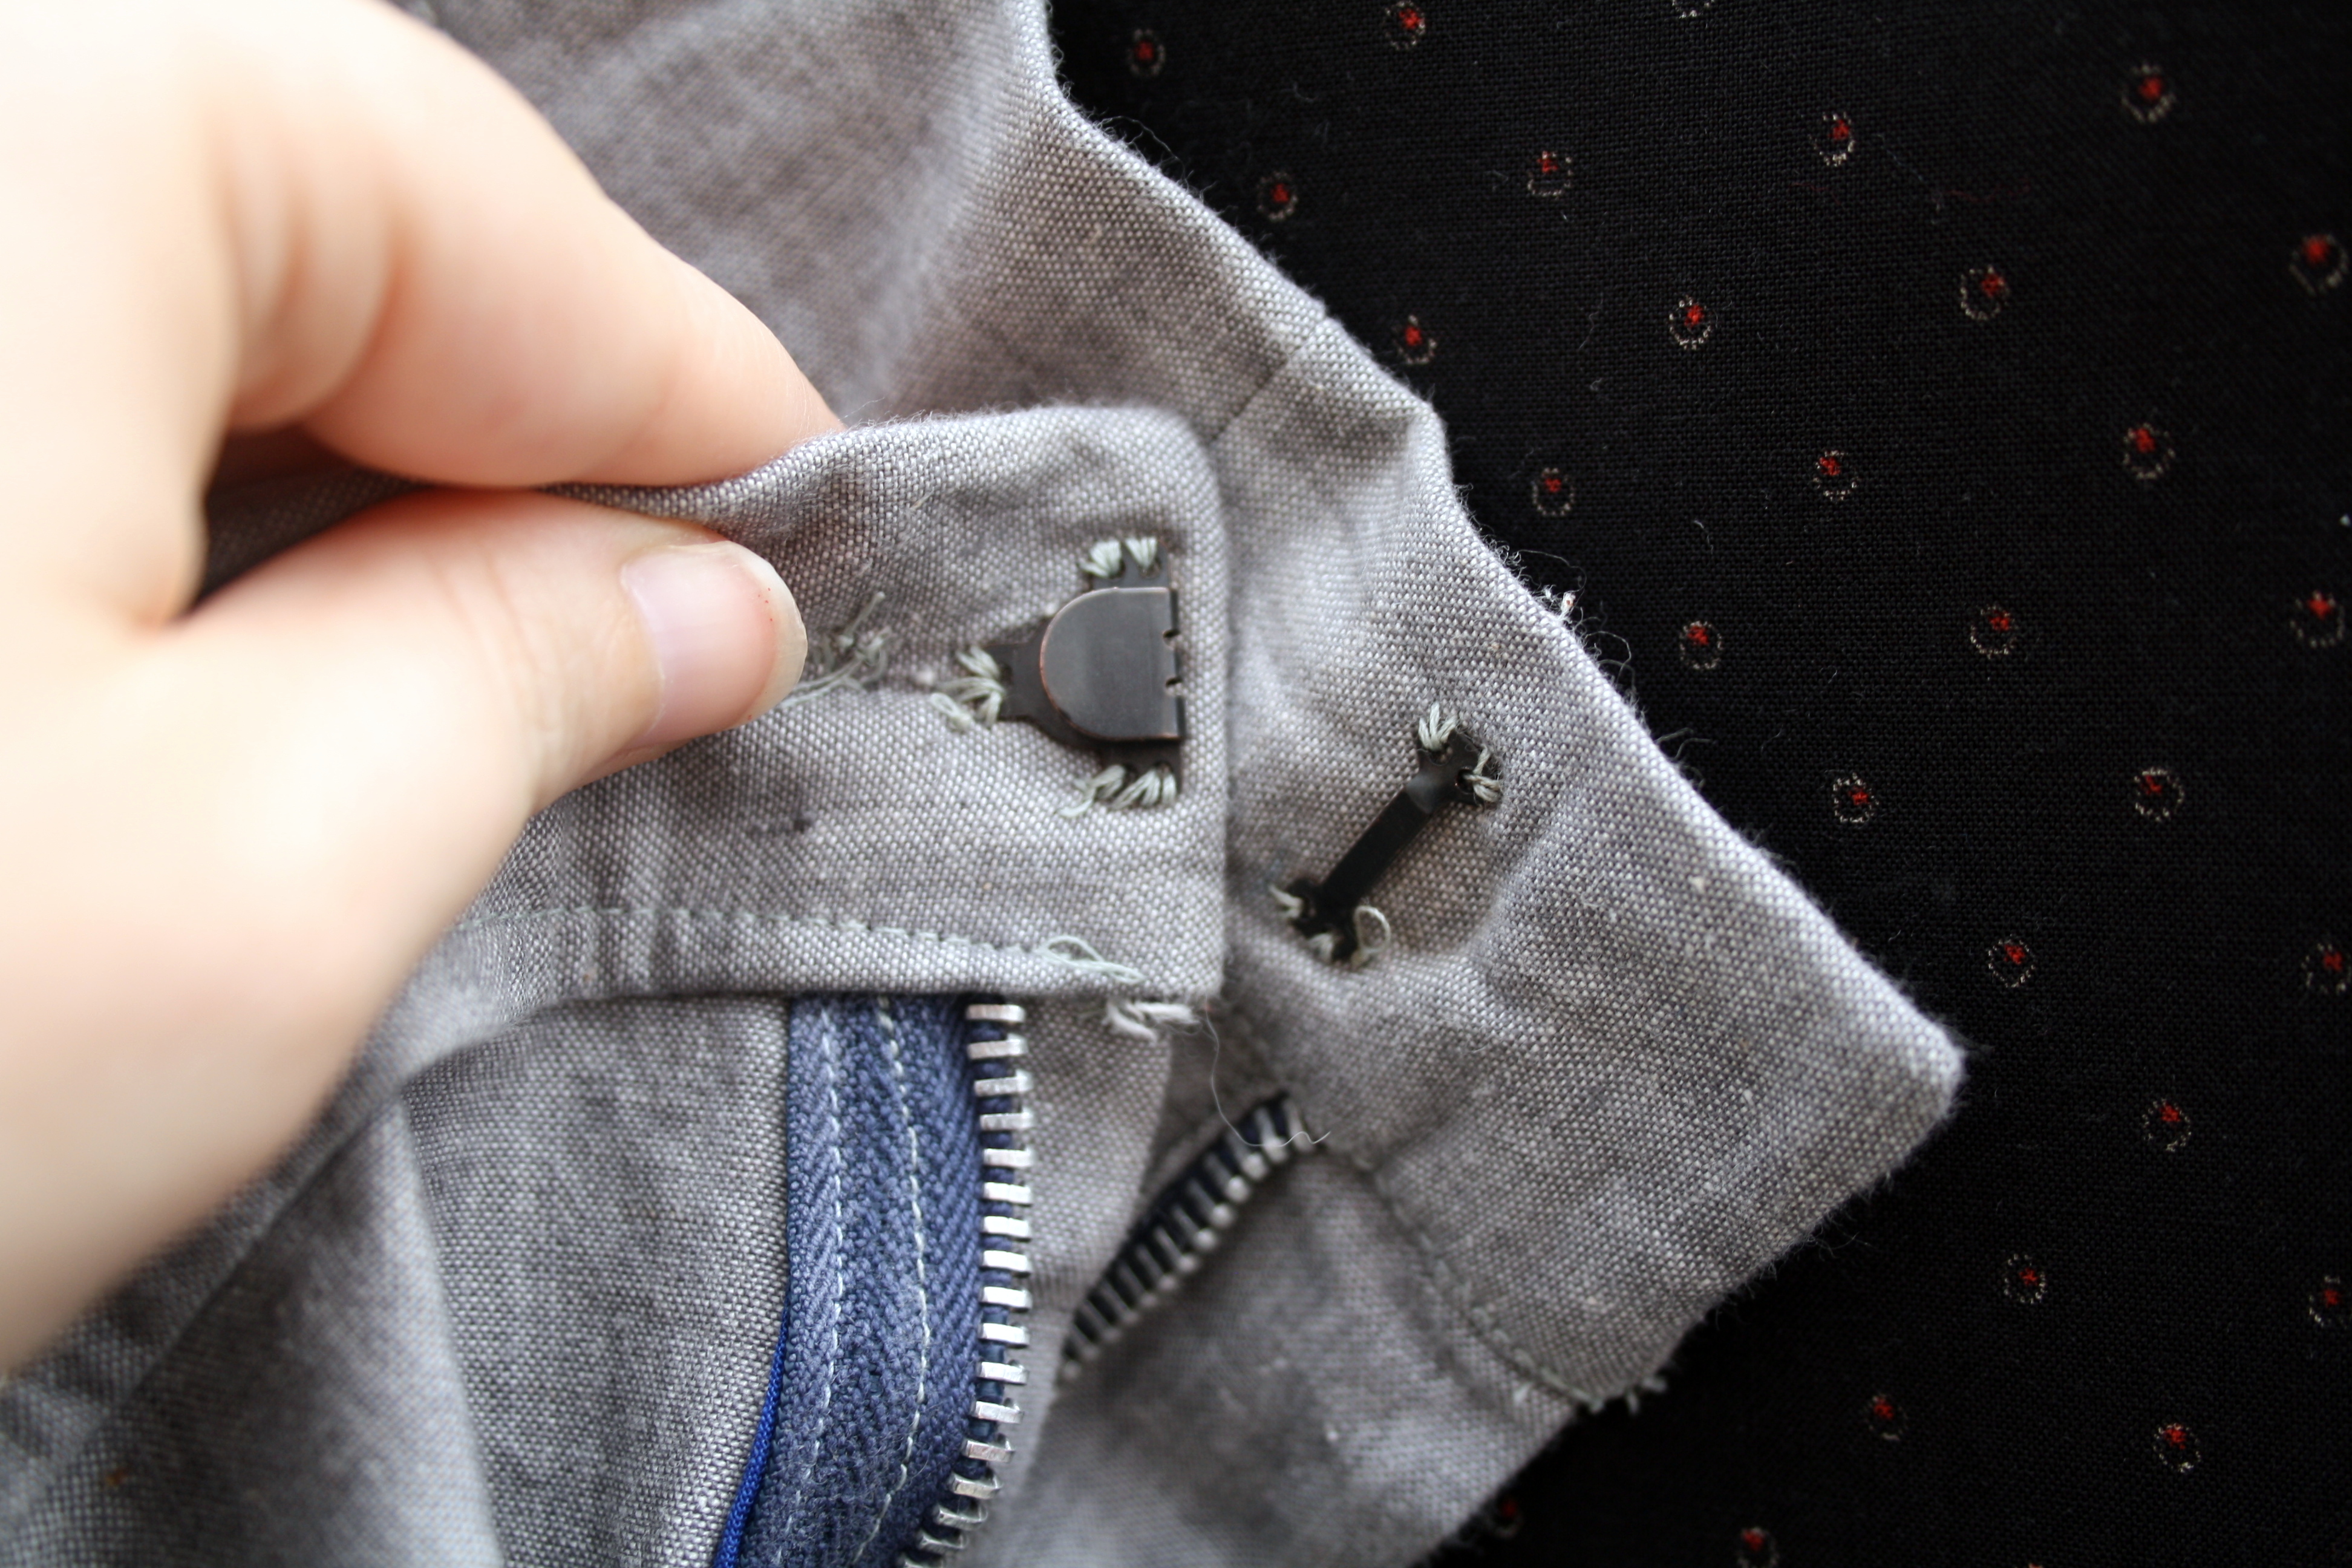
I used a repurposed zip from a huge bag I bought from the Salvation Army for $5 – there were numerous metal zips, all salvaged from old pairs of jeans, I assume, since most still had thread attached. This one is a YKK one, and seemed to be in very good condition. I also used a trouser hook and eye from my stash for the closure, after unpicking FOUR buttonhole attempts – I didn’t trim the top of the zip/zip shield as much as I should have before sewing on the waistband, and it’s quite bulky in there – too bulky for my machine to achieve any kind of decent buttonhole. I still sewed a button on the front for appearances sake though.
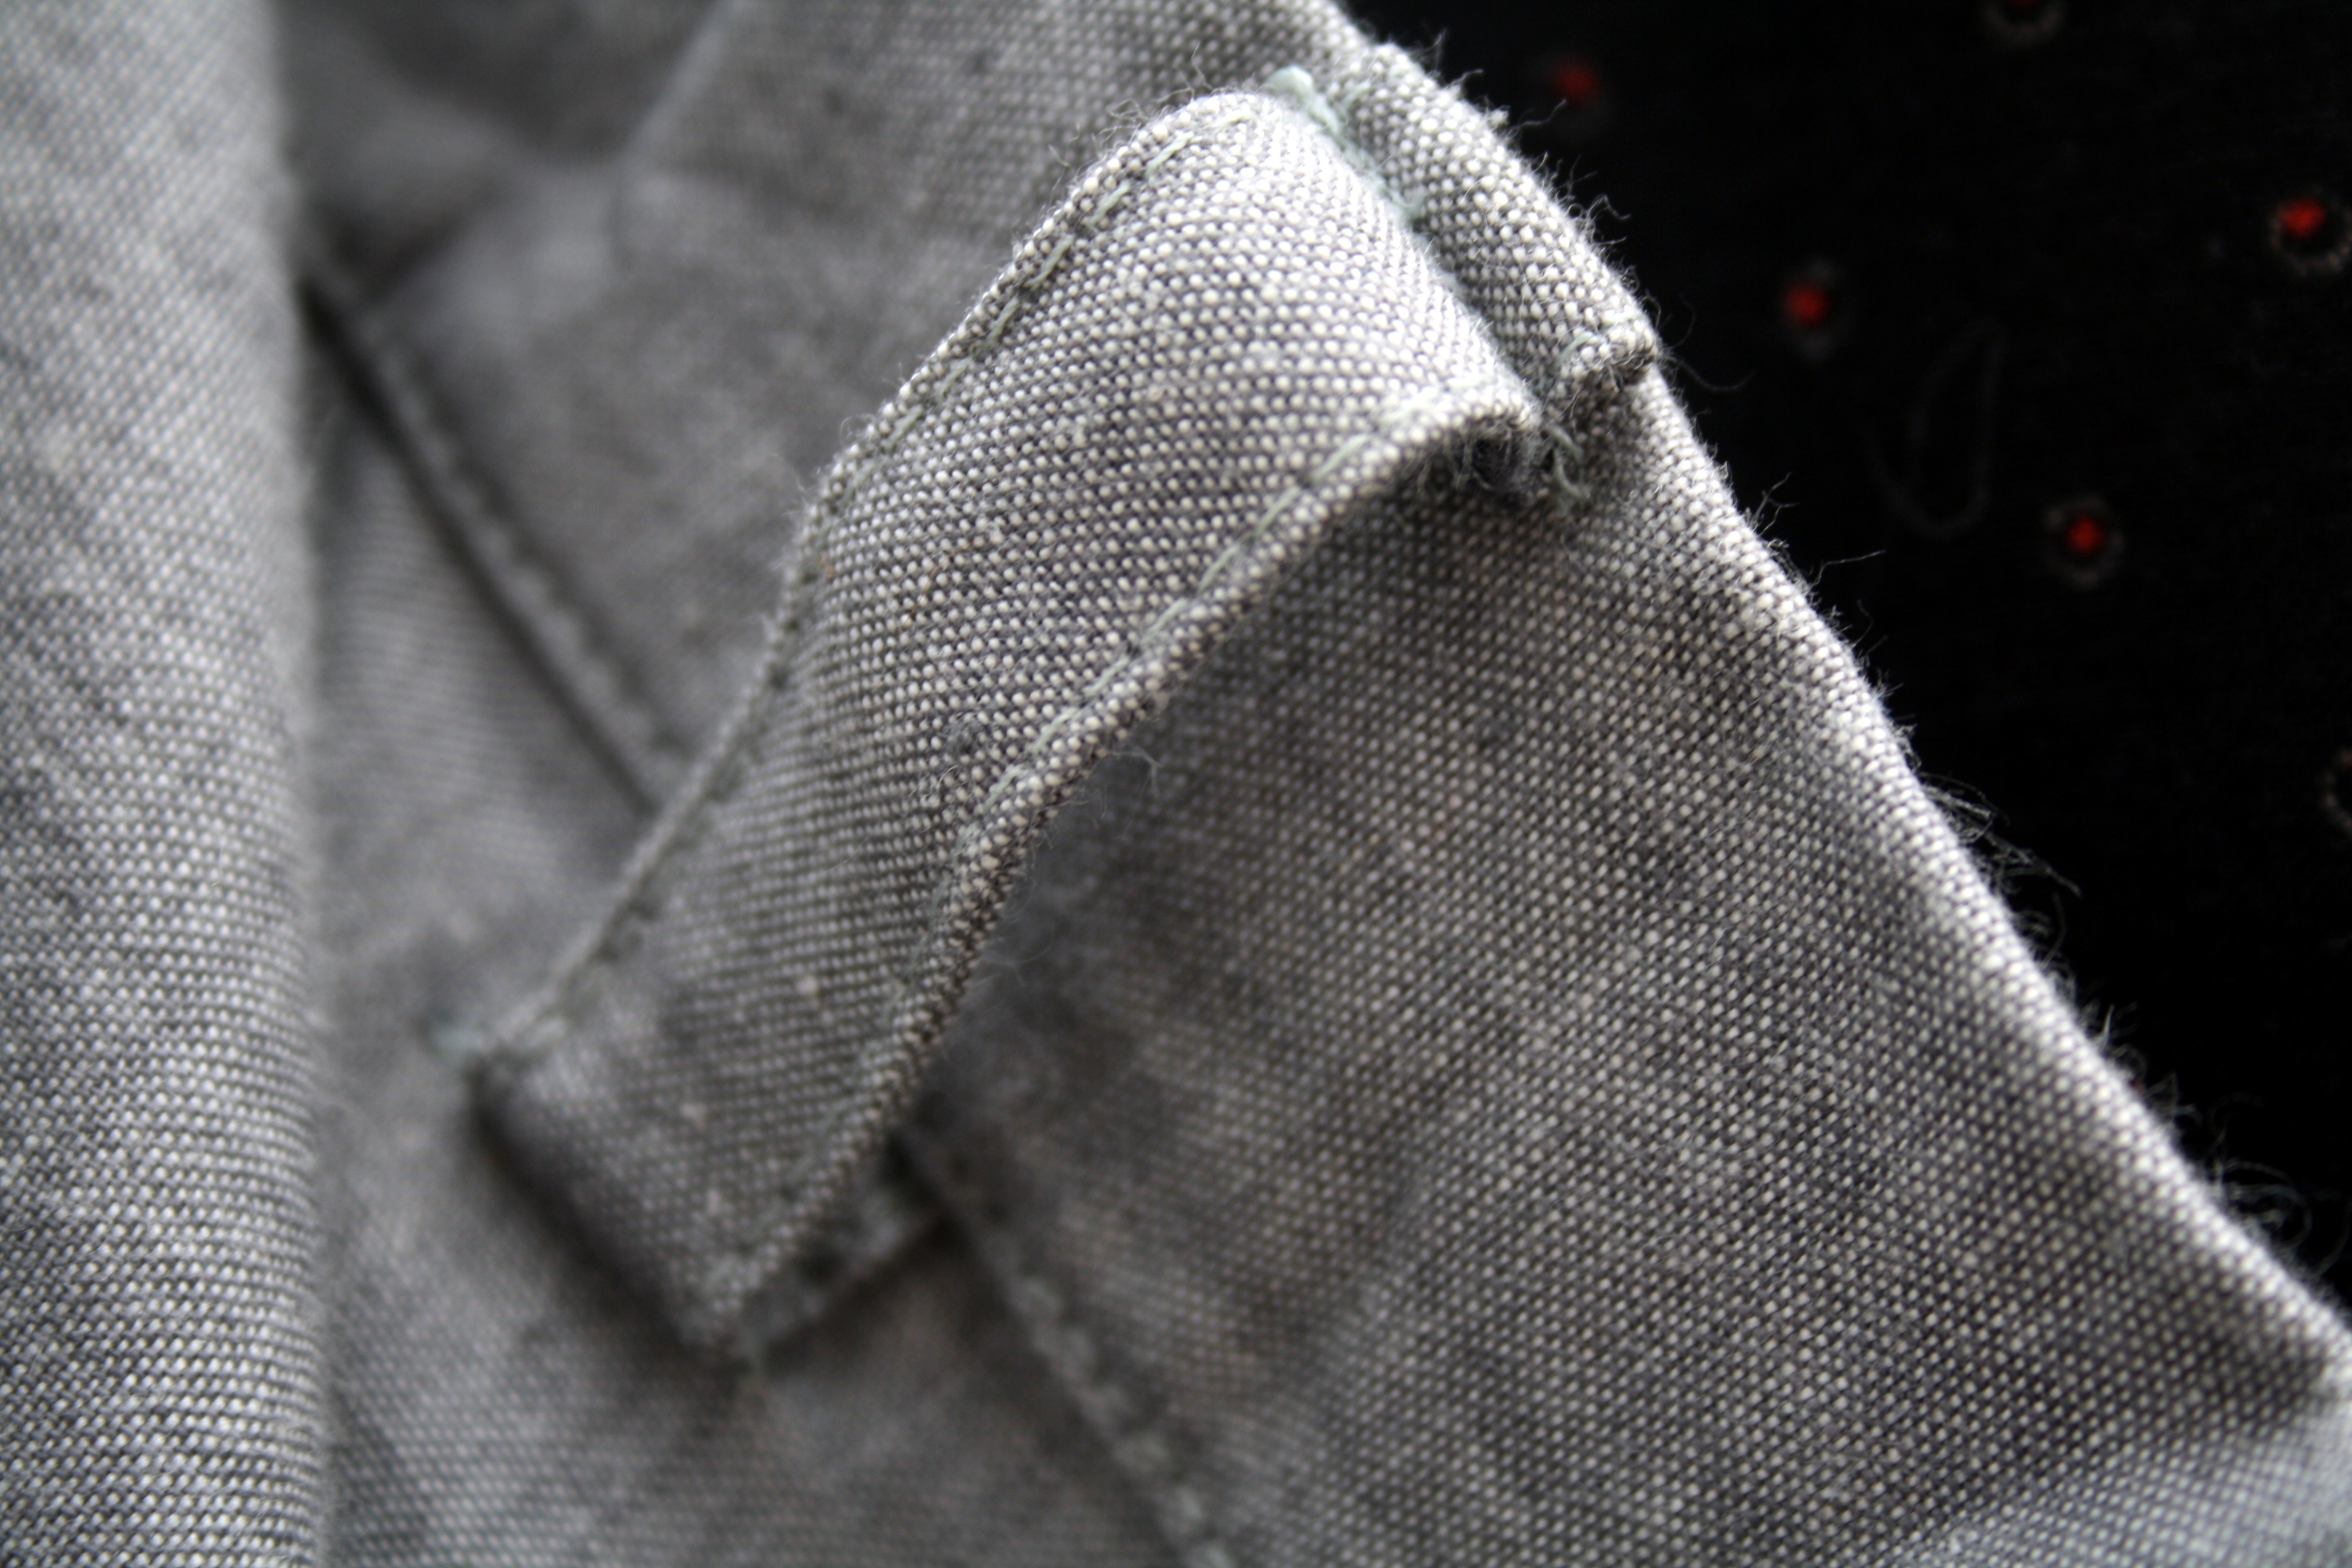
This also marked my first attempt at doing belt loops, which I’m pretty proud of! It’s also my best edge stitching to date.
So, another pair of these will be forthcoming – I found another big pile of a very similar fabric in my stash, and I’ve already trimmed the pattern pieces down to a size 36. Luke insists I make something for myself first, though (isn’t he sweet?) so I’m planning a Deer&Doe Airelle blouse in a bird print chiffon!

The belt loops look fab, but the fit is weird, from the back shot it looks several sizes too big at the top and yet too tight at his knee. How odd. Still, if he likes them, you can count them as a muslin?
I bought the Jutland pants in the Jan sale – they seem to be looser fit than the Jebediah, yet to make a start though. I got completely confused with the front opening when I made the comox trunks – I thought that was just me though. I do prefer a clear line drawing to a photo to see what’s going on.
It’s definitely a weird fit! I’m going to widen them at the knee next time, and go down a size or two. I like the look of the Jutland pants, but I already have a very utilitarian Japanese pant pattern that Luke wants me to make, so I won’t bother with that one I don’t think.
You’re so good! I keep meaning to make these for Kelvin then forgetting about it. Do you think you will flat fell the crotch/seat seam next time? At least your man loves them!
I’ll absolutely flat fell the crotch/seat seam next time! I can already see a bit of strain on the stitches there on this pair.
You convinced me to buy the pattern (even though you had a few problems with it). It’s my first PDF one apart from baby clothes, which take like 2 pages to print out. I will test whether my fear of taping all those pages together is founded or not! At least I know who to ask if I run into any problems Kirsty 🙂
It doesn’t take TOO long to stick together – just pop on some music and wield those scissors and it will go quickly 🙂 I’ll look forward to seeing how yours turn out!
Just started sewing them. The sew-along is photographed from WAY too far away! A can just figure out what’s happening.
I know 😦 I think maybe it’s one of their first sewalongs, so maybe they fixed this in later ones? Either way, not very helpful. Can’t wait to see your finished shorts!
I think they look nice! I like to sew for my husband too. I am with you on being a visual learner. I learn a lot from craftsy.com classes because I can see what they’re doing and watch it over and over. I learned the best way I’ve ever seen to do a front fly from one of those classes, and I modify every pattern so I can do it that way. Great shorts!
Thanks! I use the Craftsy zipper class all the time, it’s really good having a quality video you can watch and pause to get an idea of what’s going on.
That’s really odd about the sizing – Guy’s pants were spot on for fit although I went with his RTW size rather than his measured size – he measured 36 but wears 34 so I went for that after making an ill-fitting size 36 muslin. Is there any way the PDF got printed out too big? (I had that happen with the Thread Theory t-shirt pattern, but it printed it too small!)
I overlocked the crotch seam (which was sewn twice for reinforcement) and top-stitched to make a faux felled seam. I checked his RTW pants at the time and most of them just have it overlocked as well
Perhaps that was my mistake then – Luke normally wears a 36, but he measured as 38. The PDF was fine, at least according to the test square – I’ve been burned by that too many times, so I always check it now. All of Luke’s RTW pants (which isn’t many, to be fair), have a flat-felled crotch seam – must differ between kinds of pants and brands and that sort of thing.
Oh no! Sounds like an ordeal! Those instructions sound dumb, and you normally expect indies to be good like that. I tried making the strathcona Henley and the placket was a disaster, omg. I want to make these, but I’m a bit scared, might have to research alternative instructions!
I would definitely find other tutorials to supplement the instructions, particularly with the fly. The pockets are quite similar to the Kelly skirt, which I know you’ve made before, and the waistband can just be done the usual way of turning the inner seam allowance under and either hand-stitching or stitching in the ditch to close it. It’s always a disappointment when indie instructions don’t quite hit the mark!
Pingback: Sewing for my man | BON COURAGE
Pingback: Sewing for the husband: Thread Theory Jutland | teaandrainbows