Uncategorized

Winter is coming…

I love cold weather. Always have, and probably always will. This year, instead of living in oversized sweaters and trackpants, I’m planning a wonderful winter wardrobe full of colourful tights, cute dresses, adorable sweaters and maybe even a coat or two! And since I love looking at pretty things and feeling inspired, I thought I’d share some of the things that have got me feeling creative and stylish lately.

First up is this cute houndstooth dress from Sheinside. As soon as I get my hands on some houndstooth fabric, I’m going to use the wonderful Elisalex dress to make myself one just like it!

How adorable is this Bunny Trails scarf from Modcloth?! Although I can knit, I think sadly that this is beyond my skill level. Maybe I’ll just have to buy it as a Christmas gift to myself!

I love tights, and I’m rather taken with these heart-printed ones from Forever 21. I also long for tights with polka dots, and especially for the cat tattoo tights that have taken the internet by storm lately!

Last but not least, I’ve fallen in love with this coat from Modcloth. I know, I may have a slight Modcloth addiction, but who can blame me? However $160 for a coat is a bit out of my price range, sad to say. But I’ve already got my eye on a similar vintage pattern to try and “frankenpattern” my own, and I feel like this could be my big winter project!

What’s inspiring you this winter?

Standard
Uncategorized

Happy Halloween!

Let me start at the beginning. This delightful creature you see above is Kapibarasan, a Japanese character based on the ever-delightful capybara. I am a fan of capybaras, and I am an even bigger fan of Kapibarasan. He is my favourite Japanese character, and I own many Kapibarasan items – bags, cushions, pens, stamps, plushies…the list goes on.
Here is just a small selection of some of my Kapibarasan goods. Obviously this includes more than just Kapibarasan, but he represents a good portion of my Japan haul. Moving on, though, as I could wax lyrical about the wonder-beast that is Kapibarasan for hours – let’s talk Halloween costumes.
I’ve been in the USA for three Halloweens now, and since this was my last one, I decided I was going to make a costume instead of sitting at home, hoping no one rings my doorbell because I have no candy. I have been wanting to make a kigurumi for ages. For those that can’t be arsed clicking that link, a kigurumi is kind of like massive pajamas. Onesies appear to have exploded in popularity recently, but I am yet to find a decent pattern for one. I did, in my early sewing days, attempt to make a Totoro kigurumi. I am about to show you one of the most embarrassing photos of me that exists, but maybe it will serve to show how much sewing skills can be improved if you practice.
There are a lot of things wrong with this picture – the fact that my Dad shot it from below, thus making me look even larger than I was, the unintentional ombre as I grew my henna out, and last but not least, the extremely shoddy costume. It was my first encounter with stretch fleece and zippers in clothing, and it did not go well. But, I tried.
This time, I decided I was going to start from scratch. I got a roll of brown paper from the Dollar Tree, and a texta, and got to work. I do already own a onesie (it’s a fox onesie in case you were interested) but it’s quite form-fitting, which doesn’t work for kigurumis imho, and also zipped up. I was keen to avoid zips at all costs this time around. So I tried sketching around my existing onesie, but it really wasn’t working out, because it was stretchy and form-fitting, and my first muslin was horrendous – way too high in the crotch, the sleeves were ridiculous, and I forgot to leave room for the buttons to overlap. 
I started again, forgetting the previous onesie completely and just using math and straight lines (initially). I measured myself all over, and did some sketches, and then drew my pattern pieces using a French curve and a ruler. I went to Goodwill for another muslin sheet, and sewed it up.
The only change I made to this muslin was to lower the crotch a little more. Sewing the hood was quite challenging – I somehow stuffed up the measurements the first time for the muslin and made a super gigantic hood that was twice as large as it needed to be, but once I corrected it, I was very happy with it. The sleeves were easier than I thought – I simply measured the length of my arm and the width of my bicep, and the armhole, and went from there! I couldn’t wait to start cutting into my soft, soft fur.
Part-way through the cutting process – there was fur EVERYWHERE. I did look up a quick tutorial on cutting with napped fabrics, but it turns out it’s really simple – you just point everything in the wrong direction. Easy peasy!
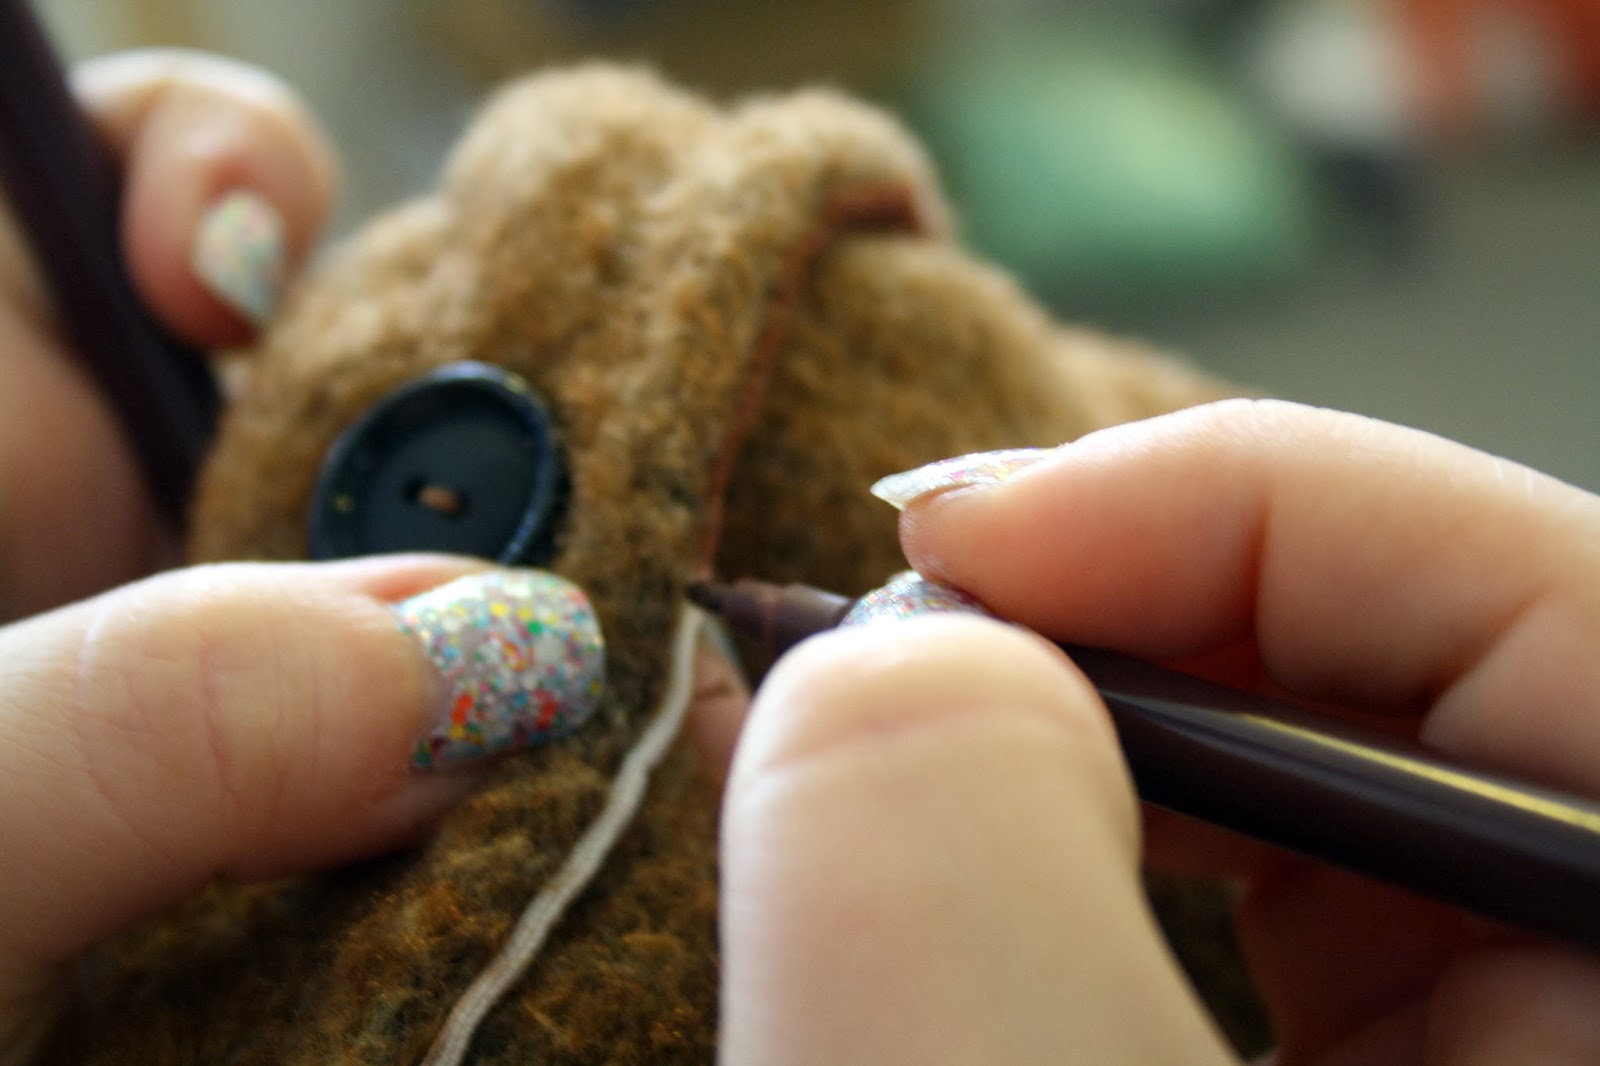
For his face, I cut out the appropriate pieces from some black twill I had lying around in my stash. I hand-stitched them on, because I wanted greater control over the process. Sometimes it’s easy for things to go wonky on a machine, and I didn’t want to unpick them.
 I did make one error – I used some canvas fabric to stabilise the button bands, instead of brown flannel. I didn’t have enough flannel (I only got one yard, to line the hood) and didn’t want to buy more, so I figured the canvas would do, reasoning no one would see it. Turns out I was wrong about that, and that you could indeed see the edge of it poking out. Another quick trip to the Dollar Tree for a pack of coloured textas and I coloured that shit in. It worked surprisingly well for such a ghetto fix!
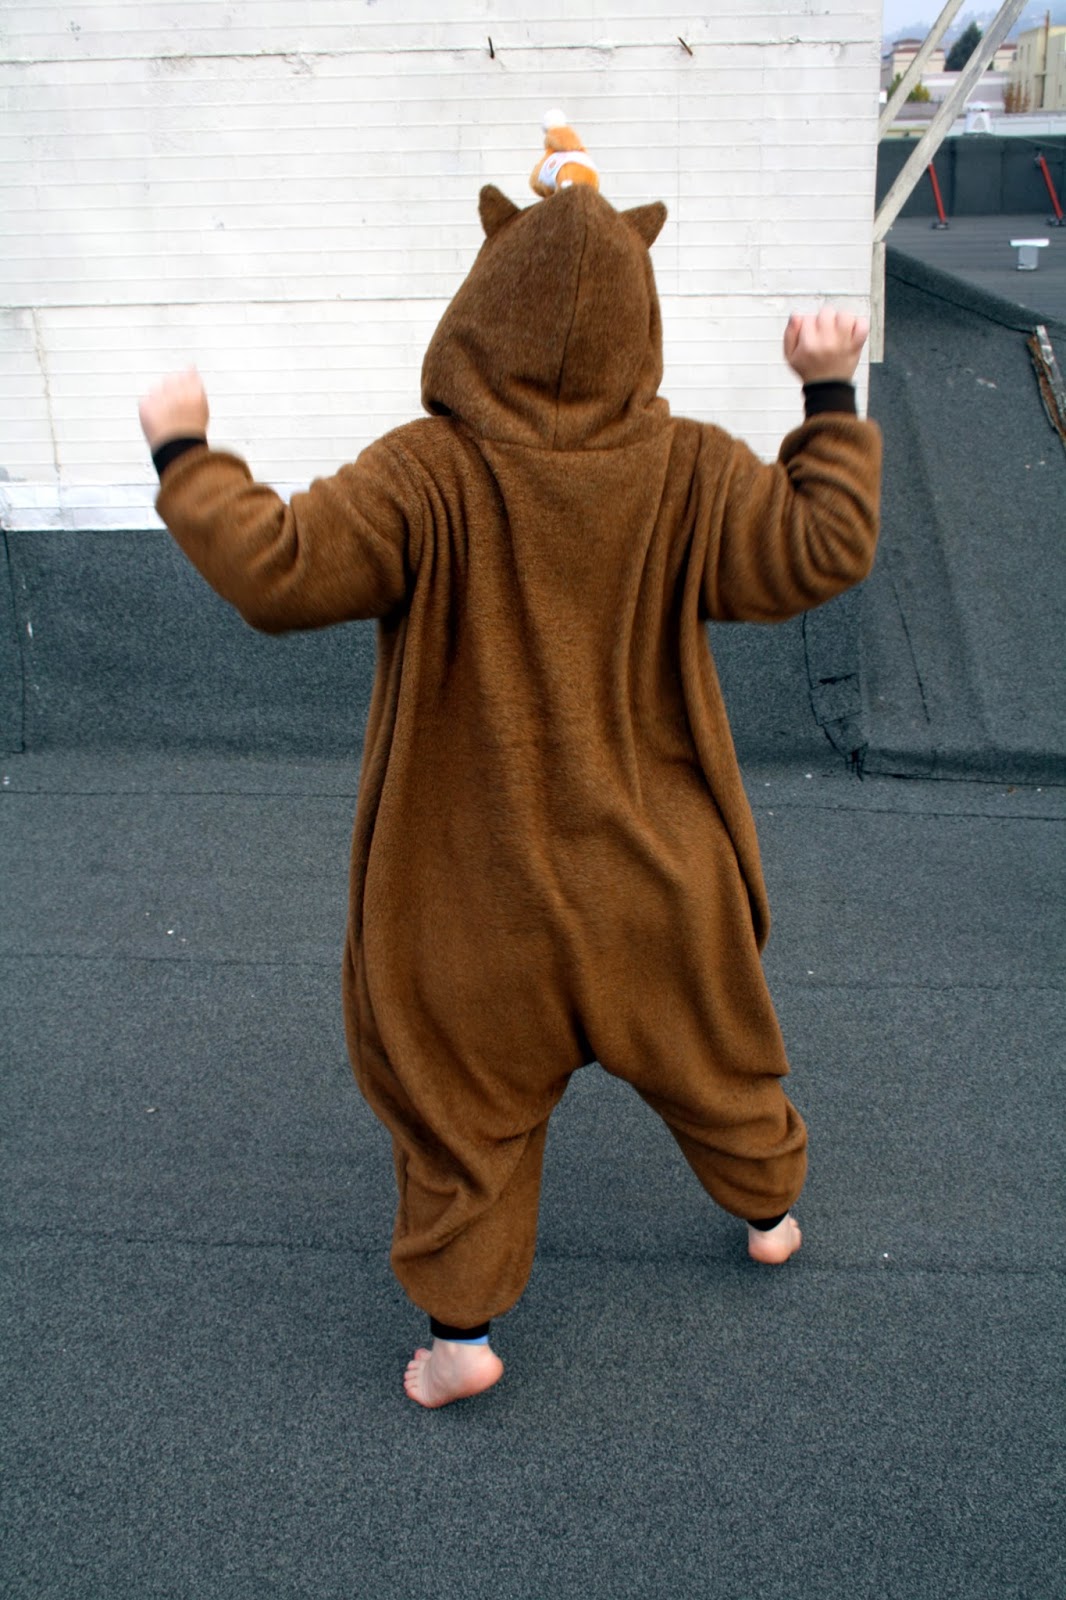
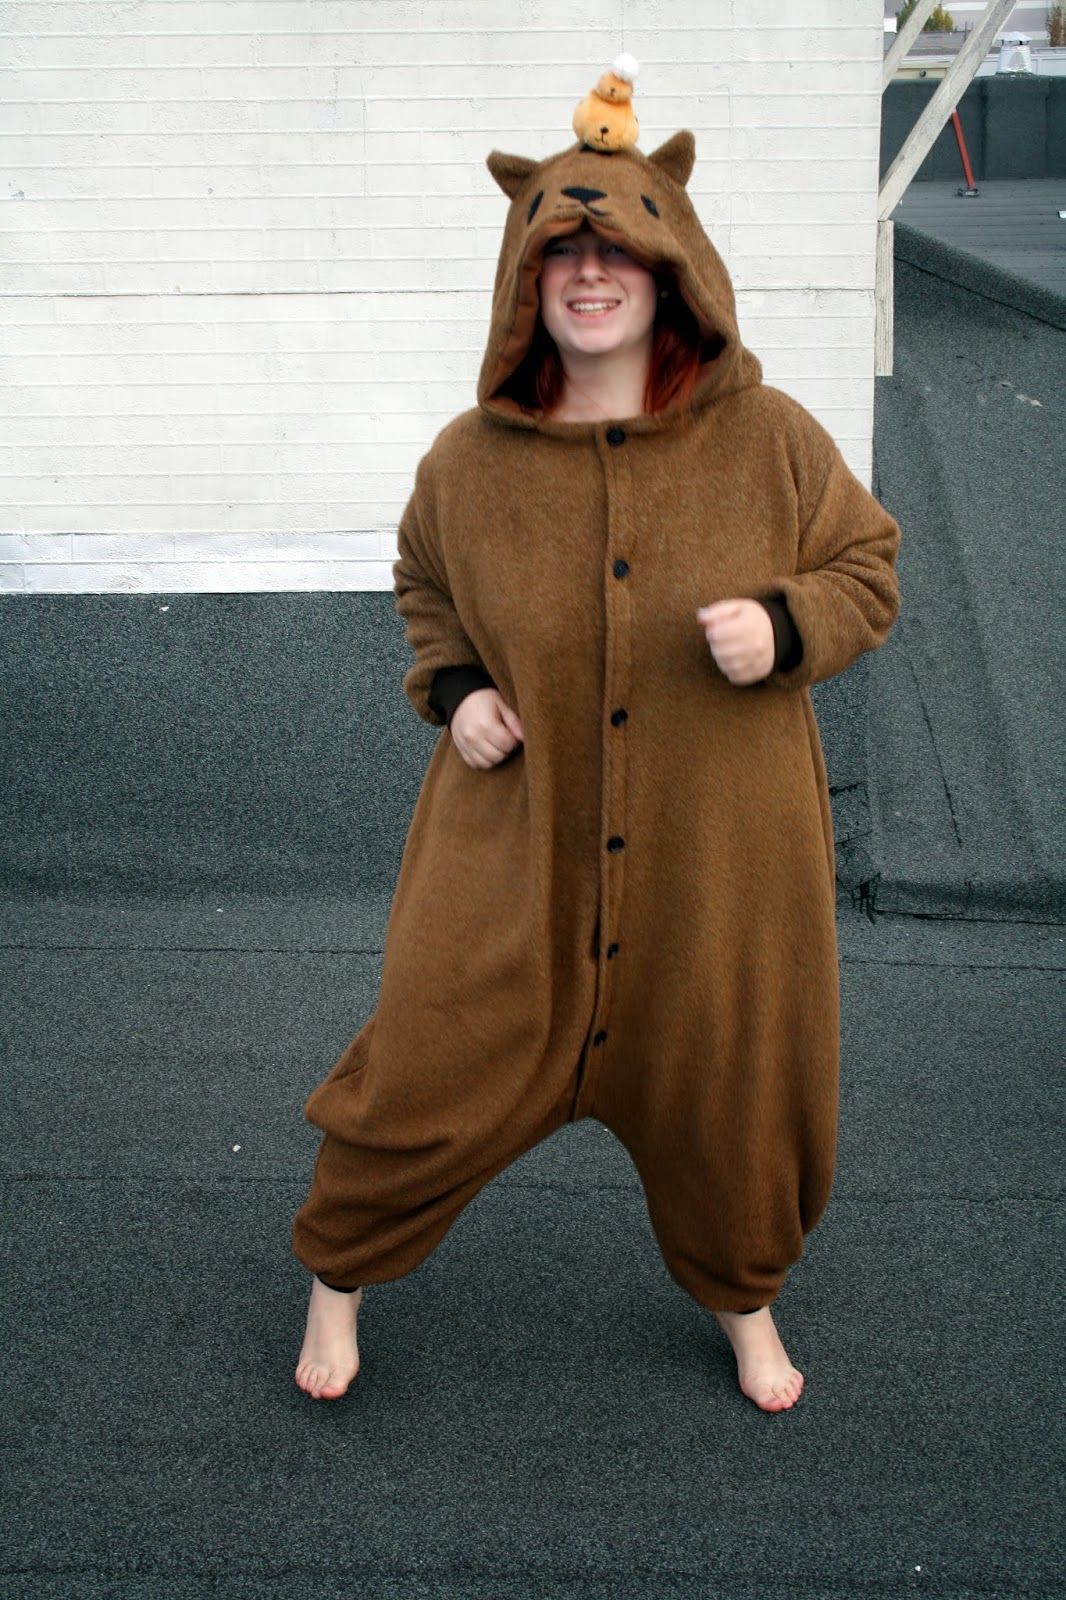
You guys, I am SO PROUD of how this turned out. It exceeded my wildest expectations! I made this from scratch! With math! 
It’s pretty big, right?
RIGHT?! Haha, it’s so huge and comfortable. Being in it is like having a constant, warm hug.
 
 I made the cuffs from a dark brown ribbing I ordered off fabric.com. It’s not proper ribbing, because I couldn’t find that stuff in the colour I wanted, but it worked well enough. Because the ends of the sleeves and legs were so large, I had to stretch the ribbing to its absolute limit to get it to go around without any folds. It sprung back remarkably well, I was impressed! 
I attached one of my own personal Kapibarasan toys to the hood with velcro – the sew-on kind for the hood part, and the stick-on kind for the toy. It held out all day, which surprised me as it specifically said not to use it on fabric. Oops. I also hot-glued fur to an old pair of sneakers, which worked amazingly well. I left a flap over the laces, and then this morning once I’d laced them up, I glued the flap shut. The fur stayed put all day, I was comfortable, and Kapibarasan had fuzzy feet! I Instagrammed the shoes, but didn’t take photos with my real camera, and am ashamed to admit I do not know how to post Instagram photo on my blog. Should probably Google that sometime.
This pretty much sums up how I feel about getting this done on time, and loving the end result!
I hope you all had a wonderful Halloween, costumed or not. I’m wondering if I can wrangle my friends into Halloween parties when I go back to Australia, so I can keep making more costumes!

Standard
Uncategorized

Wedding Kitties

Recently, I have been hard at work on a very special project. A dear friend of mine got married last week, and I wanted to give her a gift. I wanted it to be something small and light, as she’s only in the US for a brief time, and something she could keep forever. I pretty much knew straight away exactly what I wanted to make for her – wedding kitties!

Most of you probably don’t know this, but making felt plushies is actually how I got into sewing in the first place. I got a bookstore voucher for my birthday a couple of years ago, and browsing the shelves, I came across The Softies Kit, and I couldn’t resist the cuteness. I made the penguin on the front cover, and then a cake. And then a cake for my housemate’s girlfriend. And then I broke away from the kit and made a sheep, and a cow, and I was hooked. I’d done a lot of cross-stitch as a child (I was even in the cross-stitch club at school…oh, the shame!) so stitching wasn’t completely new to me, and I really liked (and still do) the relaxing nature of hand-stitching.

I used a combination of stitches to make the kitties – whipstitch, running stitch, backstitch and ladder stitch, plus some satin stitch for the noses. Their bodies are made from eco-felt, and groom-kitty’s clothes are also made from the same type of felt. For bride-kitty’s outfit, I wanted it to somewhat resemble the real bride’s wedding dress, which was quite difficult considering I hadn’t seen it, and only knew it was “knee-length, champagne-coloured and had long lace sleeves”. So, I worked with what I knew! I got 1/4 yard of champagne taffeta, 1/4 yard of a cream lace and 1/8 yard champagne sparkly tulle from Jo-Ann. As it turned out, I didn’t need anywhere NEAR that much, but it’s better to be safe than sorry. I wasn’t sure if she would wear a veil, and leaving bride-kitty’s head unadorned didn’t look right, so I went with a layered tulle bow over the left ear. The photos don’t quite do it justice, it really is quite sparkly and pretty.

Usually, I shy away from selfless sewing. When I first started sewing, and was full of amazement that I could make things, I wanted to make things for everyone! That year I endeavoured to make gifts for everyone instead of buying them, and it was that year I discovered that a lot of people just don’t like or appreciate handmade gifts. Since then, I’ve been quite selfish with my sewing, only making some clothes for my Mom and some tiny handmade gifts for a few close friends. But even though I haven’t known her long, I knew that my friend would appreciate these small kitty friends, and that made it worth puzzling through making tiny kitty wedding clothes late at night!

Working on this little kitty couple reminded me just how nice it is to step away from the sewing machine once in a while and create something with my hands, needle and thread. And, of course, how nice it is to do something special for someone else 🙂

Standard
Uncategorized

Fall For Cotton Fail

I had grand plans for the Fall For Cotton challenge, but like the best laid plans of mice and men, they just didn’t eventuate. September was a very, very busy month for me – we had a number of Australian visitors come and see us, we went on a beautiful camping trip to Crater Lake, I had my online course, and my social life became a whole lot more active lately. I’m not complaining, it was a super fun month, but it really didn’t leave a lot of time for sewing, especially not to a deadline.
To begin with, I chose Simplicity 5890 from 1968. I bought a blue and black plaid for the dress and white shirting for the shirt. I made a muslin for view 2, thinking the skirt would flatter my figure more, but there was some odd gathering around the waist that was very unflattering, so I ended up going with view 1. I did a narrow shoulder adjustment on my muslin, something I should have been doing for every garment, really! I used the tutorial provided by the lovely Ann Rowley of Great British Sewing Bee fame, and it worked beautifully. 
Then everything got set aside for a while, and my plans started getting less and less grandiose. I decided not to make the shirt underneath the dress/jumper, and just focus on the main garment. Then I decided not to use the plaid fabric, because I didn’t want to half-arse it and not match the plaid properly, so I decided to use a different, patterned fabric. Unfortunately, a burn test revealed that fabric was not 100% cotton (a requirement of the challenge), so I moved onto this pale blue cotton chambray. I actually doubt it’s chambray, honestly, but it is cotton! 
It looks like the bodice is slightly too big in some way in this photo – however, it’s comfortable enough and I really don’t intend to wear it without a cardigan, so I suppose it doesn’t matter. I made my own bias binding for the first time ever, for the neckline and armholes. There are approximately eleventy billion tutorials on how to do this, but I went with the method described at Sewtropolis – it involved the least amount of stuffing about with rulers and drawing lines, and it worked really well. 
I also made my own thread belt loops. using Colette’s tutorial, and they turned out really well! I already have about 3 RTW dresses with these loops, and I think they’re a subtle, classy addition to garments. I added a waist stay of cotton twill tape, as per the vintage instructions, and I pinked (almost) all my seams – I still need to do something about the waist seam under the stay, as you can see from the below photo.
I didn’t bother putting a zip in, as I can just wriggle into it as it is. Unfortunately, once I did wriggle into it and looked in the mirror, I was really disappointed. On its own, it was bland and boring, and I thought I would probably never wear it. At that point, I was ready to admit defeat, and let the Fall For Cotton deadline pass by without making a post about it.
But then I was getting ready to see some friends, and I saw it lying there on a chair, and I decided to try again. I paired it with black tights and a cardigan and a thin blue belt that came with a dress from H&M. I found some vintage shoes I bought from Ebay (from East Germany, no less!) in the cupboard and slipped those on, and with all the accessories, I actually thought it looked pretty cute! I got a compliment on it from one of my friends that night, and that sealed the deal. I’m so happy I could make it work, because nothing annoys me more than pouring time and effort into a sewing project only to end up with something I don’t want to wear.
For the photo shoot, I added a cute hat I bought from an Ebay seller many months ago and hadn’t worn, and I picked up a length of grosgrain ribbon from my local fabric store to make the hat ribbon and bow. Thanks to Chuleenan of Csews for the advice on hat-ribbon-sewing! Her hats are genius, you should totally check them out.
A 60s style photo for a 60s style dress seemed appropriate! 
My next project is to sew something red for the latest Sewcialist theme, “Red October”. I’ve already made my muslin and picked out my fabric, because I’m determined to get this one done on time! Are any of you participating in Red October? I’m excited to see what everyone makes!

Standard
Uncategorized

Blue Moss

I finally got around to making the Grainline Studio Moss Skirt, after deciding I need more staple garments in my wardrobe. One can’t live on fancy dresses alone, as much as I wish it were otherwise. 
Does anyone else not know what to do with their hands when photographing garments from behind?
Making the skirt was most certainly not smooth sailing, unfortunately. I have an hourglass figure, and there is almost 12″ different between my hip measurement and my waist measurement. When I buy RTW (ready to wear) jeans, I always always have gapping at the back waist, which is something I haven’t paid much attention to in the past and just kind of accepted. I made up a muslin of the Moss Skirt in size 16, tried it on, and found I could fit my entire hand down the back of my skirt. In addition to that, my waistband was somehow a good 4″ too short, and I managed to pull the zipper tab off my zipper while I was fiddling with it. 
Annoyed, I turned to the wonderful sewcialists on Twitter, and asked for advice. They immediately started offering suggestions, including the wonderful designer of the pattern herself, Jen. After chatting with them, I decided I would make some darts in the yoke of the skirt to reduce the gapping at the back, and then see how the waistband fit then. 
First I pinned the excess fabric out and pinned it, and then I measured it and sketched a dart in its place. Then I did some Googling on adding darts, and found an amazing tutorial by Ziredloh on how to change the fit of a yoke. So instead of making a 1″ dart on the yoke, I slashed and overlapped the yoke in 4 places by 1/4″ each.
This is how my yoke piece looked after slashing and overlapping (please excuse the hair and my poor desk top). I measured the top length of the yoke and divided it by 5, then marked 4 lines at equal intervals, and that’s where I slashed. I then marked 1/4″ to the left of those lines along the top seamline, and then taped my slashed pieces at that point. 
I then embarked on a new, wearable muslin with some mystery fabric I bought from a Buddhist Centre rummage sale for $1. After I’d sewn everything together except the waistband, I pinned on the old muslin waistband that was too short, and determined it was still short by about 1″. Sarah from Notches & Notions kindly sent me a little tutorial that Jen had sent her on how to extend the waistband nicely, but since I felt that the waistband was matching all the right places (centre back and side seams), I just extended the paper pattern piece by 1″ on the side it was short, and cut my new one. I happily pinned it on…only to discover it was now 1.5″ inches too short. I have absolutely no idea how this happened. I laid it on top of my newly extended waistband piece, and it matched. It’s just one of life’s little (extremely irritating) mysteries, I guess. I just had enough fabric & interfacing to cut it out AGAIN, after adding another 1.5″ extension, and this time, it fit.
A word to the wise – the instructions for the skirt do not make it clear which way to attach the waistband. I heard from a lot of people that it’s easy to sew it on upside down – but no one seemed to clarify which way was upside down! I sewed mine on with the waistband oriented like a frowny face, if that makes sense – the curves were pointing away from the top of the waistband. This worked for me, and I did try pinning it both ways – if I did it the other way, I came up with an even shorter waistband. Another trap for young players is the zip – for my second go around, I didn’t trim my zip until I’d sewed my waistband (but not the waistband facing) on. That way there was absolutely no way I could pull the zipper tab off! 
Here is the back of the skirt – slightly wrinkled, because I’d worn it twice by this point! You can’t really see any difference in the curve of the yoke, in my opinion, but it hugs my back so well! No gaping at all, and even better yet, the skirt doesn’t wiggle up as I walk, which is one thing I absolutely loathe about skirts usually.
I know this isn’t the best fly in the world, but I consider it not too bad for a second attempt! I didn’t have enough room to have a seam allowance on the right side of the fly, so I just zig-zagged along the edge to stop it fraying and sewed it to the zipper. It’s not pretty, but it works, and you can’t see it at all when it’s zipped up.
 
I lined the waistband and pockets with some cotton fabric I got from an estate sale, just for funsies, and I used a button left over from my Bleuet Dress. All in all, this project cost me only a few dollars (except the cost of the pattern, obviously). Now that I’ve ironed out the fitting issues, I definitely want to make another – a corduroy one for winter/fall, I think, in red or black.
 
My sewjo has suffered a bit of a hit this week, as Luke and I took a trip to San Diego and then hosted an Aussie friend for a few days. In addition to that I’m taking some online courses over at Coursera, and have started up a new project at work. How do you all make time for your sewing when life gets busy? Any tips?

Standard
Uncategorized

Blog Voices – Aussie Version!

I just had to get in on the whole Blog Voices thing that’s going around right now! It’s really cool to hear how my fellow sewing bloggers sound, and how different people pronounce different words. I’m Australian, with one Australian parent and one English parent (from Yorkshire), currently living in California!

Hope you enjoy my contribution! For a list of words to pronounce/questions to answer, check out the lovely Lady Katza‘s blog!

Standard
Uncategorized

My First Mathilde

Tilly’s Mathilde Blouse has been on my to-make list for some time, but I wanted to wait until I had the right fabric. To me, Mathilde demands a soft, flowy fabric to make it that perfect summery blouse, and when I saw this rayon challis at Stonemountain & Daughter, I knew I’d hit the jackpot. I half-heartedly started to make a muslin out of some cheap horrendous tropical fabric I got from Goodwill, but in the end I couldn’t be arsed and just decided to make the largest size. I think I made the right decision – it’s meant to be a loose fit, and the softness of the rayon means that it skims my body rather than billowing out like a stiff tent. I love that this is a blouse I wouldn’t be afraid to eat a large lunch in!

The blouse came together pretty quickly, all things considered. I used two of Tilly’s hacks – I shortened the sleeves and used gathers instead of pintucks on the front bodice. The instructions for the Mathilde blouse are fantastic! Although the pdf itself is a little sparse, Tilly goes through every step in detail on her blog, complete with plenty of photos to show exactly how things go together. I finished the interfaced back edges, sleeve hems and facings with bias binding, which has become a bit of a standard thing for me these days. I thought about making my own, and even cut out a square to do so, but the fabric shifted every time I tried to draw lines on it despite my best efforts to hold it still, and I decided it wasn’t worth the effort. Still, store-bought bias binding is so stiff and horrible, I’m going to have to start making my own eventually, I think. Need to invest in a better fabric-marking pen. Any suggestions?
 

I used little pearl buttons for the back – I only had two in my stash but luckily Stonemountain had the exact same buttons so I could buy more! As an aside, my button collection is shameful. Word to the wise – don’t buy random packets of buttons from Ebay and expect any of them to match in any way. They won’t. I wanted something nice and classy that wouldn’t take the focus off the fabric and I think I achieved that with the pearls. I added an extra button at the top afterwards, because I found it gaped a bit without it. So 7 buttons in total, all carefully lined up, and no buttonhole mishaps this time! I’ve now totally given up on letting my seam ripper anywhere near my carefully crafted buttonholes, and rely entirely on my husband’s Swiss army knife. I have yet to destroy a single buttonhole with the knife, as opposed to 4 (!) with the seam ripper.

I definitely want to whip up a few more Mathildes, and I want to try experimenting with a sheer yoke, amongst other things, but if I work with another fiddly, fraying fabric right now I might never sew again, so I think I’m going to refresh my sewing palate with a nice, sturdy cotton twill and have a go at the Moss Skirt next!

Standard
Uncategorized

And the winner is…

So, this morning, as promised, I drew the winner of the Pattern Pyramid giveaway. The random number generator I used didn’t have to work too hard, because there were only 4 entrants!

So, without further ado, the winner is…

Congratulations, TwirlDesigns – please contact me so we can arrange the sending of the pattern parcel! I couldn’t see an email address for you on your blog, so I used your contact form to let you know you won. Hopefully that worked!

TwirlDesigns has also made the Bombshell Swimsuit (and looks mighty fine in it, too)!

I look forward to seeing what pattern you pick and what you add to the Pyramid, Twirl!

Standard
Uncategorized

Pattern Pyramid Go!

I am pleased to report that I was the lucky, lucky winner of the latest Pyramid Pattern giveaway over at Amy‘s blog! I had heard of this magical pattern collection traversing the globe, but I never thought I would be part of it. It arrived today, in all its glory, and now I’m looking for the next recipient!

But first, in case you aren’t familiar with the history of the Pattern Pyramid: It was started by Karen back in 2012, before winging its way to Sew Brunswick in Australia. From there it went to Seersucker Sally in Philly before heading across to Tiffany in Seattle. She sent it to Kat in New Zealand, who decided it was time for a new continent altogether and sent it to the wee lass Debi in Scotland! From Scotland it was back to the USA and into the hands of Heather (of Bombshell Swimsuit fame, no less) and from there onto Lucinda in Boston. Traversing the US again, the Pyramid went to Amy, newly settled in Seattle, and now it’s here with me in good old Berkeley. Phew! Those are some air miles!

So let’s take a look at what wonderful patterns make up the Pyramid, shall we?

Damn, that’s a lot of patterns! We have the stunning Vogue 7588 (36″ bust), the funky McCall’s 2539 (33.5″ bust), a classy Simplicity 4141 (34″ bust) separates set, and then another in Simplicity 8154 (36″ bust)! The adorable Simplicity 7818 jumper dress (36″ bust) and the equally adorable Simplicity 7863 suit set (34″). I wish I was a few sizes smaller! We have the elegant Butterick 2304 (34″ bust) making an appearance, together with the Mad Men-esque Simplicity 9171 (40″ bust). If you wanted to get started on autumn clothes already, there’s McCall’s 5479 (29.5 – 34″ bust) and then a trenchcoat/pant set made by Style 1821 (36″ bust). There’s the gorgeous Claire Schaeffer designed jacket V8804 (36 – 44″ bust) and the bombshell McCall’s 5996 (34″ bust). A more modern dress by McCall’s 6433 (29.5 – 34″ bust), and a lovely wrap dress in the form of Vogue 7693 (30 – 32.5″ bust). Finally, we have a cute blouse/dress combo Simplicity 6276 (32″ bust), a Burda 8279 pantsuit (36 – 48″ bust) and the flowy Style 2697 (32.5″ bust). 
I’m also added the slightly Hawthorn-esque Vogue Career 7214 (40 – 44″ bust), the McCall’s 8103 (44 – 48″ bust) dress/jacket combo and the cute little Butterick 6619 (32.5″ bust). I felt that there weren’t many larger sizes in the Pyramid as it stood, so I added a couple to balance it out. 
So! Now for the fun bit! I get to give these patterns away to a lucky blogger so they can continue their journey. There a few small rules to keep in mind, namely:
  • To enter you must have an active blog so that you can host your own giveaway and continue the Pattern Pyramid on its journey.
  • If you are the winner, you will pick one pattern to keep for yourself, then host your own giveaway, randomly select a winner, and mail the remaining patterns to them.  They will in turn continue the process.
  • If you are the winner, Karen would love it if you could make a small contribution to The Brooke. This is a charity close to the heart of Catherine, who so generously provided the original patterns.

I will send this Pattern Pyramid anywhere in the world! To enter, simply leave a comment on this blog post, and I will randomly select a winner on 5th August, 11:00 PDT. It’s that easy!

And if you’re wondering which pattern I took for myself, let me show you!

McCall’s M5525! I’ve been wanting to make a jacket for ages, so this was perfect.
Good luck everyone!

Standard
Uncategorized

Red Bow Hawthorn

Well, I did it! I finished the Colette Hawthorn, and only a little after the Sewalong ended! There were quite a few factors that drew out the making of this blouse – a combination of multiple muslins, nightmare fabric and I made have made a dress for shiggles in between muslins. Oops. But it’s done now, and I have to say – I love it! I’ve never worn or made anything with a peplum before, because I was afraid it would make my ample hips look even larger. Silly me. I could have been wearing amazing peplums all this time!
I made two muslins of the bodice – the first in a size 14, which was too big in the neck and armholes. I then made another in a size 12, expecting to have to do an FBA, but it actually fit just fine in the bust area! It was, however, a little snug in the waist, so I graded it out to a 14 at the waist when I cut my final fabric. Speaking of, this fabric is the devil. Woven in the forges of Satan himself. I bought it from Ebay a little while ago, and it’s some kind of polyester. Very slippery, but it has nice drape going for it, at least. I tried my best to keep it under control while I was cutting the pattern pieces out – I used my cutting mat, rotary cutter and a number of heavy items from my kitchen, but the pieces still ended up wonky. Mostly in a too-big kind of way. I hand-basted my darts before sewing them with my machine, which helped keep them straight and where they should be. Another irritating thing about this fabric – my Chaco liner pen chalk just fell right off it. Ugh.
I fiddled with the sleeves a bit, but they didn’t quite come out how I wanted. I wanted them to be fluttery, full sleeves. I was quite naive in thinking adding 3 inches to the width would achieve this. However, the sleeves are comfortable and loose and don’t cling to my arms, so I’m pleased about that. I didn’t add cuffs, instead I did a hand-rolled hem on the edges and left it at that. Incidentally, that’s how I hemmed the bottom of the peplum, too. It took 3 hours!
In the end, I managed to get all the pieces to fit together, except for the peplum and the bodice. There was about an inch too much bodice for the peplum, so I incoporated it into a tiny box pleat in the centre of the bodice back, which you can just see in this photo. It doesn’t look too bad, I don’t think – I wish it wasn’t there, but I couldn’t think of a better way to fix it. Oh, and did I mention this fabric frays if you so much as glance at it? No? Well, it did. So French seams, everywhere. Everywhere except the armholes, which I’m regretting. I’m going to bias bind them, because the fraying is just out of control. 
Here you can see the cute little floral buttons I bought from Stonemountain & Daughter, and the inside of the blouse. I suffered the same problem a few others did with the collar being a bit too short to reach the edge of the blouse with the 5/8″ seam allowance, and while I was reading about that, I saw Purls & Pleats tutorial on finishing the facings with a Hong Kong finish, and decided to do that with some white bias binding from my stash. I think it came out looking well fancy! Oh, and I didn’t bother recutting and sewing the collar, I just let it be a little too short and I don’t think it’s noticeable at all. When I make it again, though, I will use a 1/4″ seam allowance for the collar sides to fix the issue, though.
Me and my lovely photographer! I think he does a good job, don’t you? 😉

Standard