Uncategorized

Archer Appreciation: Muslin

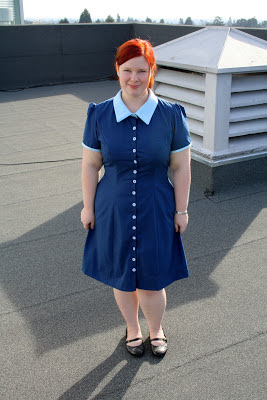
So, December was Archer Appreciation Month in the sewing world (Archer being the wonderful shirt pattern by Grainline Studio), and while I did buy the shirt pattern in the month of December, it seems like I appreciated it a bit longer than everyone else! Oops.

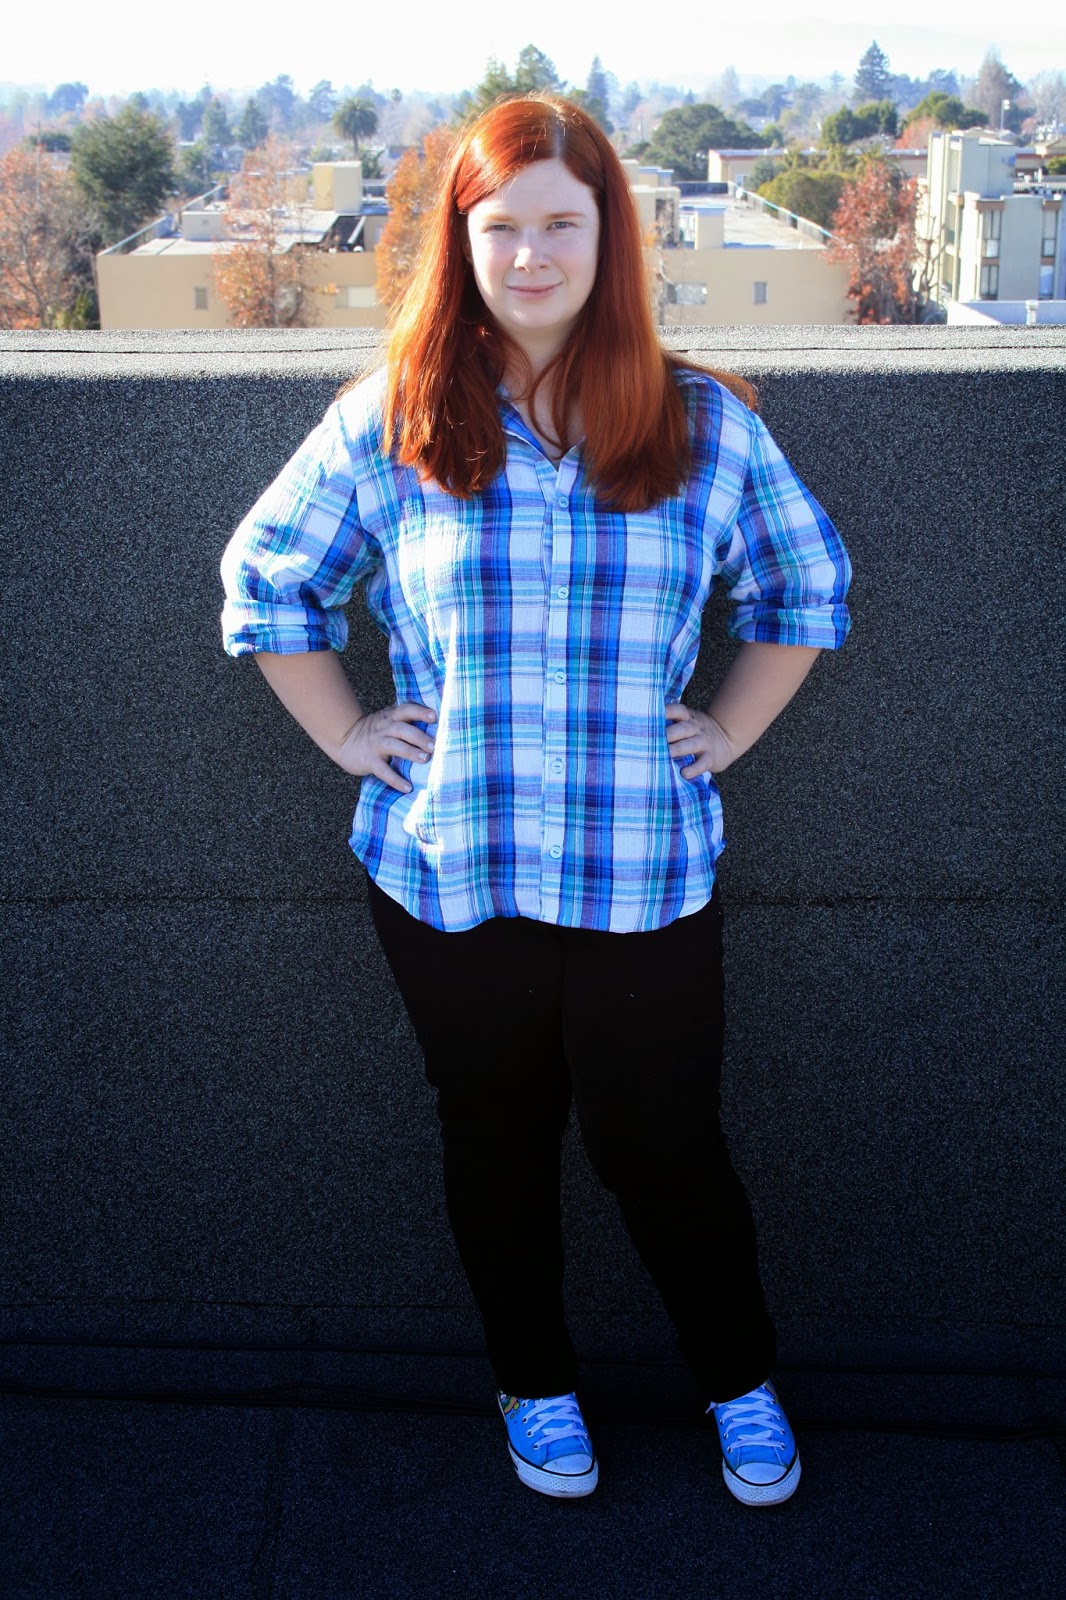
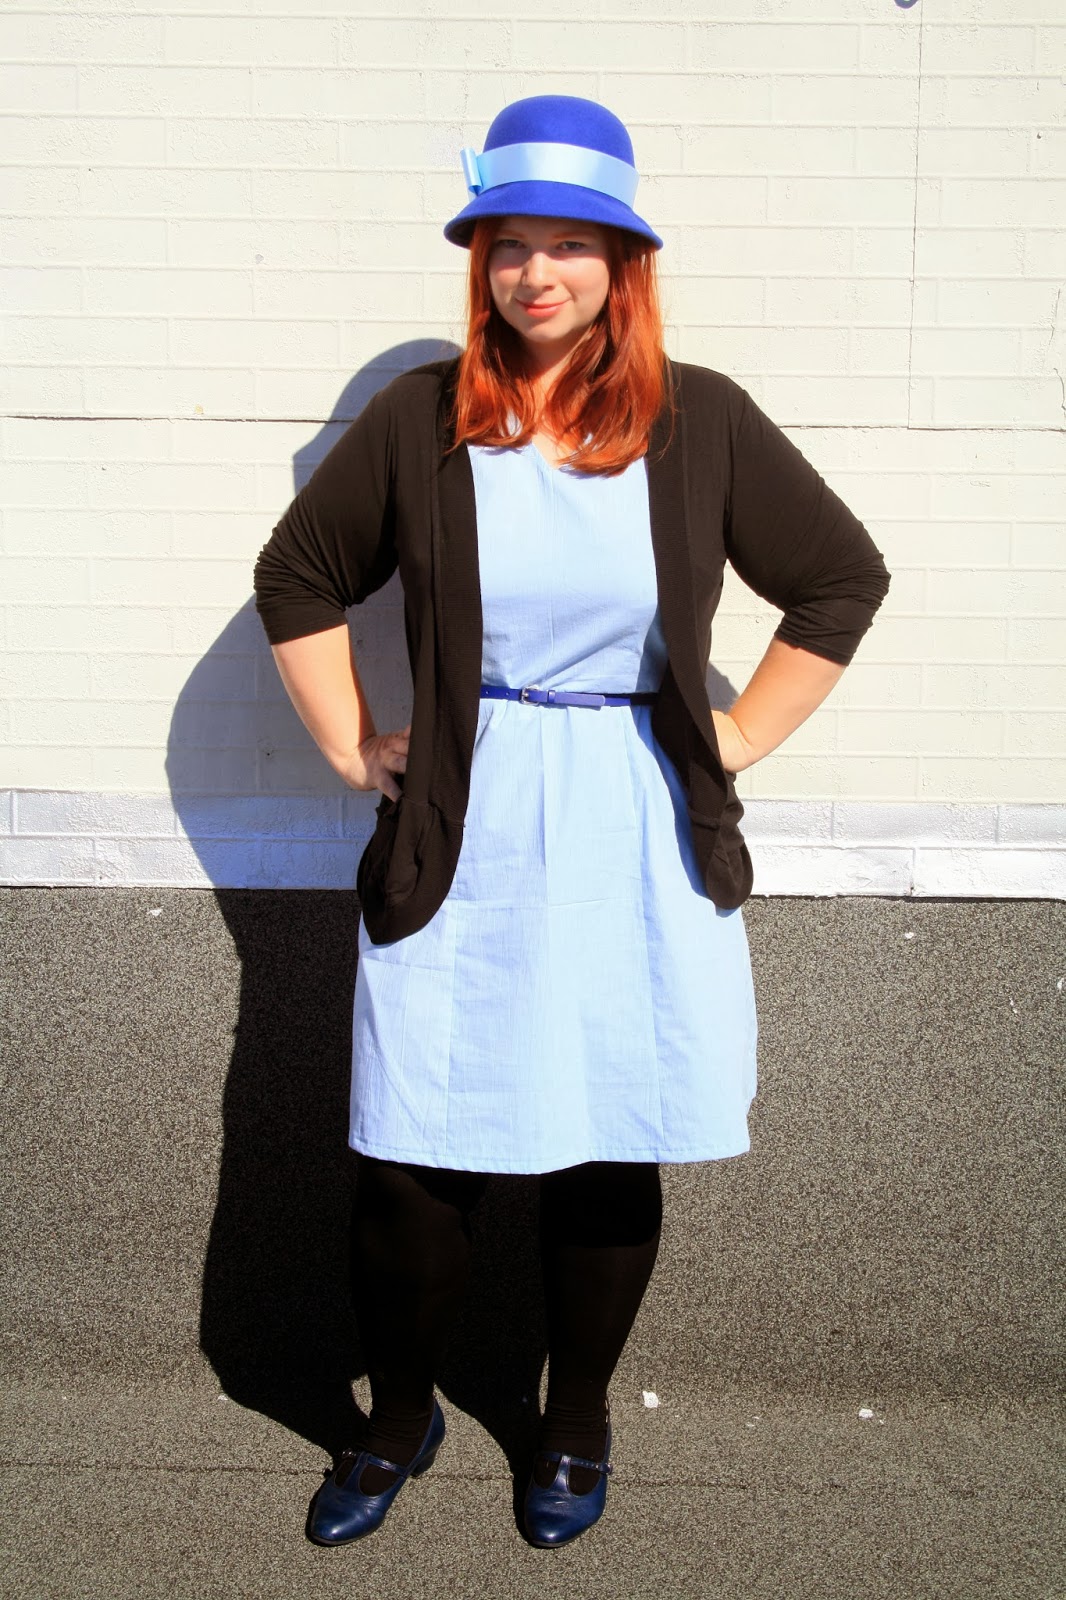
This is my Archer muslin, view A. I cut out a straight 16, and made no changes to the pattern (other than to leave off the pocket, because I’ve never used a pocket on a shirt, ever). I didn’t make any changes because even though I thought it might be too long/too big, I needed to see what I was working with first. I have to say, I am pleasantly surprised at the fit!

The Archer is supposed to be a “boyfriend” shirt, so not too fitted and kind of slouchy. I’m happy with the length of the shirt, I think it hits right about where I want it to. Apart from that, I think I could probably afford to go down one size all over and still have it be comfortable – it’s just a smidge too loose for my liking. I also want to do a narrow shoulder adjustment of about 1″, since I don’t like the look of stuff hanging down past my shoulders. There is, however, one rather large problem I am cleverly concealing in this photo…

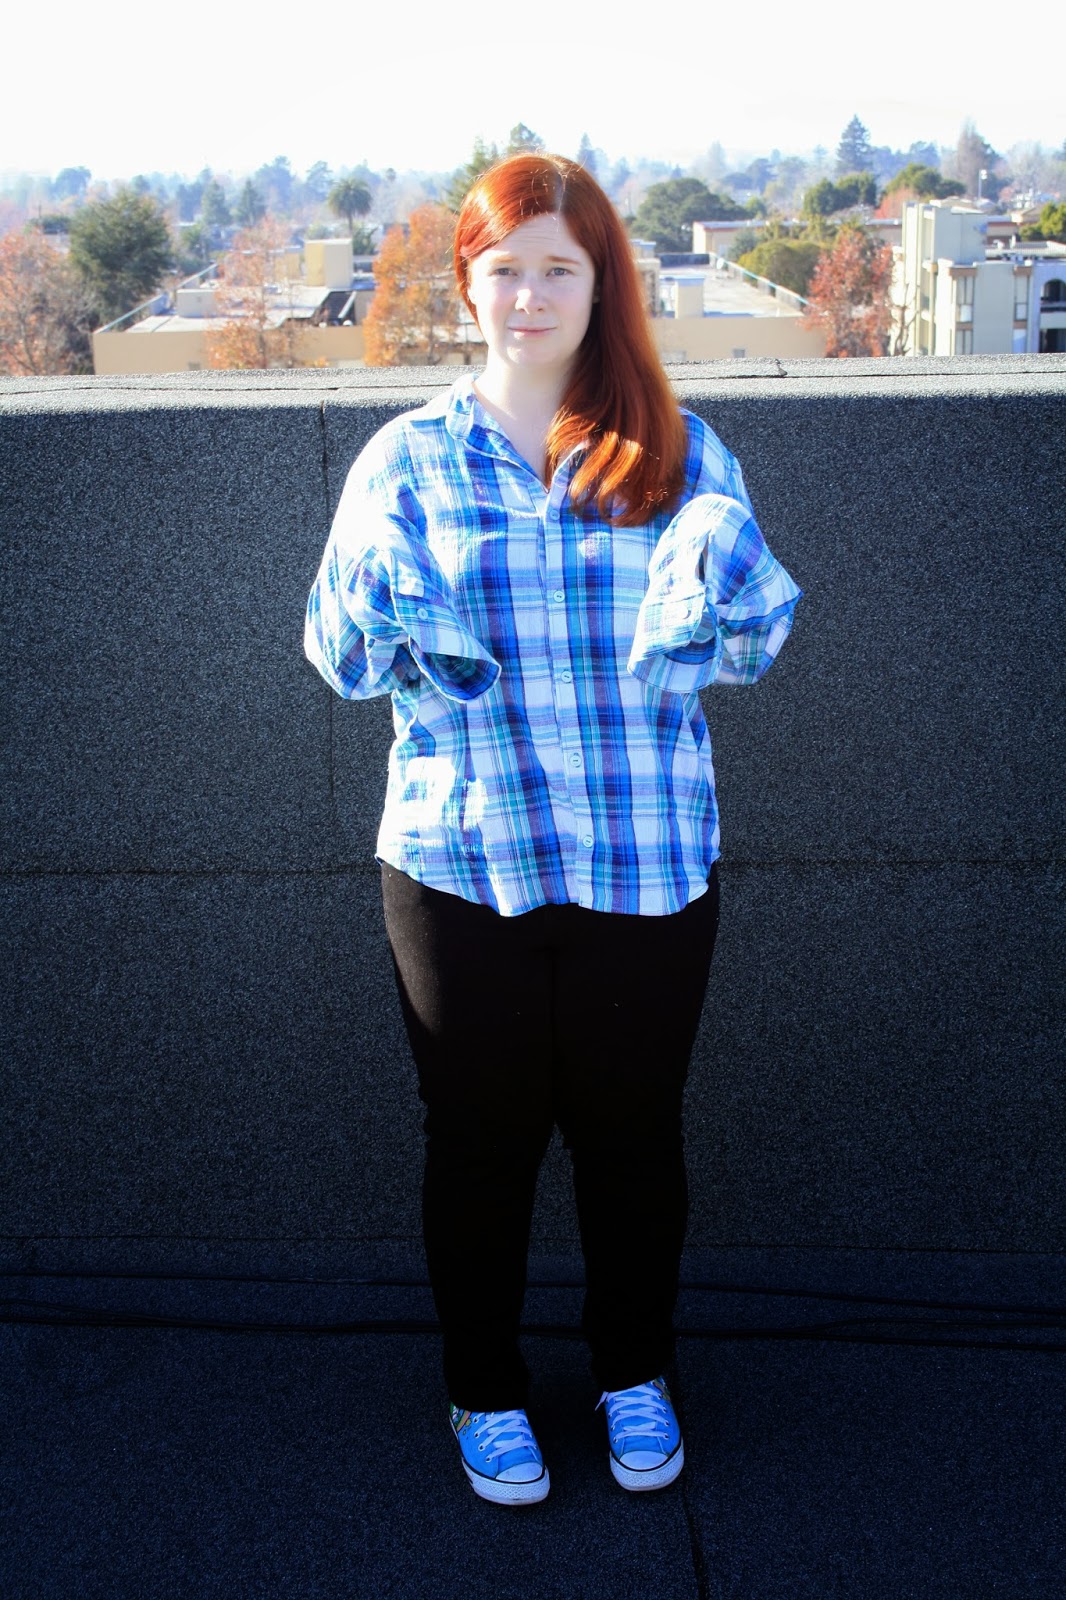
The sleeves are a good few inches too long for me. They are, in fact, ridiculous. I expected them to be a little long, because I am shorter than average, but this shirt makes me feel like a hobbit. I will definitely be shortening them considerably in my final make.

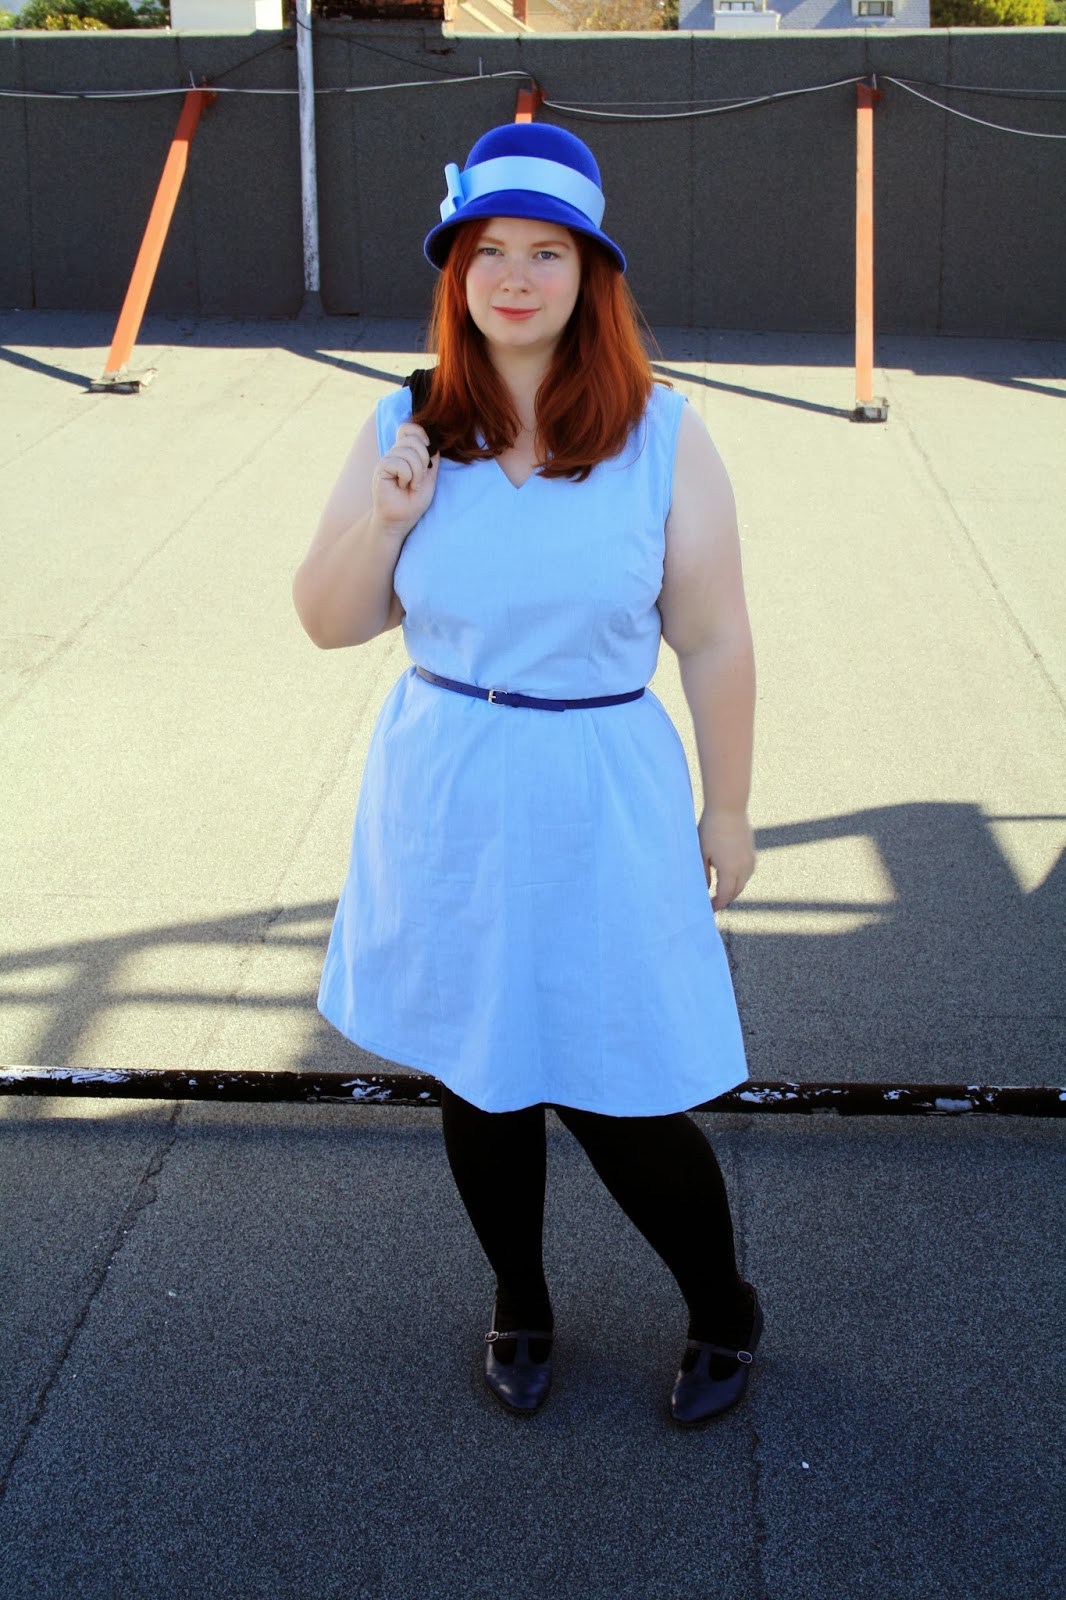
Sewing the shirt up was not without its trials and tribulations – this fabric (a cotton gauze I picked up super cheap from somewhere ages ago) had no discernible right and wrong side, and this led to numerous issues with the construction. Having said that, it pressed like a dream and was very easy to sew and manipulate.

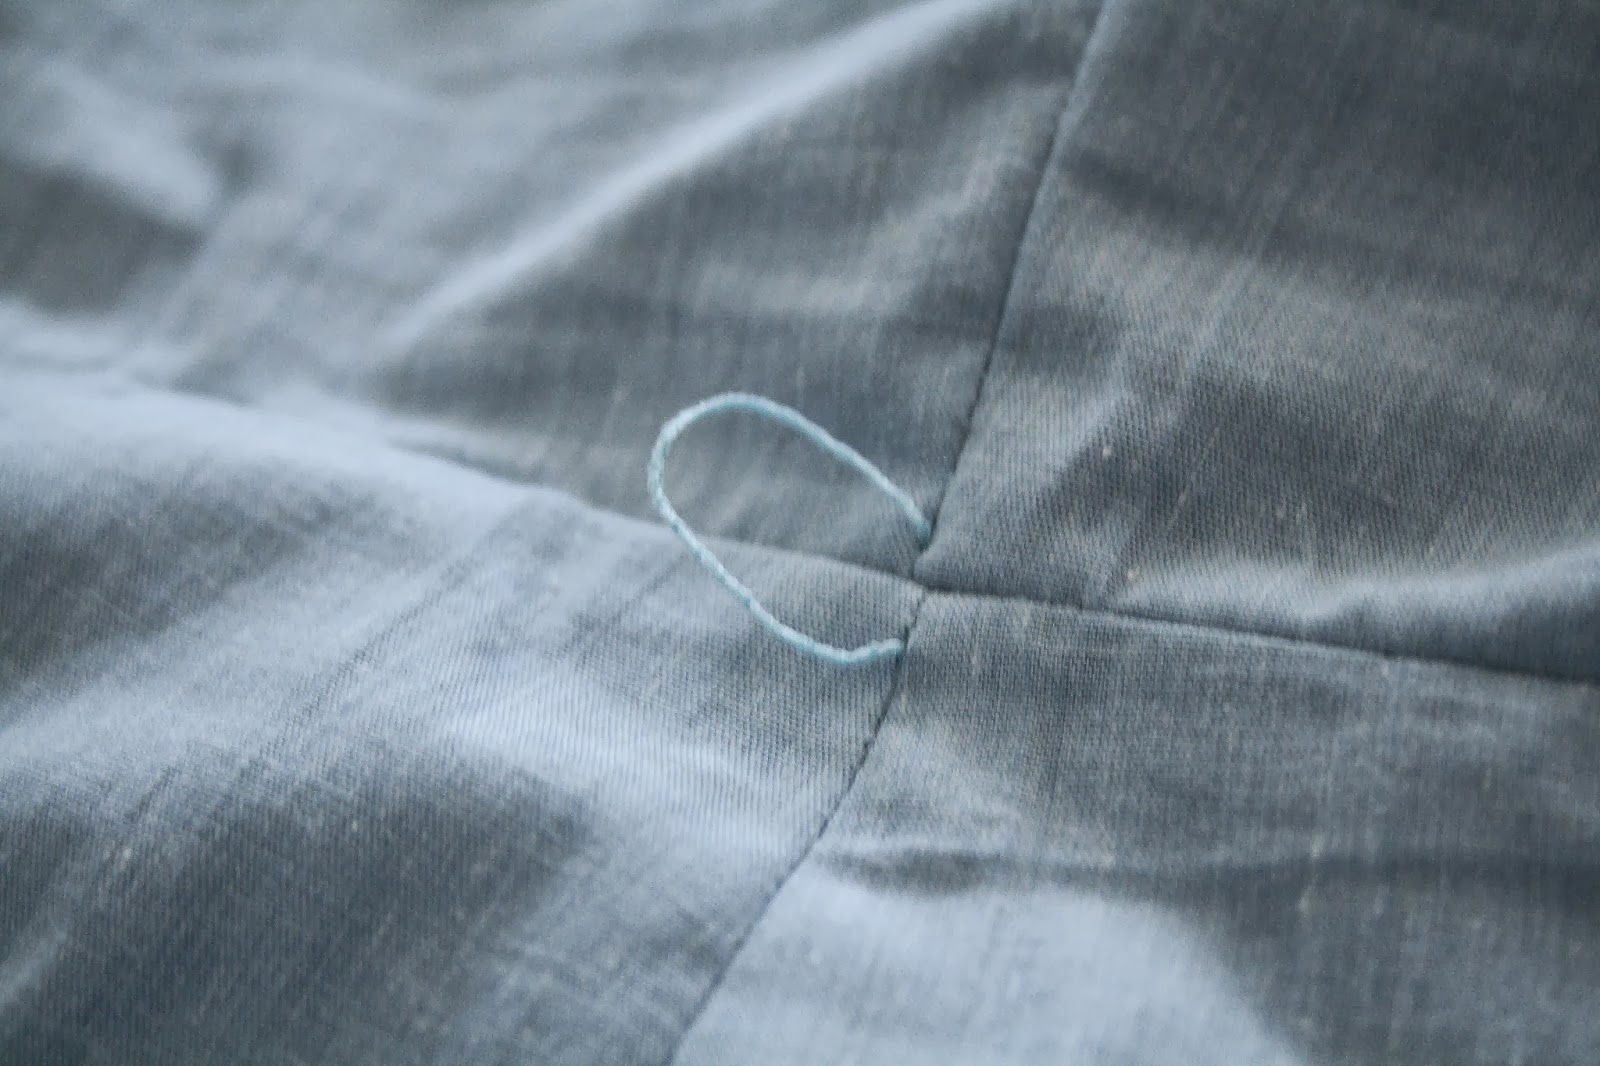
I sewed the sleeve plackets on the wrong side of the sleeves, so they sit on top of my hands, rather than behind. Given I’ll only be wearing this shirt with them rolled up, it’s not a huge issue, but one I will be very careful not to repeat in the final version. I also managed to do what I always do and stuff up which side the buttons go on for a woman’s shirt. I don’t know how I always do it, but I do. It doesn’t really matter, except it feels very wrong when I go to button it up. Given how large the shirt is, though, I can just pop it over my head so again, not a big problem in the grand scheme of things.

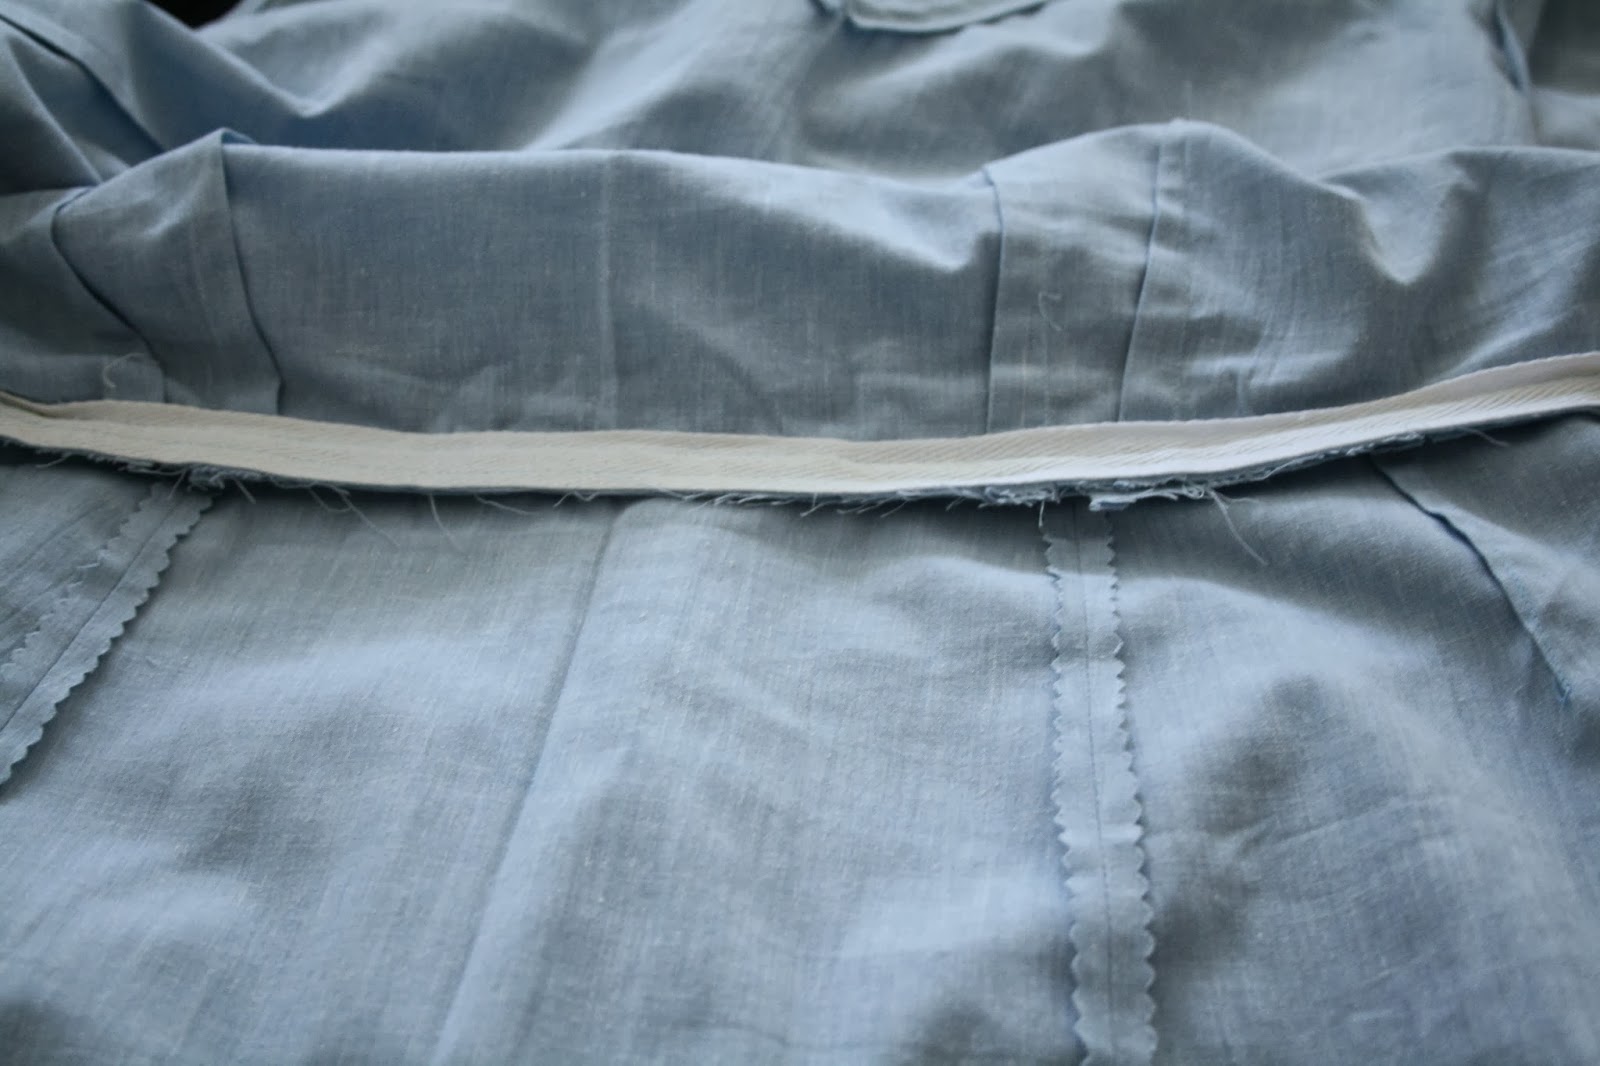
I went with the bias-cut yoke on the back, and messed up which way the pleat goes – I couldn’t be bothered going back to my laptop again to check, so I just did it the way that made sense to me. Oh well. I know for next time, now!

On the advice from other fellow sewers, I used the collar tutorial from Four Square Walls and it went in like a dream. I can’t really say whether it’s better than Jen’s method, though, because I’ve only used this one. I’m super proud of it, though!

So in conclusion, I love the Archer. Love love love! I can’t wait to make another, proper version – I have a blue and black plaid flannel ready, washed and waiting!

Standard
Uncategorized

Top 5 Inspirations & Goals for 2013

I’m going to combine these two into one post, because I’m lazy and want to get back to actual sewing!

Let’s start with the inspirations first!

1. Pinterest! Whenever I want to be inspired, I just load it up and have a browse. Of course, this leads to me pinning many, many things that never get done, but it’s nice to just scroll through and see what other people have made or check out new styles. I’ll admit, though, I use it a lot more for baking than I do for sewing!

2. Kollabora! I loved Kollabora when I first discovered it, and for a while, it seemed like everything I saw on there was amazing. As with anything, though, as it got popular, the quality of the posts seemed to get a bit lower, and combined with their crappy TOS, I’m starting to go off them a bit. But there are still lots of lovely things on there, and it’s still miles better than Craftster.

3. Reddit! I’m an avid Redditor and one of the main subreddits I hang out at is r/sewing. I love helping people who have questions, seeing the amazing things people make and just discussing sewing stuff with likeminded people.

4. Going shopping! Both online and in the real world, looking at RTW clothes is always inspiring for me. Being able to examine items of clothing in stores helps me envision how they were constructed, and I can keep somewhat abreast of fashion trends, even if I’m not really interested in following them. Modcloth is perhaps my best source of inspiration – the clothes they sell almost always match my style, and I must have about 50 of their dresses pinned to my Inspiration board on Pinterest by now.

5. My fellow bloggers, of course! I follow about 150 sewing blogs (I’m not even kidding) and settling down with a coffee to check my RSS feeds in the morning is one of my favourite parts of the day. I wanted to pick 5 bloggers I find the most inspiring, but picking 5 from 150 was extremely difficult, so I actually ended up with more!

  • paunnet – her style is so cute and adorable, and through her I first found out about Deer&Doe patterns, when they were still only in French!
  • peneloping – another adorable seamstress with amazing style, her ability to make “copycat” versions of RTW clothing is nothing short of incredible to me. 
  • tilly and the buttons – her patterns are lovely, and I’m so inspired by the way she’s making her hobby into her career! I can’t wait for her book, and I love reading her tips and tricks on sewing. I’ve learned a lot from her!
  • lladybird – Lauren is hilarious, and she is probably the most prolific seamstress I follow! She made, I believe, 86 garments this year, which is amazing – and they all look fantastic. 
  • making it well – she has wonderful style and really knows what suits her – and I love how down-to-earth and honest she is about her sewing adventures. 
  • dolly clackett – she makes the best dresses, end of story. She inspired me to try the By Hand London patterns, and I love reading her blog posts and seeing her cute little face in all her lovely makes. That’s not creepy, right?
  • three dresses project – I had the honor of meeting Leila in person recently at the SF sewcialist meetup, and she was so kind and lovely! I wish I had half her energy and determination – she knows what she likes to wear and just goes for it! Plus she hosts the weekly Fabric Chat forum on Twitter!

Now, let’s move into the goals for 2014. I hadn’t really given them much thought prior to this entry, to be honest, but let’s give it a go:

1. Make pants! I’ve had the Thurlow pants pattern for forever, and I really need to stop being scared of them and just make them already. How bad can it be?

2. Find a good undies pattern and proceed to make all my underwear. I did have a go at this in 2013, but the pattern I chose was just too low-rise for me, and they’re not comfy.

3. Make more clothes for Luke! He says he would like to have a wardrobe made by me, and I’m excited by that prospect. Especially now that Thread Theory have released such nice patterns for men, I look forward to making him stylish clothes that fit.

4. Blog more often. It’s a difficult balance, for me – I don’t want to make stuff just for the sake of blogging about it, but I also know I could blog more often than I did this year. Hopefully I can get into a more regular schedule with my blogging and also tidy it up a bit – I’d like to learn more about prettying up my blog and making it a bit more pleasant to look at.

5. Draft my own patterns! This is something I’ve only really considered doing this year, and it’s something I’d really love to do. I have lots of ideas, and I’m hoping to learn more about using software to draft patterns and grading and all that stuff so I can put my designs out there. I’m inspired by Rachel from House of Pinheiro who just released her first pattern this year!

I’ve loved reading everyone else’s Top 5 lists, and I’ve come across so many new and wonderful blogs to follow because of it! Happy New Year to everyone who reads my blog, and I hope 2014 is an amazing year for all of us!

Standard
Uncategorized

Top 5 Reflections of 2013

Top 5 of 2013 - An Annual Blog Series

1. Buying clothes is ok sometimes. This year I took the Seamless Pledge, which involved not buying any new clothes and instead making everything I needed or buying secondhand. I mostly stuck to it, and I greatly reduced the number of clothes I bought this year! But, I discovered that sometimes, you don’t have the time to make everything you need. And sometimes, even if I *could* make what I want, I simply don’t have access to all the adorable fabrics that retailers seem to. For instance, I bought a knit circle skirt from H&M with cats on it – yes, I could have made it myself (and I already plan on copying it to do so) but I know I couldn’t have found that fabric, or even anything similar. Trust me, I google “cat fabric” about once a week.

2. I buy WAY too much fabric. I’m leaving the US in less than 3 months, and my stash is frighteningly large. I also buy fabric without much of a plan, or if I do have a vague project in mind, I’ve forgotten what it was by the time I actually get around to using it.

3. Cheap knit fabric isn’t worth my time. It stretches out of shape way too easily, is thin, and just generally looks like crap. Much better to spend a few extra $ and end up with a much higher quality that will last a long time.

4.  I like challenging myself. This year I drafted several patterns from scratch, sewed a zip fly, made a swimsuit, and managed to successfully perform a sleeve adjustment. I love learning new things and new techniques, and I still feel like I learn something new every time I sew something.

5. I thought I was a slow sewer, but actually, I’m just a master procrastinator. If I have a deadline, I can go from pattern drafting to finished garment in a weekend. If I don’t have a deadline, I can be sitting on a gathered skirt for almost a month. It’s something I need to work on in most areas of my life, really, but I feel it most keenly when I see how many finished objects my fellow sewing bloggers have churned out this year!

Standard
Uncategorized

Top 5 Misses of 2013

Top 5 of 2013 - An Annual Blog Series

Now that I celebrated my successes of 2013, it’s time to move on to the not-so-perfect makes. I know, we’re moving fast here, but the end of the year is almost upon us, so I have to hurry this shit along. So, without further ado, here they are!

This dress never got worn after this photo shoot. The waist was too low to begin with, and only got worse as the rayon fabric sagged over time. Plus it’s too long (I like my dresses to sit above my knees, not below them) and the whole dress was slightly too big. Bleh.

Too big. Not suitable for everyday wear, or any-day wear if I’m being honest. Wrinkled if I so much as looked at it. While I was proud of the amount of effort I put into it, it’s just not something I have any occasion to wear.
 In contrast to the others posted here, this blouse is just too small. I’ve tried to convince myself it isn’t, but it is. It is uncomfortable tight across my stomach, and the hook and eye just will. not. lie. flat. As such, it hasn’t been worn outside of this photo shoot. It has potential, though, since I’m still losing weight, so I’m keeping it around!
Coming in at number 4 was a vintage Butterick shift dress that I tried to make out of a floral sheet. The sheet was too thick, the pattern was supremely unflattering, and I looked like a pair of your grandma’s curtains. I threw it in the bin in disgust and didn’t give it another thought (until now). No photos exist of it, and none ever will.
5. Colette Meringue
This project never made it onto my blog – in fact, it’s pre-blog. It was okay, but it was WAY too big around the waist, and slightly too long. I didn’t know anything about fitting, or pattern adjustments, and just thought oh well, too big, I’ll give it to Goodwill. I regret doing that, but haven’t been able to really motivate myself to make another Meringue, either. I just don’t think it’s the right skirt for me.
Basically, my biggest obstacles to wearable garments are fitting and suitability. While I’m losing weight, I have to accept that some stuff can’t be altered easily, and so it will be transient (and I can always remake it in a smaller size). And these days, I’m starting to work on things I’ll wear a lot – knit dresses, skirts, and when I get around to it, an Archer shirt. Not as exciting as pretty dresses, but they get a lot more use! Don’t worry, though, I still can’t resist a pretty dress, so I’m sure there will be more in future 🙂

Standard
Uncategorized

Top 5 Hits of 2013

Top 5 of 2013 - An Annual Blog Series
I’ve had this blog for almost a whole year already, can you believe it?! Crazy. Anyhow, the lovely Gillian over at Crafting A Rainbow annually invites everyone to join her in posting about their hits, misses, reflections, inspirations and goals over the past year. I feel like I haven’t made that much stuff over the past year, but I’m going to give it a go anyway! And why not start with the good stuff – here are my top 5 makes for 2013!

It may have been a Halloween costume, but this is the make I’m most proud of this year. I drafted it myself, and it’s just so damn cute. Plus it came in handy as pajamas during the (unseasonally) cold Berkeley winter!

I love this dress! I wear it quite a lot, over tights in the winter, bare legs in the summer. It’s so comfortable, and it was so easy to make, too.

This dress is super flattering, and is probably the garment I’ve gotten the most compliments on. I admit, I don’t wear it as often as I should – every time I wear it I feel very self-conscious about my shoddy buttonholes, but it’s still a hit for me because it’s so cute.

This blouse is comfy and loose, and so soft. Sometimes it’s nice to wear something not quite so fitted, and this blouse makes me feel pretty and free to eat a big lunch!

This dress was perfect for summer – cute and flirty and comfortable! Plus I love the colour. This one also got a lot of compliments, and it held up to a full day at the San Diego Zoo, so it’s a winner in my book for sure.

Stay tuned for the next post on the top 5 misses of 2013 – not every garment can be a winner, after all!

PS: Merry Christmas to everyone! Today I’ll eat the last chocolate in my Advent calendar and have a nice quiet dinner with my husband, and tomorrow we’ll go to the zoo! I hope wherever you are, your Christmas is safe, enjoyable and filled with happiness ❤

Standard
Uncategorized

Plaid Saturday

This project has been a long time in the making. It was actually meant to be an entry for the Sewcialist “Red October” challenge, but then life got busy and I got distracted making Kapibarasan, and it fell to the wayside. Luckily, though, I just scraped it in for Grunge November! Plaid is grunge, yes? Yes.

This dress is the ever-popular Elisalex dress by the girls at By Hand London. I’d heard so many good things about it, particularly the bodice, so I finally decided to give it a try. After carefully consulting the advice given in their sewalong, I cut out a size 14, which matched my waist measurement, and did a 2″ FBA so it would fit my bust. I also did a 1/2″ narrow shoulder adjustment, which is becoming the norm for me these days. It worked beautifully, I must say – I’m delighted with the fit of the bodice! If everything had continued as smoothly for the rest of the dress, then I probably would have had this dress done ages ago. Unfortunately, though, the Elisalex dress is drafted for individuals with tiny, slender arms, which I do not possess. Thus, I ended up having to do some pretty severe sleeve adjustments, which was an extremely frustrating and head-scratching experience.

This is how my poor sleeve pattern piece looked by the time I was done. None of the original traced pattern remains (which was done in Swedish tracing paper) – I had to switch to freezer paper halfway through! I quickly discovered there were not many helpful articles online about sleeve adjustments, and despite owning three very good sewing textbooks, none of them yielded anything terribly useful. In the end, the best resource I found was this article by Threads, which I ended up using. I honestly forget how many inches I needed to adjust the sleeve head by – I have a slightly unusual problem in that my biceps are very large, but my armpit area is not, and so I had to try and find a balance between not having huge folds of fabric hanging around my armpit, and not having a skintight upper sleeve. And then, of course, I had to adjust the sleeve length, because I’m 5’1″ and don’t have Amazonian arms – I think I took about 4″ off the length? Plus I had to significantly narrow the wrist width, since it got widened a lot more than necessary with all the other adjustments. In the end, I was mostly satisfied with the fit, but I think the wrists and forearms could still be more fitted.

I already knew from the outset I wasn’t going to use the tulip skirt from the original pattern – I mean absolutely no disrespect to the girls of By Hand London, or anyone who has made the dress with that skirt, but I find it’s rarely flattering, and certainly not on me. Initially I added the gathered skirt from the Cambie dress in the same plaid fabric as the bodice, but when I tried it on, it looked terrible. It added way too much bulk around my waist, and it was way too much plaid. So I scrapped that, and tried the other skirt from the Cambie, in a black cotton sateen from my stash. Much better! And pockets, too!

This was my first time working with plaid, and I found plaid-matching to be a horrible, horrible experience. I got this plaid fabric from the East Bay Depot for Creative Reuse, and so I don’t know what kind of fabric it is. All I can tell you is that it shifted dreadfully every time I tried to cut it, and even when I tried my hardest to match the plaid, it always seemed slightly off. In retrospect, it probably wasn’t heavy enough to work with the Elisalex, but lining it seemed to help a little. I lined the bodice in a black cotton voile from my stash, and I followed the wonderful instructions provided in the booklet for a neat finish.

I used an invisible zipper instead of an exposed one – By Hand London recommend a 16″ zipper, but my local fabric store only had 18″ so I simply shortened it by 2″, no worries. I tried so, so hard to match the plaid across the zipper, but in the end I didn’t succeed. It’s not too obvious, and by that time it was my sixth try at inserting the zipper (shifty fabric+late night+stupid mistakes) and I really didn’t care any more. During my many attempts at the zipper, I somehow managed to twist half of the dress around, resulting in some kind of moebius dress nightmare. Do you want to know the worst part? I managed to do that twice

Of course, I paired my dress with my delightful kitty shoes. Any excuse will do to wear these babies!

I thought I’d start doing a little bit of a break-down of my projects, as I’ve seen some other bloggers do – it seems like a good idea to keep track of cost, modifications and so on! As you can see, I was a good girl for this one and only used fabric from my stash! I really need to start whittling it down, because I’m only in the US for 3 more months, and I have quite the embarrassing tower of fabric waiting to be used…

Pattern: Elisalex Dress by By Hand London
Size: 14
Adjustments: 4″ FBA, 1/2″ narrow shoulder, shortened sleeves by 4″, adjusted sleeve head by many, many inches
Modifications: Substituted skirt for Cambie dress skirt, view A, size 14. Shortened skirt by 6″.
Supplies: Plaid fabric of unknown type (possibly rayon) – from stash
                Black cotton sateen fabric – from stash
                Black cotton voile for lining – from stash
                18″ black invisible zipper, shortened to 16″ – $2.50
                Black & red thread – from stash
                1 hook & eye pair – from stash

I think this is the perfect holiday dress! Unfortunately, the one holiday party I was invited to got cancelled, so I’ll have to find somewhere else to wear it. Anniversary dinner, perhaps?

Standard
Uncategorized

Winter is coming…

I love cold weather. Always have, and probably always will. This year, instead of living in oversized sweaters and trackpants, I’m planning a wonderful winter wardrobe full of colourful tights, cute dresses, adorable sweaters and maybe even a coat or two! And since I love looking at pretty things and feeling inspired, I thought I’d share some of the things that have got me feeling creative and stylish lately.

First up is this cute houndstooth dress from Sheinside. As soon as I get my hands on some houndstooth fabric, I’m going to use the wonderful Elisalex dress to make myself one just like it!

How adorable is this Bunny Trails scarf from Modcloth?! Although I can knit, I think sadly that this is beyond my skill level. Maybe I’ll just have to buy it as a Christmas gift to myself!

I love tights, and I’m rather taken with these heart-printed ones from Forever 21. I also long for tights with polka dots, and especially for the cat tattoo tights that have taken the internet by storm lately!

Last but not least, I’ve fallen in love with this coat from Modcloth. I know, I may have a slight Modcloth addiction, but who can blame me? However $160 for a coat is a bit out of my price range, sad to say. But I’ve already got my eye on a similar vintage pattern to try and “frankenpattern” my own, and I feel like this could be my big winter project!

What’s inspiring you this winter?

Standard
Uncategorized

Happy Halloween!

Let me start at the beginning. This delightful creature you see above is Kapibarasan, a Japanese character based on the ever-delightful capybara. I am a fan of capybaras, and I am an even bigger fan of Kapibarasan. He is my favourite Japanese character, and I own many Kapibarasan items – bags, cushions, pens, stamps, plushies…the list goes on.
Here is just a small selection of some of my Kapibarasan goods. Obviously this includes more than just Kapibarasan, but he represents a good portion of my Japan haul. Moving on, though, as I could wax lyrical about the wonder-beast that is Kapibarasan for hours – let’s talk Halloween costumes.
I’ve been in the USA for three Halloweens now, and since this was my last one, I decided I was going to make a costume instead of sitting at home, hoping no one rings my doorbell because I have no candy. I have been wanting to make a kigurumi for ages. For those that can’t be arsed clicking that link, a kigurumi is kind of like massive pajamas. Onesies appear to have exploded in popularity recently, but I am yet to find a decent pattern for one. I did, in my early sewing days, attempt to make a Totoro kigurumi. I am about to show you one of the most embarrassing photos of me that exists, but maybe it will serve to show how much sewing skills can be improved if you practice.
There are a lot of things wrong with this picture – the fact that my Dad shot it from below, thus making me look even larger than I was, the unintentional ombre as I grew my henna out, and last but not least, the extremely shoddy costume. It was my first encounter with stretch fleece and zippers in clothing, and it did not go well. But, I tried.
This time, I decided I was going to start from scratch. I got a roll of brown paper from the Dollar Tree, and a texta, and got to work. I do already own a onesie (it’s a fox onesie in case you were interested) but it’s quite form-fitting, which doesn’t work for kigurumis imho, and also zipped up. I was keen to avoid zips at all costs this time around. So I tried sketching around my existing onesie, but it really wasn’t working out, because it was stretchy and form-fitting, and my first muslin was horrendous – way too high in the crotch, the sleeves were ridiculous, and I forgot to leave room for the buttons to overlap. 
I started again, forgetting the previous onesie completely and just using math and straight lines (initially). I measured myself all over, and did some sketches, and then drew my pattern pieces using a French curve and a ruler. I went to Goodwill for another muslin sheet, and sewed it up.
The only change I made to this muslin was to lower the crotch a little more. Sewing the hood was quite challenging – I somehow stuffed up the measurements the first time for the muslin and made a super gigantic hood that was twice as large as it needed to be, but once I corrected it, I was very happy with it. The sleeves were easier than I thought – I simply measured the length of my arm and the width of my bicep, and the armhole, and went from there! I couldn’t wait to start cutting into my soft, soft fur.
Part-way through the cutting process – there was fur EVERYWHERE. I did look up a quick tutorial on cutting with napped fabrics, but it turns out it’s really simple – you just point everything in the wrong direction. Easy peasy!
For his face, I cut out the appropriate pieces from some black twill I had lying around in my stash. I hand-stitched them on, because I wanted greater control over the process. Sometimes it’s easy for things to go wonky on a machine, and I didn’t want to unpick them.
 I did make one error – I used some canvas fabric to stabilise the button bands, instead of brown flannel. I didn’t have enough flannel (I only got one yard, to line the hood) and didn’t want to buy more, so I figured the canvas would do, reasoning no one would see it. Turns out I was wrong about that, and that you could indeed see the edge of it poking out. Another quick trip to the Dollar Tree for a pack of coloured textas and I coloured that shit in. It worked surprisingly well for such a ghetto fix!
You guys, I am SO PROUD of how this turned out. It exceeded my wildest expectations! I made this from scratch! With math! 
It’s pretty big, right?
RIGHT?! Haha, it’s so huge and comfortable. Being in it is like having a constant, warm hug.
 
 I made the cuffs from a dark brown ribbing I ordered off fabric.com. It’s not proper ribbing, because I couldn’t find that stuff in the colour I wanted, but it worked well enough. Because the ends of the sleeves and legs were so large, I had to stretch the ribbing to its absolute limit to get it to go around without any folds. It sprung back remarkably well, I was impressed! 
I attached one of my own personal Kapibarasan toys to the hood with velcro – the sew-on kind for the hood part, and the stick-on kind for the toy. It held out all day, which surprised me as it specifically said not to use it on fabric. Oops. I also hot-glued fur to an old pair of sneakers, which worked amazingly well. I left a flap over the laces, and then this morning once I’d laced them up, I glued the flap shut. The fur stayed put all day, I was comfortable, and Kapibarasan had fuzzy feet! I Instagrammed the shoes, but didn’t take photos with my real camera, and am ashamed to admit I do not know how to post Instagram photo on my blog. Should probably Google that sometime.
This pretty much sums up how I feel about getting this done on time, and loving the end result!
I hope you all had a wonderful Halloween, costumed or not. I’m wondering if I can wrangle my friends into Halloween parties when I go back to Australia, so I can keep making more costumes!

Standard
Uncategorized

Wedding Kitties

Recently, I have been hard at work on a very special project. A dear friend of mine got married last week, and I wanted to give her a gift. I wanted it to be something small and light, as she’s only in the US for a brief time, and something she could keep forever. I pretty much knew straight away exactly what I wanted to make for her – wedding kitties!

Most of you probably don’t know this, but making felt plushies is actually how I got into sewing in the first place. I got a bookstore voucher for my birthday a couple of years ago, and browsing the shelves, I came across The Softies Kit, and I couldn’t resist the cuteness. I made the penguin on the front cover, and then a cake. And then a cake for my housemate’s girlfriend. And then I broke away from the kit and made a sheep, and a cow, and I was hooked. I’d done a lot of cross-stitch as a child (I was even in the cross-stitch club at school…oh, the shame!) so stitching wasn’t completely new to me, and I really liked (and still do) the relaxing nature of hand-stitching.

I used a combination of stitches to make the kitties – whipstitch, running stitch, backstitch and ladder stitch, plus some satin stitch for the noses. Their bodies are made from eco-felt, and groom-kitty’s clothes are also made from the same type of felt. For bride-kitty’s outfit, I wanted it to somewhat resemble the real bride’s wedding dress, which was quite difficult considering I hadn’t seen it, and only knew it was “knee-length, champagne-coloured and had long lace sleeves”. So, I worked with what I knew! I got 1/4 yard of champagne taffeta, 1/4 yard of a cream lace and 1/8 yard champagne sparkly tulle from Jo-Ann. As it turned out, I didn’t need anywhere NEAR that much, but it’s better to be safe than sorry. I wasn’t sure if she would wear a veil, and leaving bride-kitty’s head unadorned didn’t look right, so I went with a layered tulle bow over the left ear. The photos don’t quite do it justice, it really is quite sparkly and pretty.

Usually, I shy away from selfless sewing. When I first started sewing, and was full of amazement that I could make things, I wanted to make things for everyone! That year I endeavoured to make gifts for everyone instead of buying them, and it was that year I discovered that a lot of people just don’t like or appreciate handmade gifts. Since then, I’ve been quite selfish with my sewing, only making some clothes for my Mom and some tiny handmade gifts for a few close friends. But even though I haven’t known her long, I knew that my friend would appreciate these small kitty friends, and that made it worth puzzling through making tiny kitty wedding clothes late at night!

Working on this little kitty couple reminded me just how nice it is to step away from the sewing machine once in a while and create something with my hands, needle and thread. And, of course, how nice it is to do something special for someone else 🙂

Standard
Uncategorized

Fall For Cotton Fail

I had grand plans for the Fall For Cotton challenge, but like the best laid plans of mice and men, they just didn’t eventuate. September was a very, very busy month for me – we had a number of Australian visitors come and see us, we went on a beautiful camping trip to Crater Lake, I had my online course, and my social life became a whole lot more active lately. I’m not complaining, it was a super fun month, but it really didn’t leave a lot of time for sewing, especially not to a deadline.
To begin with, I chose Simplicity 5890 from 1968. I bought a blue and black plaid for the dress and white shirting for the shirt. I made a muslin for view 2, thinking the skirt would flatter my figure more, but there was some odd gathering around the waist that was very unflattering, so I ended up going with view 1. I did a narrow shoulder adjustment on my muslin, something I should have been doing for every garment, really! I used the tutorial provided by the lovely Ann Rowley of Great British Sewing Bee fame, and it worked beautifully. 
Then everything got set aside for a while, and my plans started getting less and less grandiose. I decided not to make the shirt underneath the dress/jumper, and just focus on the main garment. Then I decided not to use the plaid fabric, because I didn’t want to half-arse it and not match the plaid properly, so I decided to use a different, patterned fabric. Unfortunately, a burn test revealed that fabric was not 100% cotton (a requirement of the challenge), so I moved onto this pale blue cotton chambray. I actually doubt it’s chambray, honestly, but it is cotton! 
It looks like the bodice is slightly too big in some way in this photo – however, it’s comfortable enough and I really don’t intend to wear it without a cardigan, so I suppose it doesn’t matter. I made my own bias binding for the first time ever, for the neckline and armholes. There are approximately eleventy billion tutorials on how to do this, but I went with the method described at Sewtropolis – it involved the least amount of stuffing about with rulers and drawing lines, and it worked really well. 
I also made my own thread belt loops. using Colette’s tutorial, and they turned out really well! I already have about 3 RTW dresses with these loops, and I think they’re a subtle, classy addition to garments. I added a waist stay of cotton twill tape, as per the vintage instructions, and I pinked (almost) all my seams – I still need to do something about the waist seam under the stay, as you can see from the below photo.
I didn’t bother putting a zip in, as I can just wriggle into it as it is. Unfortunately, once I did wriggle into it and looked in the mirror, I was really disappointed. On its own, it was bland and boring, and I thought I would probably never wear it. At that point, I was ready to admit defeat, and let the Fall For Cotton deadline pass by without making a post about it.
But then I was getting ready to see some friends, and I saw it lying there on a chair, and I decided to try again. I paired it with black tights and a cardigan and a thin blue belt that came with a dress from H&M. I found some vintage shoes I bought from Ebay (from East Germany, no less!) in the cupboard and slipped those on, and with all the accessories, I actually thought it looked pretty cute! I got a compliment on it from one of my friends that night, and that sealed the deal. I’m so happy I could make it work, because nothing annoys me more than pouring time and effort into a sewing project only to end up with something I don’t want to wear.
For the photo shoot, I added a cute hat I bought from an Ebay seller many months ago and hadn’t worn, and I picked up a length of grosgrain ribbon from my local fabric store to make the hat ribbon and bow. Thanks to Chuleenan of Csews for the advice on hat-ribbon-sewing! Her hats are genius, you should totally check them out.
A 60s style photo for a 60s style dress seemed appropriate! 
My next project is to sew something red for the latest Sewcialist theme, “Red October”. I’ve already made my muslin and picked out my fabric, because I’m determined to get this one done on time! Are any of you participating in Red October? I’m excited to see what everyone makes!

Standard