Uncategorized

Wedding Kitties

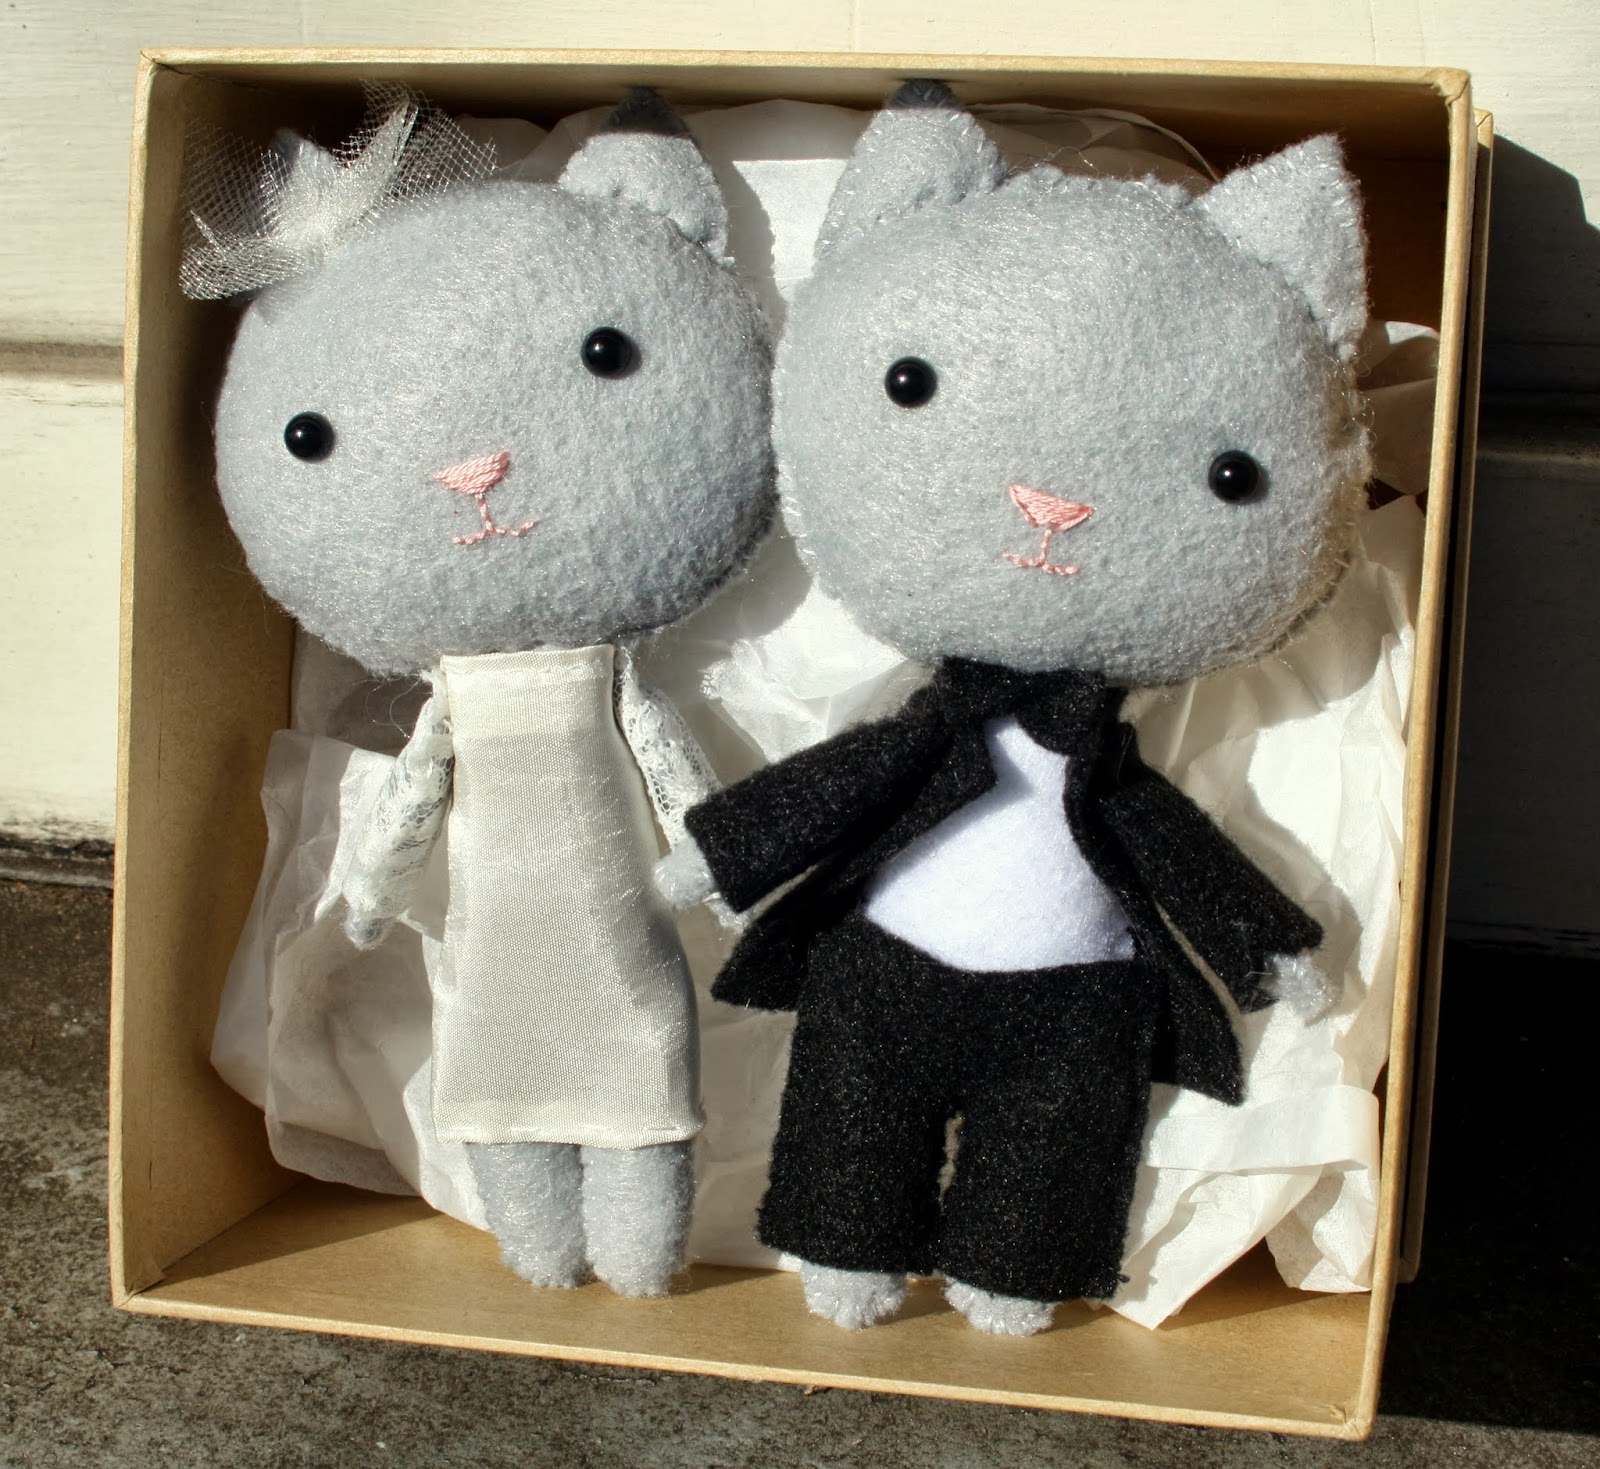
Recently, I have been hard at work on a very special project. A dear friend of mine got married last week, and I wanted to give her a gift. I wanted it to be something small and light, as she’s only in the US for a brief time, and something she could keep forever. I pretty much knew straight away exactly what I wanted to make for her – wedding kitties!

Most of you probably don’t know this, but making felt plushies is actually how I got into sewing in the first place. I got a bookstore voucher for my birthday a couple of years ago, and browsing the shelves, I came across The Softies Kit, and I couldn’t resist the cuteness. I made the penguin on the front cover, and then a cake. And then a cake for my housemate’s girlfriend. And then I broke away from the kit and made a sheep, and a cow, and I was hooked. I’d done a lot of cross-stitch as a child (I was even in the cross-stitch club at school…oh, the shame!) so stitching wasn’t completely new to me, and I really liked (and still do) the relaxing nature of hand-stitching.

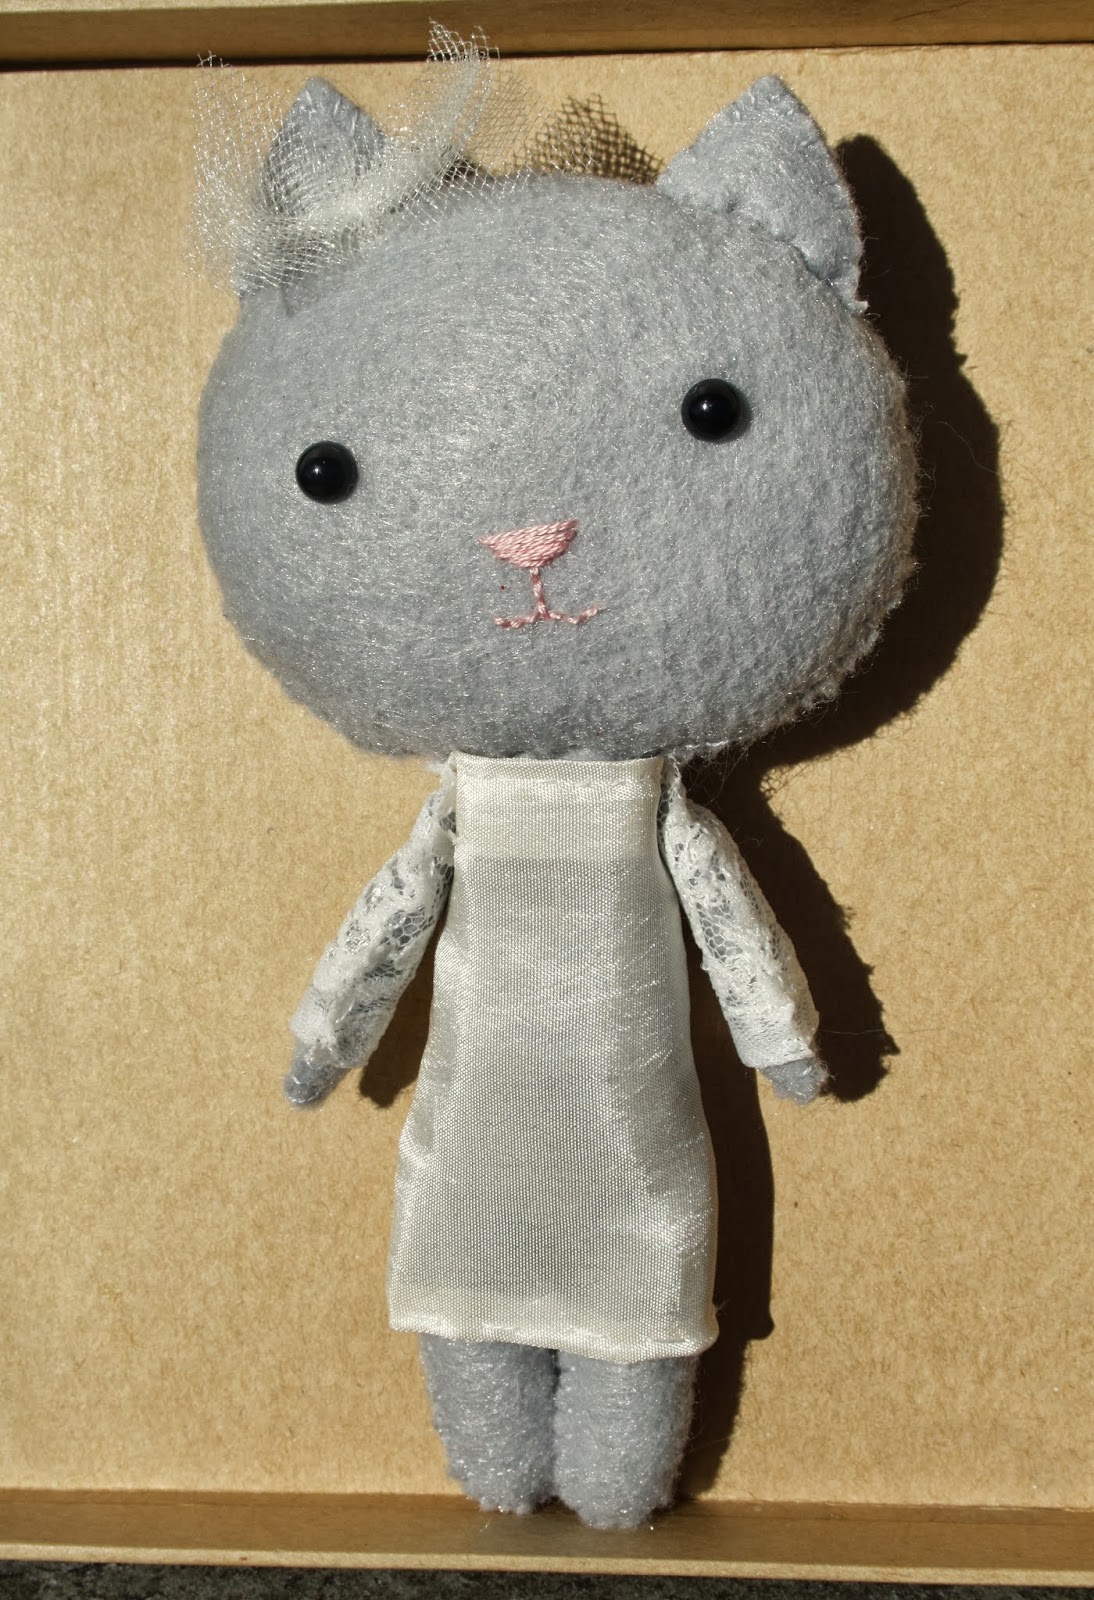
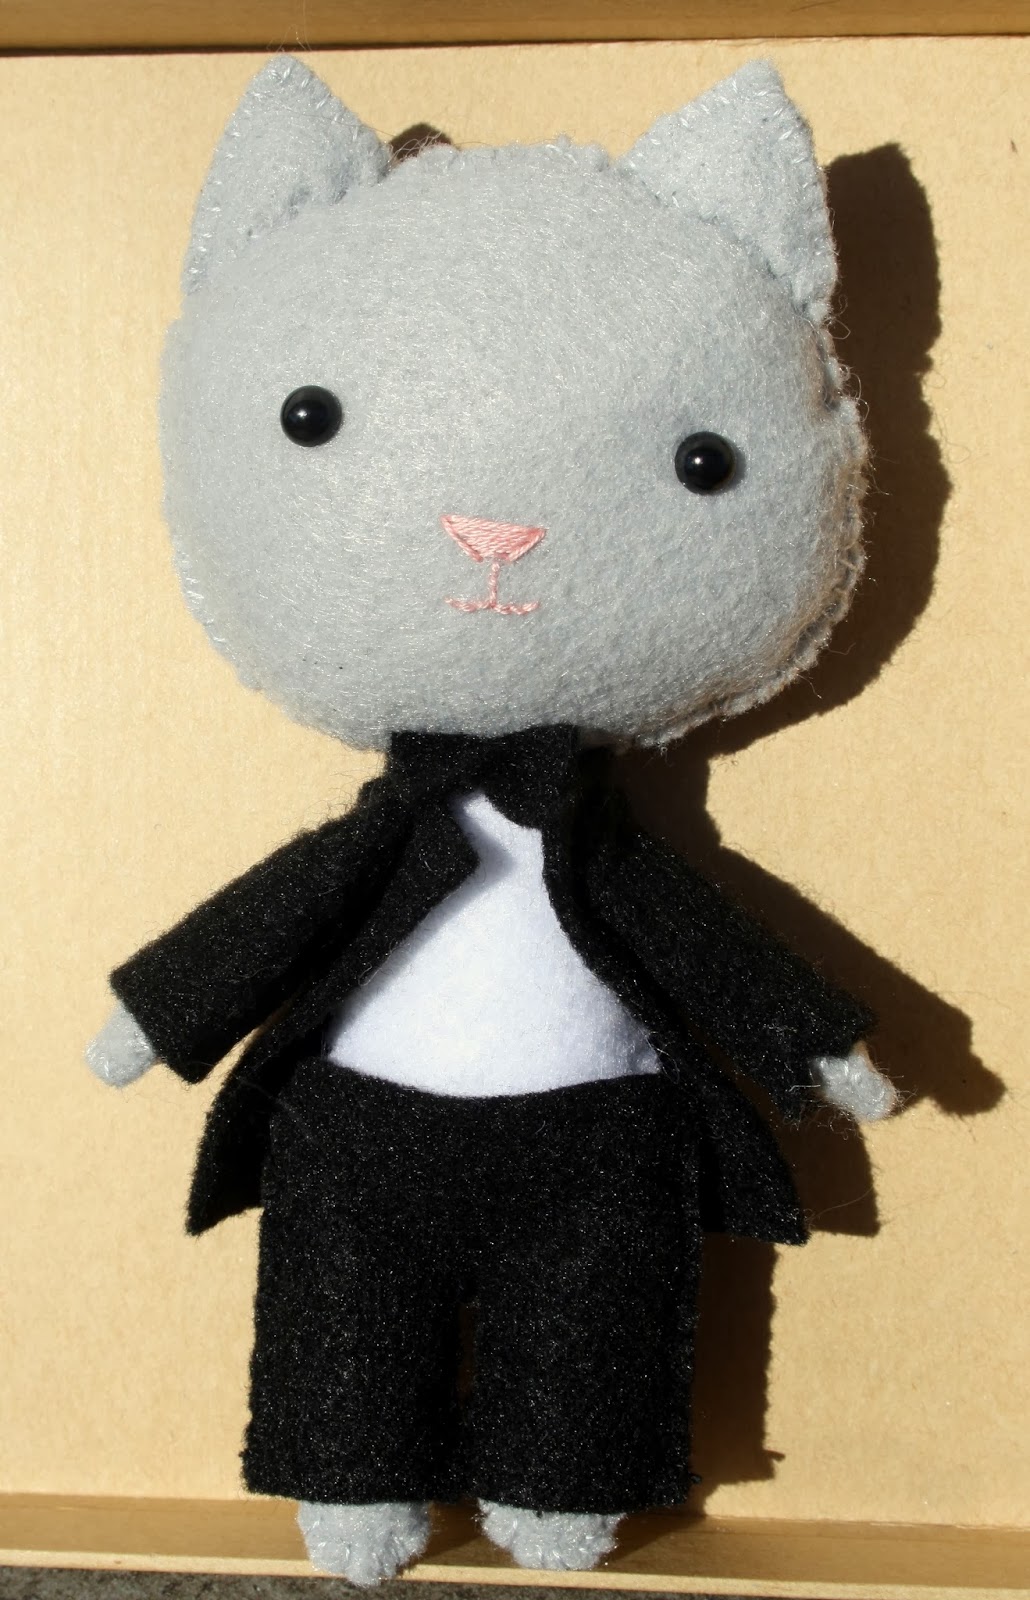
I used a combination of stitches to make the kitties – whipstitch, running stitch, backstitch and ladder stitch, plus some satin stitch for the noses. Their bodies are made from eco-felt, and groom-kitty’s clothes are also made from the same type of felt. For bride-kitty’s outfit, I wanted it to somewhat resemble the real bride’s wedding dress, which was quite difficult considering I hadn’t seen it, and only knew it was “knee-length, champagne-coloured and had long lace sleeves”. So, I worked with what I knew! I got 1/4 yard of champagne taffeta, 1/4 yard of a cream lace and 1/8 yard champagne sparkly tulle from Jo-Ann. As it turned out, I didn’t need anywhere NEAR that much, but it’s better to be safe than sorry. I wasn’t sure if she would wear a veil, and leaving bride-kitty’s head unadorned didn’t look right, so I went with a layered tulle bow over the left ear. The photos don’t quite do it justice, it really is quite sparkly and pretty.

Usually, I shy away from selfless sewing. When I first started sewing, and was full of amazement that I could make things, I wanted to make things for everyone! That year I endeavoured to make gifts for everyone instead of buying them, and it was that year I discovered that a lot of people just don’t like or appreciate handmade gifts. Since then, I’ve been quite selfish with my sewing, only making some clothes for my Mom and some tiny handmade gifts for a few close friends. But even though I haven’t known her long, I knew that my friend would appreciate these small kitty friends, and that made it worth puzzling through making tiny kitty wedding clothes late at night!

Working on this little kitty couple reminded me just how nice it is to step away from the sewing machine once in a while and create something with my hands, needle and thread. And, of course, how nice it is to do something special for someone else 🙂

Standard
Uncategorized

Fall For Cotton Fail

I had grand plans for the Fall For Cotton challenge, but like the best laid plans of mice and men, they just didn’t eventuate. September was a very, very busy month for me – we had a number of Australian visitors come and see us, we went on a beautiful camping trip to Crater Lake, I had my online course, and my social life became a whole lot more active lately. I’m not complaining, it was a super fun month, but it really didn’t leave a lot of time for sewing, especially not to a deadline.
To begin with, I chose Simplicity 5890 from 1968. I bought a blue and black plaid for the dress and white shirting for the shirt. I made a muslin for view 2, thinking the skirt would flatter my figure more, but there was some odd gathering around the waist that was very unflattering, so I ended up going with view 1. I did a narrow shoulder adjustment on my muslin, something I should have been doing for every garment, really! I used the tutorial provided by the lovely Ann Rowley of Great British Sewing Bee fame, and it worked beautifully. 
Then everything got set aside for a while, and my plans started getting less and less grandiose. I decided not to make the shirt underneath the dress/jumper, and just focus on the main garment. Then I decided not to use the plaid fabric, because I didn’t want to half-arse it and not match the plaid properly, so I decided to use a different, patterned fabric. Unfortunately, a burn test revealed that fabric was not 100% cotton (a requirement of the challenge), so I moved onto this pale blue cotton chambray. I actually doubt it’s chambray, honestly, but it is cotton! 
It looks like the bodice is slightly too big in some way in this photo – however, it’s comfortable enough and I really don’t intend to wear it without a cardigan, so I suppose it doesn’t matter. I made my own bias binding for the first time ever, for the neckline and armholes. There are approximately eleventy billion tutorials on how to do this, but I went with the method described at Sewtropolis – it involved the least amount of stuffing about with rulers and drawing lines, and it worked really well. 
I also made my own thread belt loops. using Colette’s tutorial, and they turned out really well! I already have about 3 RTW dresses with these loops, and I think they’re a subtle, classy addition to garments. I added a waist stay of cotton twill tape, as per the vintage instructions, and I pinked (almost) all my seams – I still need to do something about the waist seam under the stay, as you can see from the below photo.
I didn’t bother putting a zip in, as I can just wriggle into it as it is. Unfortunately, once I did wriggle into it and looked in the mirror, I was really disappointed. On its own, it was bland and boring, and I thought I would probably never wear it. At that point, I was ready to admit defeat, and let the Fall For Cotton deadline pass by without making a post about it.
But then I was getting ready to see some friends, and I saw it lying there on a chair, and I decided to try again. I paired it with black tights and a cardigan and a thin blue belt that came with a dress from H&M. I found some vintage shoes I bought from Ebay (from East Germany, no less!) in the cupboard and slipped those on, and with all the accessories, I actually thought it looked pretty cute! I got a compliment on it from one of my friends that night, and that sealed the deal. I’m so happy I could make it work, because nothing annoys me more than pouring time and effort into a sewing project only to end up with something I don’t want to wear.
For the photo shoot, I added a cute hat I bought from an Ebay seller many months ago and hadn’t worn, and I picked up a length of grosgrain ribbon from my local fabric store to make the hat ribbon and bow. Thanks to Chuleenan of Csews for the advice on hat-ribbon-sewing! Her hats are genius, you should totally check them out.
A 60s style photo for a 60s style dress seemed appropriate! 
My next project is to sew something red for the latest Sewcialist theme, “Red October”. I’ve already made my muslin and picked out my fabric, because I’m determined to get this one done on time! Are any of you participating in Red October? I’m excited to see what everyone makes!

Standard